Tutorial 10: Frequency filters
Authors: Francois Tadel, Elizabeth Bock, John C Mosher, Sylvain Baillet
Contents
Evaluation of the noise sources
We are now going to process our continuous recordings to remove the main sources of noise. Typically, we can expect contaminations coming from the environment (power lines, stimulation equipment) and from the subject (movements, blinks, heartbeats, breathing, muscle tension, metal in the mouth or the body). In this tutorial will focus first on the contaminations that occur continuously, at specific frequencies.
Before running any type of cleaning procedure on MEG/EEG recordings, we recommend to always start with a quick evaluation of the noise level. An easy way to do this is to estimate the power spectrum of all the sensors over the entire recordings.
- Clear the list of files in the Process1 tab.
Select all the three datasets we have linked to our protocol.
You can select the three "link to raw file" nodes, the three folders or the entire subject node.

- Click on [Run] to open the pipeline editor window.
Select the process "Frequency > Power spectrum density (Welch)"
This process evaluates the power of the MEG/EEG signals at different frequencies, using the Welch's method (see Wikipedia or MathWorks). It splits the signals in overlapping windows of a given length, calculates the Fourier Transform (FFT) of each of those short segments, and average the power of the FFT coefficients for all the overlapping windows.
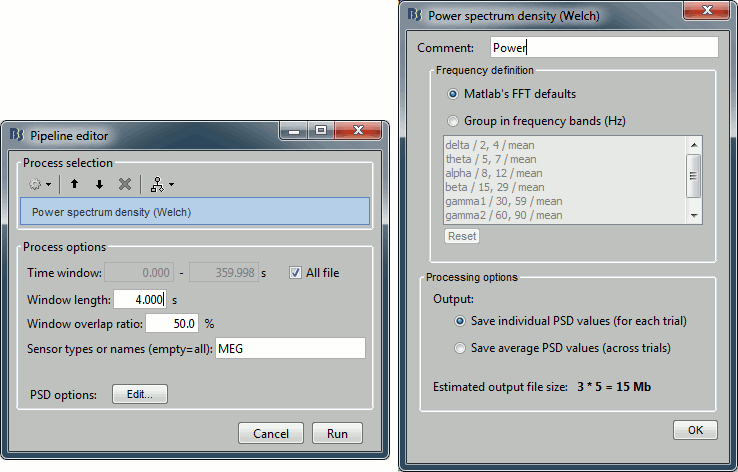
- Set the options as follows (click on [Edit] for the additional options):
Time window: [All file]
Portion of the input file you want to use the for estimating the spectrum.Window length: 4 seconds
Estimator length = length of the overlapping time windows for which we calculate the FFT. The number of time samples in the estimator is the same as the number of frequency bins in the output file. Increasing this parameter increases the output frequency resolution (distance between two frequency bins) but degrades the stability of the estimator, because we decrease the total number of averaged time windows.Overlap: 50%
How much overlap do we want between two consecutive two time windows.Sensor types or names: MEG
In some processes, you can specify the names or types of sensors on which you want to apply the process. This way you can for instance apply different filters on the EEG and the MEG, if you have both in the same files.Frequency definition: Matlab's FFT default
You have the option to use directly the frequency binning returned by the FFT, or do an additional step of averaging those bins in larger frequency bands. Note that you can edit those frequency bands.Output: Save individual PSD value.
This option will estimate separately the PSD for each of the three files in input, and create three files in output. If you select the other option (save average), it calculates the same three files but averages them on the fly and saves only one file in the database.
- Click on [Run] to start the execution of the process.
Troubleshooting: If you get "Out of memory" errors, try to run this PSD estimation on a shorter time segment. For example, set the time window to [0,100s] instead of the full file. This process starts by loading all the needed recordings in memory, you might not have enough memory available on your system to fit the entire dataset.
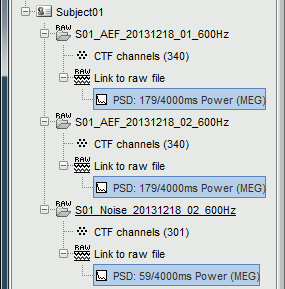
It produces three new files, that appear as "depending" on the three datasets we have linked.
Interpretation of the PSD
Detect and remove artifacts
Spectral evaluation
- One of the typical pre-processing steps consist in getting rid of the contamination due to the power lines (50 Hz or 60Hz). Let's start with the spectral evaluation of this file.
- Double-click on the new PSD files to display them.
Observations for Run01:
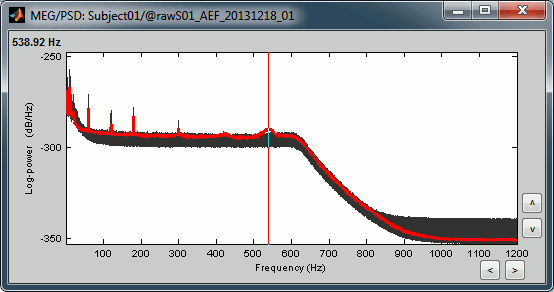
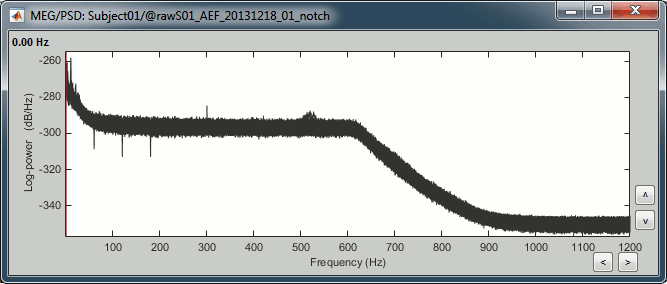
Peaks related with the power lines: 60Hz, 120Hz, 180Hz (240Hz and 300Hz could be observed as well depending on the window length used for the PSD)
The drop after 600Hz corresponds to the low-pass filter applied at the acquisition time.
One channel indicates a higher noise than the others in high frequencies: MLO52 (in red).
Observations for Run02:
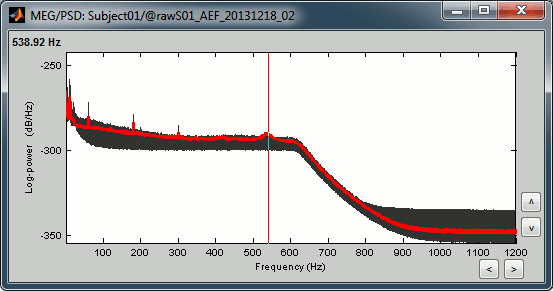
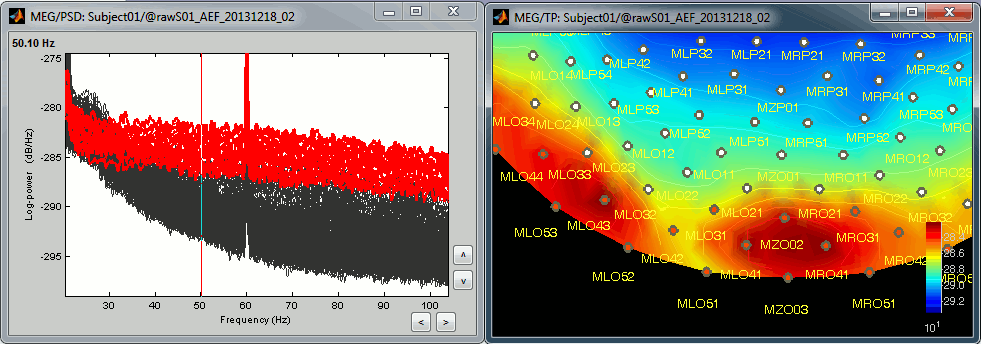
Same peaks related with the power lines: 60Hz, 120Hz, 180Hz
Same drop after 600Hz.
Same noisy channel: MLO52.
Additionally, we observe higher level of noise in frequencies in the range of 30Hz to 100Hz on many occipital sensors. This is probably due to some tension in the neck due to an uncomfortable position. We will see later whether those channels need to be tagged as bad.
Power line contamination
Put ALL the "Link to raw file" into the Process1 box (or directly the Subject01 folder)
Run the process: Pre-process > Notch filter
Select the frequencies: 60, 120, 180 Hz
Sensor types or names: MEG
- The higher harmonics are too high to bother us in this analysis, plus they are not clearly visible in all the recordings.
- In output, this process creates new .ds folders in the same folder as the original files, and links the new files to the database.
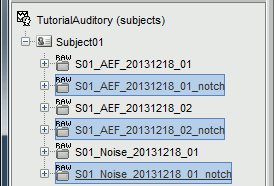
Run again the PSD process "Frequency > Power spectrum density (Welch)" on those new files, with the same parameters, to evaluate the quality of the correction.
- Double-click on the new PSD files to open them.
- Zoom in with the mouse wheel to observe what is happening around 60Hz (before / after).
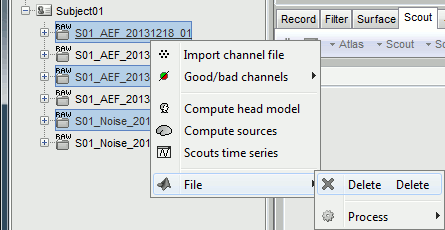
To avoid the confusion later, delete the links to the original files: Select the folders containing the original unfiltered files and press the Delete key (or right-click > File > Delete).
From Continuous
It is common to have portions of recordings contaminated by events coming from the subject (eye blinks, movements, heartbeats, teeth clenching, implanted stimulators...) or from the environment (stimulation equipment, elevators, cars, trains, building vibrations...). Some occur at specific frequencies and can be removed using frequency filters, as introduced in the first chapter of this tutorial. Some other artifacts have more complex frequency patterns but are well defined, reproducible and can be removed efficiently using Signal Space Projections (SSP). This tutorial shows how to apply this technique to correct for the cardiac and ocular artifacts.
We are going to use the protocol TutorialRaw created in the previous tutorial ?Review continuous recordings and edit markers. If you have not followed this tutorial yet, please do it now.
Power line contamination
Notch filters are adapted to remove some well identified contaminations from oscillating systems, such as the power lines 50Hz or 60Hz. Here is an example of how to evaluate and correct fixed frequency artifacts. Important notes:
Usually you would prefer to apply the frequency filters before the SSP correction.
This approach is limited to CTF and Elekta-Neuromag recordings for now, other file formats will be developed on demand. An alternative approach for other file formats is described in the EEG/Epilepsy tutorial.
Identify the unwanted frequencies
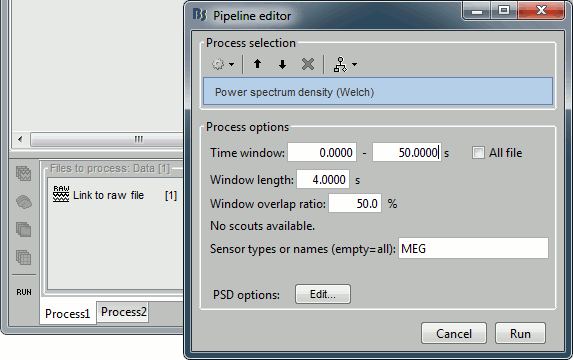
Drag and drop the "Link to raw file" in the Process1 tab, click on the button [Run] to open the Pipeline editor window and select the process "Frequency > Power spectrum density (Welch)". This will estimate the power spectrum of the signal using the Welch method. Set the time window to process to [0,50]s, and the window length to 4 sec, with an overlap of 50%, this will be more than enough to get a good estimate of the spectrum (average of the Fourier transform of 24 windows of 4800 samples each). Leave the other options to the default values.
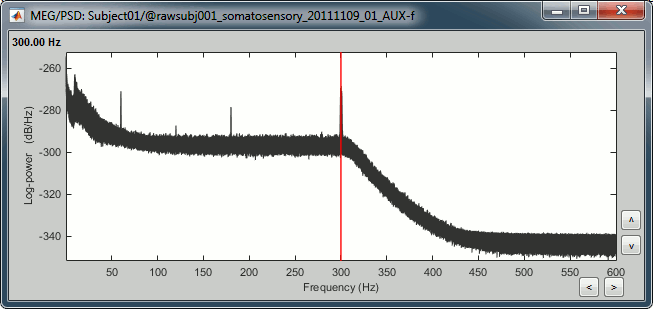
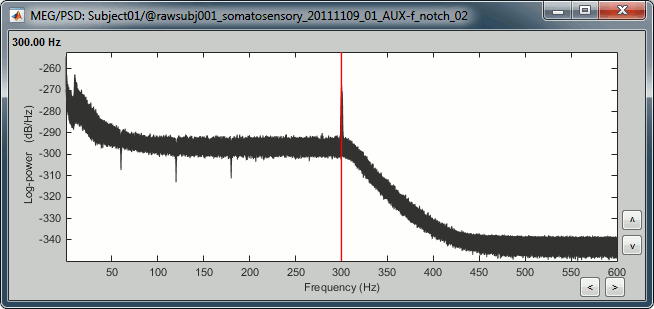
Double click on the "Power (MEG)" file that was created under the "Link to raw file" in the database explorer. This shows the estimate of the power spectrum for the first 50 seconds of the continuous file, for all the sensors, with a logarithmic scale. You can identify four peaks at the following frequencies: 60Hz, 120Hz, 180Hz and 300Hz. The first three are related with the power lines (acquisition in Canada, where the electricity is delivered at 60Hz, plus the harmonics), and are expected to be coming from pure sinusoidal components in the signal. The last one is an artifact of the low-pass filter at 300Hz that was applied on the recordings at the acquisition time. We are going to ignore this one, as it is probably more complex and spanning over several frequency bins.
Remove: 60Hz and harmonics
Leave the file "Link to raw file" in the Process1 list and now run "Pre-process > Notch filter".
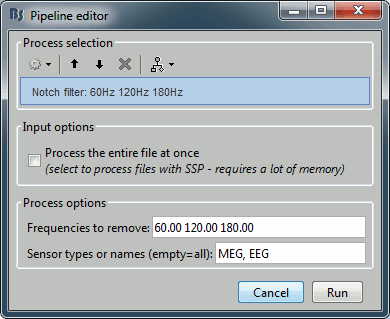
Enter the frequencies to remove (60Hz, 120Hz and 180Hz) and leave the other options to the default values.
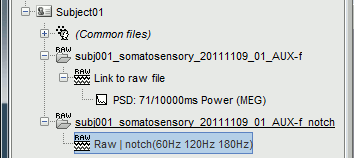
The operation creates a new "Link to raw file" entry in the database, pointing to a new CTF dataset in the same folder as the original continuous file. To check where this file was created: right-click on the file "Raw | notch(60Hz 120Hz 180Hz)" > File > Show in file explorer. This file has the exact same properties as the original file, including the SSP projectors, only the values of the MEG sensors were updated.
Alternatives
If the notch filter is not giving satisfying result, you can use two other processes:
Sinusoid removal: This process can do a better job at removing precise frequencies by identifying the sinusoidal components and then subtracting them from the signals in time domain (not a frequency filter).
Band-stop filter: This process can be useful for removing larger segments of the spectrum, in case the power line peaks are spread over numerous frequency bins or for suppressing other types of artifacts.
Evaluate the results
Now run the same frequency analysis: process "Frequency > Power spectrum density (Welch)", time window = [0,50]s, window length = 4000ms, overlap = 50%. Double click on the new "Power (MEG)" file. As expected, the three first peaks due to the power lines are gone.
You can run a few other pre-processing operations directly on the continuous files, including a band-pass filter. Frequency filters and sinusoid removals are operations that you should apply at very early stages of the analysis, before epoching the recordings. Those operations do not perform well next to the beginning and the end of the signals, they may generate important artifacts. It is therefore much more accurate to filter the entire recordings from the original continuous file at once, rather than filtering small epochs after importing them in the database.
From now on, we are only going to work on this clean file "Raw | notch(60Hz 120Hz 180Hz)".
