Tutorial 4: Importing MEG recordings
We are now going to import the recordings you downloaded in the previous tutorial (sample_ctf): the averaged reponses to electric stimulation of the thumbs on both hands, 400 trials for each hand. Epochs Stimulus occurs at time 0.
Note that the recordings used in this example have already been pre-processed, epoched and averaged, so that you could go faster to the source analysis. The full process from the raw continuous recordings to the averaging is documented in the three tutorials in the section ?Process continuous recordings. But please keep on reading the tutorials in the way they are listed on the tutorials page. Be patient, you'll get there.
Import recordings
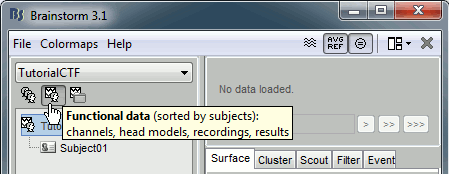
1. Select the TutorialCTF protocol, and go to the Functional data (sorted by subject) view
2. Right-click on Subject01, select Import MEG/EEG...
File format: "MEG/EEG: CTF .ds (*.meg4;*.res4)"
File: sample_ctf/data/somMDYO-18av.ds (select the full directory and click on Open)
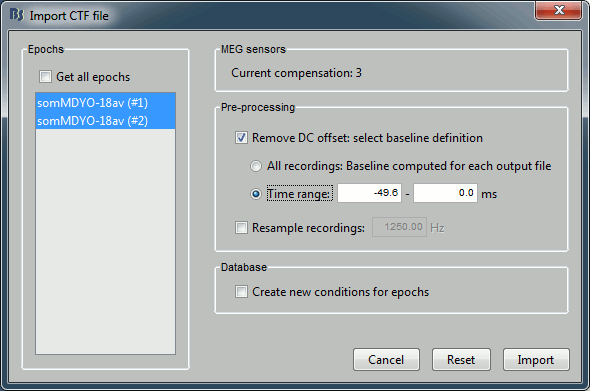
- Two blocks of data are available in this file. The names are not really meaningful, so you have to know what was saved in the file. In this specific case, the first "epoch" is the average, the second is the standard deviation for the same trials. Keep both "epochs" selected.
Check the "Remove DC offset" option, together with "Time range", between -49.6 and 0. For each sensor, this will compute the average value across the time (only for the pre-trigger period, ie. where times < 0), and substract this mean to all the time values.
This option removes the baseline value of each sensor, ie. the continuous (DC) offset that is added permanently on top of the recordings of interest. In MEG, the sensors record variations around a somewhat arbitrary level, therefore this operation is always needed, unless it was already applied during one of the pre-processing steps.
Note that a high-pass filter with a very low frequency (for instance 0.3Hz) can replace efficiently this DC correction. If a high-pass filter has already been applied to the recordings, you may want to unselect this option.Click on Import. The files are read, and a 3D window that shows the position of the head in the CTF helmet pops-up. This window is the same as the one obtained with the popup menu "MRI registration > Check", that is described later in this tutorial.
3. A condition was created, called after the filename. It contains three items:
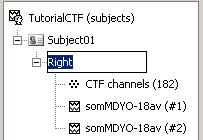
The first is the channel file: description of the positions, names, types, and various properties of the sensors that recorded the data. The value (182) means that there are 182 channels of data recorded in all the files. They are not necessarily MEG channels, it may also includes EEG, EOG, stimulation lines, references, etc.
- The last two represent the recordings associated with the stimulation of the Right thumb (average and standard deviation).
- Having the channels defined in the same file as the recordings is specific to MEG. Those systems always store all the available information at the same time. When dealing with EEG, you have to import separately the positions of the electrodes.
Rename the condition into Right (F2, or successive left clicks, or right-click>Rename)
Channel file
Let's explore what you can do with the first file. Right-click on the CTF channels file and try all the menus.
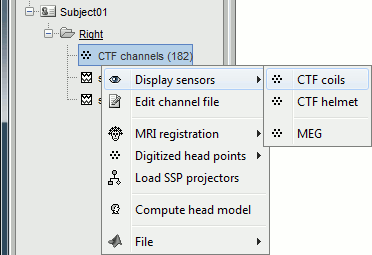
Menu: Display
The menus in the Display menu display the same thing, but in a different way. You can add the scalp (or cortex) surface easily with the toolbar in the Surfaces tab, in the main window (Add a surface "+" button).
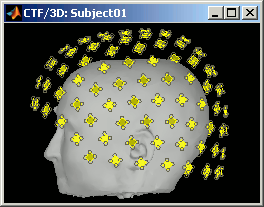
CTF coils: Display the coils of this CTF MEG system: they are all axial gradiometers, only the coils close to the head are represented. The coils are represented the way there are processed in the forward model computation. The small squares do not represent exactly the reality, as CTF coils are circular, but the way they are modeled.
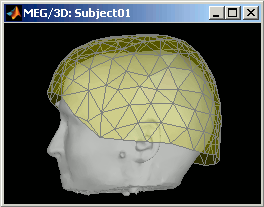
CTF Helmet: Show a surface that represents the inner surface of the MEG helmet (ie. the plastic surface that the subject's head is almost supposed to touch). This view is useful for verifying that the registration is correct: if the registration is really wrong, there is a high chance that you would observe the scalp and helmet surfaces intersecting.
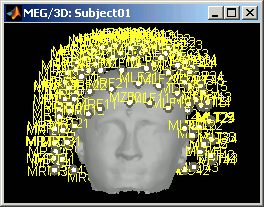
MEG: MEG sensors are represented as small white dots (centers of the coils close to the head), and can be selected by clicking on them.
Menu: Edit channel file
Display a table with all the information about the individual channels. You can use this window to view and edit the channels properties.

The channel file describes each channel separately, with the following information:
Indice : Indice of the channel, which is also the indice of the row in the data matrix ('F' field in the recordings file). You can edit this field if you need to reorder the channels (might be useful for EEG recordings).
Name : Name that was given to the channel by the acquisition device.
Type : Channel type, eg. MEG, EEG, EOG, ECG, EMG, Stim, Other, etc.
- Sometimes you have to change the Type for some sensors. For instance if the EOG channel was saved as a regular EEG channel, you have to change its type to prevent it from being used in the source estimation.
- To delete a channel from this file: select "(Delete)" in the type column, and then save the window to save the file.
Comment : Description of the channel.
Loc : Indicates the position in space of the sensor (x,y,z coordinates). One column per coil and per integration point. You should not modify these values from this interface.
Orient : Indicates the orientation of the coil (x,y,z coordinates). One column per coil or per integration point.
Weight : When there are more than one coil or integration point, the Weight field indicates the multiplication factor to apply to each of these points.
Menu: MRI Registration
For the moment, the registration between anatomy and sensors is based only on three points that are manually positioned (nasion and ears). This rough alignment technique is quite robust but also very unprecise, and depends on the precision with which the people defined the fiducials, both during the data acquisition and on the MRI slices. For this reason, it is sometimes necessary to correct the position of the sensors.
Check: Show all the possible information that may help to verify the registration between the sensors and the anatomy. For those specific recordings, it would just show the head surface, and the inner helmet surface, exactly like the "Display sensors > CTF Helmet" menu.
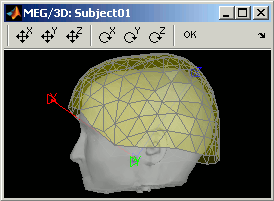
Edit...: Opens a window where you can move manually the MEG helmet relatively to the head. It works the same way as the interface to co-register surfaces presented in the previous tutorial: select an operation by clicking on it in the toolbar, and then right-click+move up/down to apply it. From a scientific point of view it is not a exactly a rigorous operation, but sometimes it is much better than using wrong default positions.
Refine using head points: If some digitized head points are available, this menu launches an iterative algorithm that uses those points to try to get a better MRI/sensors registration. In our case, there are no such points that were acquired, and you will get an error message if you select this menu.
There is nothing to change here, but remember to always check the registration scalp/sensors just after you import MEG or EEG recordings.
Menu: Digitized head points
Before locking your subject into that dark shielded room, when you acquire the position of some reference points with a magnetic tracking system (eg. Polhemus Isotrak), it is a good practice to acquire also many other points at the surface of the head. It does not take a very long time but provides very valuable information to register properly the MEG sensors with the MRI and surfaces. The more head points the better, with a minimum of 50 or 100, avoiding the softer parts of the head (cheeks, base of the neck, ears, eyes) because they may have different shapes when the patient is sitting on the MEG chair and when he/she is laying down in the MR scanner. Always insist on the nose, it provides a really good indicator of the orientation of the head.
View head points: Visualize the head points that were digitized before the MEG acquisition. There are no extra points here, so you will have to read another tutorial to play with those menus.
Add points: Add extra head points to the existing ones, from any type of file.
Remove all points: Removes all the currently defined head points.
Warp: Use those digitized head points to create a pseudo-individual anatomy, in the case you don't have an individual MRI for the subject. It uses the default anatomy (MNI/Colin27) and deforms it to match the head points. Make sure the alignment is correct before calling this menu. This step is described better in this page.
Note: The digitization of the head shape and the head localization coils with a Polhemus device can be done with Brainstorm: see the digitize tutorial.
Menu: File
Some other fields are present in the channel file that cannot be accessed with the Channel editor window. You can explore those other fields with the File menu, selecting View file contents or Export to Matlab. As we saw in previous tutorial.
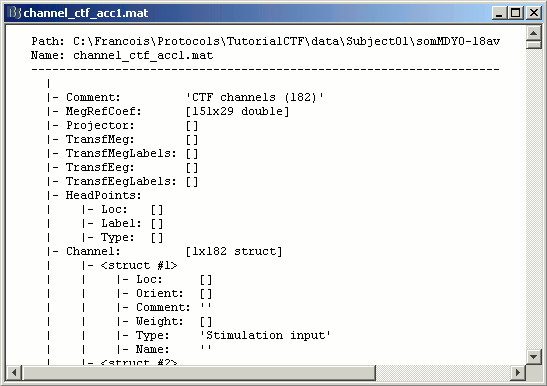
Some fields you may find there:
Comment : String that is displayed in the Brainstorm database explorer
MegRefCoef: Noise compensation matrix for CTF recordings, which is computed by the CTF systems, based on some other sensors that are located far away from the head.
Projector: SSP projectors used for denoising purposes.
TransfMeg / TransfMegLabel: Transformations that were applied to the positions of the MEG sensors to bring them in the Brainstorm coordinate system (as Brainstorm and CTF coordinate systems are the same, this field is empty).
TransfEeg / TransfEegLabel: Same for the position of the EEG electrodes.
HeadPoints: Extra head points that were digitized with a tracking system.
Channel: An array that defines each channel individually
History: Describes all the operations that were performed with Brainstorm on this file. To get a better view of this piece of information, use the menu File > View file history.
MEG recordings
To understand what is stored in the two other files: double-click on the first, then double-click on the second.
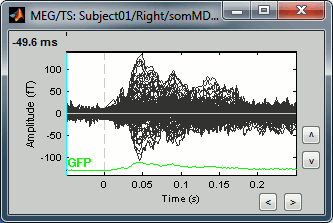
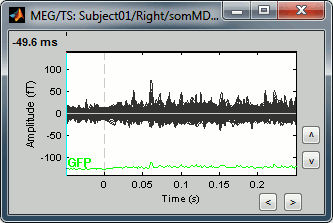
- The first one is the response to the electric stimulation averaged over 400 trials, from 50ms before to 250ms after the stimulus. The values for each MEG sensor is represented by a black line, all the sensors are all overlaid on the same graph.
- Roughly, you can observe a first response peak at 23ms, and a second one at about 47ms.
- The second one is the standard deviation of the trials that were average, for each sensors and at each time.
You can rename them ERF (for Evoked Response Field) and Std, to get something more meaningful than somMDYO-18av (#1) and somMDYO-18av (#2). Use F2 or any other renaming method.
Close the windows using the Close all button on the right of the main Brainstorm toolbar. It closes all the figures at the same time and frees all the memory. Always use this instead of closing the figures individually.

Now have a look to what is inside a recording file: right-click on Right/ERP > File > View file contents.
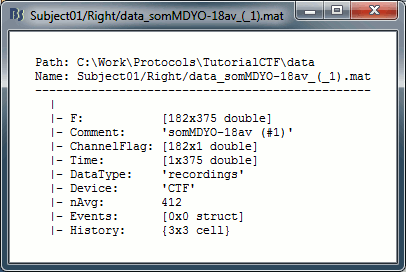
F: recordings time series (nChannels x nTime), in Volts
Comment: String displayed in the Brainstorm database explorer to represent this file
ChannelFlag: one value per channel, 1 means good, -1 means bad (not displayed or processed)
Time: Time values, in seconds
DataType: Type of the data saved in the F matrix (recordings, zscore...)
Device: Name of the acquisition system used to record this file
nAvg: For averaged files, number of trials that were used to compute this file
Events: Time markers available in the file (stimulus triggers or other events)
History: Operations performed on file since it was imported
Managing conditions
You have already imported the average response for the stimulation of the right thumb. Let's also import the left thumb, but proceeding in a slightly different way.
Right-click on Subject01 > Add condition > Left
Import the second file (somMGYO-18av.ds) in the Left condition. Same options as before.
Rename the recordings in ERF and Std.
Switch to the Functional data (sorted by condition), with the third button in the explorer toolbar.
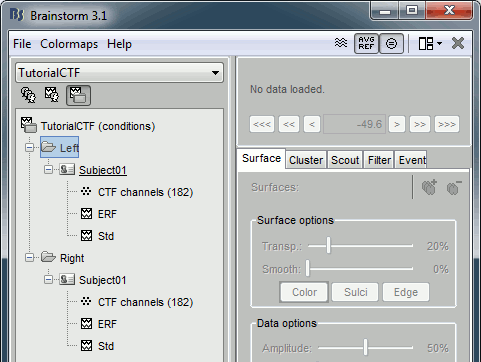
- This view is not very useful when you have one subject and two conditions. But remember this option for later, it will be very useful when you will have 60 subjects and 12 conditions per subject in your database.
Feedback
Next
Everything is now loaded in TutorialCTF protocol : subject anatomy (MRI and surfaces), recordings and channels description. The next tutorial presents all the tools available to ?explore the recordings.
