Tutorial 1: Create a new protocol
Authors: Francois Tadel, Sylvain Baillet
Contents
Brainstorm folders
Brainstorm needs different directories to work properly. If you put everything in the same folder, you would run into many problems. Try to understand this organization before creating a new database.
1. Program directory: "brainstorm3"
- Contains all the program files: Matlab scripts, compiled binaries, templates, etc.
- There is no user data in this folder.
- You can delete it and replace it with a newer version at anytime, your data will be safe.
- Recommended location:
Windows: My documents\brainstorm3
Linux: /home/username/brainstorm3
MacOS: Documents/brainstorm3
2. Database directory: "brainstorm_db"
- Created by user.
- Contains all the Brainstorm database files.
- Managed automatically by the application: do not move, delete or add files by yourself.
- Recommended location:
Windows: My documents\brainstorm_db
Linux: /home/username/brainstorm_db
MacOS: Documents/brainstorm_db
3. User directory: ".brainstorm"
Created automatically at Brainstorm startup. Typical location:
Windows: C:\Documents and Settings\username\.brainstorm
Linux: /home/username/.brainstorm
MacOS: /Users/username/.brainstorm
- Contains:
brainstorm.mat: Brainstorm user preferences.
tmp/: Temporary folder, cleaned every time Brainstorm is started.
You may have to change the location of the temporary folder if you have a limited amount of storage or a limited quota in your home folder.process/: Personal plugins folder.
reports/: Process reports.
openmeeg/: OpenMEEG binaries (downloaded automatically when needed)
templates/: Additional anatomy templates, saved as .zip files.
mex/: Some mex files that have to be recompiled.
4. Original data files:
- Recordings you acquired and you want to process with Brainstorm.
Put them wherever you want but not in any of the previous folders.
Starting Brainstorm for the first time
If you haven't read in the installation instructions, do it now: Installation.
Start Brainstorm from Matlab or with the compiled executable.
BST> Starting Brainstorm:
BST> =================================
BST> Version: 28-Jan-2015
BST> Checking internet connectivity... ok
BST> Compiling main interface files...
BST> Emptying temporary directory...
BST> Deleting old process reports...
BST> Loading configuration file...
BST> Initializing user interface...
BST> Starting OpenGL engine... hardware
BST> Reading plugins folder...
BST> Loading current protocol...
BST> =================================
- Read and accept the license file.
- Select your Brainstorm database directory (brainstorm_db).
If you do something wrong and don't know how to go back, you can always re-initialize Brainstorm by typing "brainstorm reset" in the Matlab command window, or by clicking on [Reset] in the software preferences (menu File > Edit preferences).
Main interface window
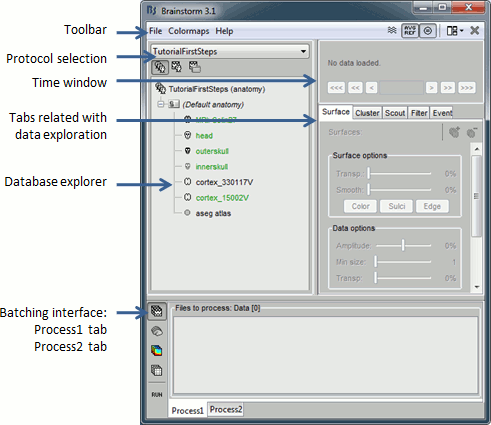
Database structure
Brainstorm allows you to organize your recordings and analysis with three levels of definition:
Protocol
- Group of datasets that have to be processed or displayed together.
- A protocol can include one or several subjects.
Some people would prefer to call this experiment or study.
- You can only open one protocol at a time.
- Your Brainstorm database is a collection of protocols.
Subject
- A person who participated in a given protocol.
- A subject contains two categories of information: anatomy and functional data.
- Anatomy: Includes at least an MRI volume and some surfaces extracted from the MRI.
- Functional data: Everything that is related with the MEG/EEG acquisition.
- For each subject, it is possible to use either the actual MRI of the person or one of the anatomy templates available in Brainstorm.
Sub-folders
- For each subject, the functional files can be organized in different sub-folders.
- These folders can represent different recordings sessions (aka acquisition runs) or different experimental conditions.
The current structure of the database does not allow to have more that one level of sub-folders for each subject. It is not possible to organize the files by session AND by condition.
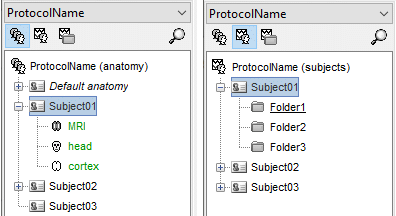
Database files
- The database folder "brainstorm_db" is managed completely from the graphic user interface (GUI).
- All the files in the database have to be imported through the GUI. Do not try to copy files by yourself in the brainstorm_db folder, it won't work.
- Everything in this folder is stored in Matlab .mat format, with the following architecture:
Anatomy data: brainstorm_db/protocol_name/anat/subject_name
Functional data: brainstorm_db/protocol_name/data/subject_name/subfolder/
- Most of the files you see in the database explorer in Brainstorm correspond to files on the hard drive, but there is no one-to-one correspondance. There is extra information stored in each directory, to save properties, comments, default data, links between different items, etc. For this reason, you should not try to manipulate directly the files in the Brainstorm database directory.
- The structure of the database is saved in the user preferences, so when you start the program or change protocol, there is no need to read again all the files on the hard drive (which may take some time).
If Brainstorm or Matlab crashes before the database structure is correctly saved, the files that are displayed in the Brainstorm database explorer may differ from what is actually on the disk. When this happens, you can force Brainstorm to rebuild the structure from the files on the hard drive: right-click on the folder to udpate > Reload.
Create first protocol
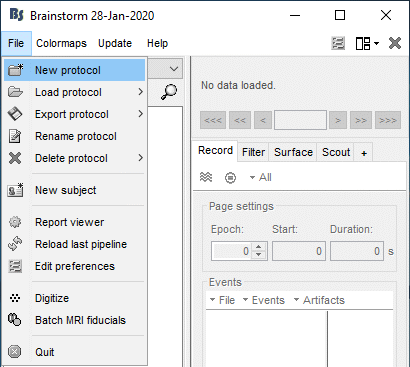
Click on the File menu, and select, and select New protocol.
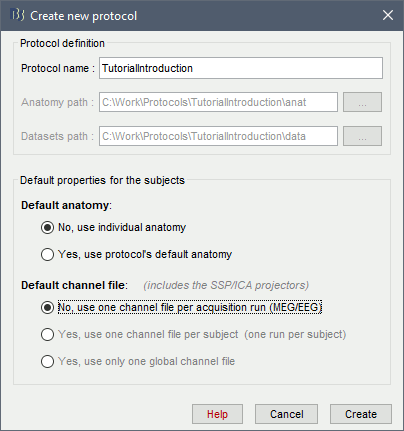
Edit the protocol name and enter: "TutorialFirstSteps". It will automatically update the paths (Anatomy path and Datasets path).
Default properties for the subjects:
- These are the default settings that are used when creating new subjects. It is then possible to override those settings for each subject individually.
Our objective is to create one subject that uses the default anatomy Colin27, so select the option "Yes, use protocol's default anatomy".
The option Default channel file is a bit more complicated to understand. It defines at what level we want to define the sensors information (position, orientation, name...) in the database. To make you data management more efficient, you can in some cases use the same channel file for all the subjects, or for all the folders within one subject. For more information on this option, click on the Help button.
- In this specific case, this option is not relevant because we are not going to import any recordings.
Once you get something like the following figure, click on Create.
Protocol exploration
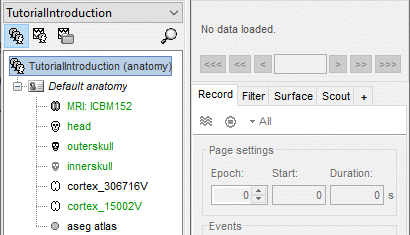
The protocol is created and you can now see it in the database explorer. It is represented by the top-most node in the tree.
You can switch between anatomy and functional data with the first three buttons in the toolbar. There are no subjects in the database yet, so the Functional data views are empty. However, in the Anatomy view, there is a (Default anatomy) node; it contains the MRI and the surfaces that can be used by default for the subjects without individual anatomy.
The default anatomy used in Brainstorm is based on the Colin27 MRI volume provided by the Montreal Neurological Institute (MNI): an average of 27 T1 scans of Colin Holmes brain (more info).
The cortex surfaces here were extracted from this average MRI with FreeSurfer.
- The inner and outer skull surfaces were generated with Brainstorm.
Display the Anatomy view, and click on the small "+" to expand the contents of the (Default anatomy) node. There is one MRI and several surfaces, identified by different icons.
- Everything you can do with a node (anatomy files, subjects, protocol) is accessible by right-clicking on it. Take a few minutes to explore all the popup menus by yourself. Don't be afraid of clicking everywhere, at this point you cannot damage anything.
Summary
- Different folders for:
the program (brainstorm3),
the database (brainstorm_db),
your original recordings.
- Never modify the contents of the database folder by yourself
- Do not put the original recordings in any of the Brainstorm folders, import them with the interface