|
Size: 2841
Comment:
|
Size: 3207
Comment:
|
| Deletions are marked like this. | Additions are marked like this. |
| Line 2: | Line 2: |
| The BFC correction tool is a graphical user interface for manually guiding the bias field correction in the MRI images. It is an addon to BrainSuite's bias-field correction in case the MRI image requires more accurate bias-field correction and uses tissue classification results from BrainSuite. | The BFC correction tool is a graphical user interface for manually guiding the bias field correction in the MRI images. It is an addon to [[BrainSuite|BrainSuite13]]'s bias-field correction in case the MRI image requires more accurate bias-field correction and uses tissue classification results from [[BrainSuite|BrainSuite13]]. |
| Line 6: | Line 6: |
| [[attachment:gui_tool2.png|{{attachment:gui_tool2.png|gui_tool.png|height="197",width="276"}}]] [[attachment:bfc_corrector_anim.gif|{{attachment:bfc_corrector_anim.gif|attachment:bfc_corrector_anim.gif|height="196",width="284"}}]] | [[attachment:gui_tool2.png|{{attachment:bfc_corr_tool.png|gui_tool.png|height="197",width="276"}}]] [[attachment:bfc_corrector_anim.gif|{{attachment:bfc_corrector_anim.gif|attachment:bfc_corrector_anim.gif|height="196",width="284"}}]] |
| Line 10: | Line 10: |
| 1. As BFC Correction Tool uses BrainSuite generated tissue classification file ''fname''.pvc.label.nii.gz, complete BrainSuite extraction sequence till Tissue Classification. | 1. As BFC Correction Tool uses [[BrainSuite|BrainSuite13]] generated tissue classification file, complete [[BrainSuite|BrainSuite13]] extraction sequence till Tissue Classification. The subject folder should have ''fname''.pvc.label.nii.gz and ''fname''.bfc.nii.gz for BFC Correction Tool to work successfully. |
| Line 12: | Line 12: |
| 1. In Windows, double click on gui_bias_correct.exe. In MAC, from the terminal, run gui_bias_correct.sh. This step will open file selection menu. Open the BrainSuite generated ''fname''.bfc.nii.gz file to be corrected. This will open the user interface as shown above. | 1. In Windows, double click on gui_bias_correct.exe. In MAC, from the terminal, run gui_bias_correct.sh. This step will open file selection menu. Open the [[BrainSuite|BrainSuite13]] generated ''fname''.bfc.nii.gz file to be corrected. This will open the user interface as shown above. |
| Line 16: | Line 16: |
| 1. Close the gui. You can now open the corrected image in BrainSuite and redo the BFC to correct the small bias field issue that were left uncorrected, and proceed with rest of the BrainSuite sequence. | 1. Close the gui. You can now open the corrected image in [[BrainSuite|BrainSuite13]] and redo the BFC to correct the small bias field issue that were left uncorrected, and proceed with rest of the [[BrainSuite|BrainSuite13]] sequence. |
| Line 22: | Line 22: |
| * Linux 64 bit * Mac 64 bit |
* [[http://neuroimage.usc.edu/resources/gui_bias_correct_linux.tar.gz|Linux 64 bit]] * [[http://neuroimage.usc.edu/resources/gui_bias_correct_maci64.tar.gz|Mac 64 bit]] |
BFC Correction Tool
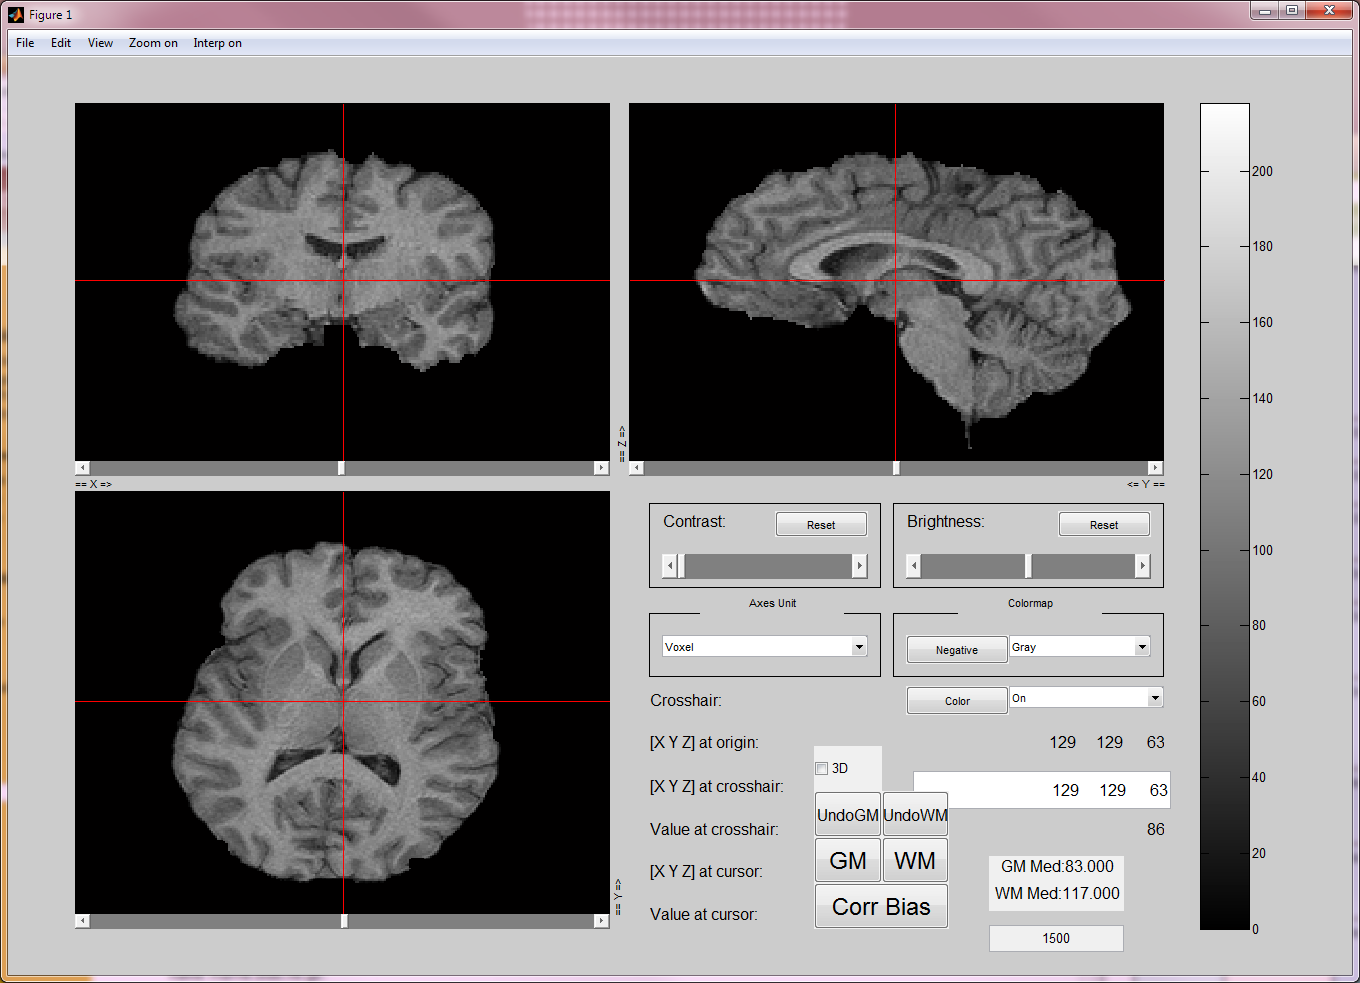
The BFC correction tool is a graphical user interface for manually guiding the bias field correction in the MRI images. It is an addon to BrainSuite13's bias-field correction in case the MRI image requires more accurate bias-field correction and uses tissue classification results from BrainSuite13.
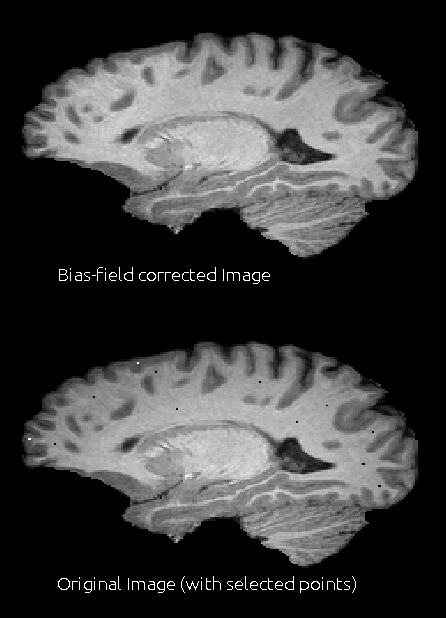
BFC Correction Tool allows users to manually select points corresponding to gray matter, white matter and CSF. Then, the bias field is estimated by finding a smooth scaling function such that the selected points are at approximately median intensity of the corresponding tissue types.
Here are the step by step instuctions for using the BFC correction tool.
As BFC Correction Tool uses BrainSuite13 generated tissue classification file, complete BrainSuite13 extraction sequence till Tissue Classification. The subject folder should have fname.pvc.label.nii.gz and fname.bfc.nii.gz for BFC Correction Tool to work successfully.
- Download the tool from links given below and unzip the files into a folder.
In Windows, double click on gui_bias_correct.exe. In MAC, from the terminal, run gui_bias_correct.sh. This step will open file selection menu. Open the BrainSuite13 generated fname.bfc.nii.gz file to be corrected. This will open the user interface as shown above.
- In the interface, find a region by scrolling through slices where you want to correct the bias field. In this region, select a point using the crosshair and press the tissue type button (WM, GM or CSF). Repeat this to select a few points (4-5) in different regions of bias field issues.
When you are done selecting the points, press Corr Bias button. This will perform the bias field correction. This step may take 2-3 min. Once it is done, it will open a window to show the corrected image and the bias field that corrects the image.
The corrected image will be saved in the same directory as the original image with the file name fname.corr.nii.gz. The estimated bias filed will also be saved in the same directory with the file name fname.bias.nii.gz.
Close the gui. You can now open the corrected image in BrainSuite13 and redo the BFC to correct the small bias field issue that were left uncorrected, and proceed with rest of the BrainSuite13 sequence.
Download Links
BFC correction tool requires matlab MCR for R2012a which can be downloaded from here.
Authors: Anand A. Joshi, Chitresh Bhushan


