|
Size: 12890
Comment:
|
Size: 21717
Comment:
|
| Deletions are marked like this. | Additions are marked like this. |
| Line 7: | Line 7: |
| The goal of these introduction tutorials is to guide you through most of the features of the software. All the pages use the same example dataset. The results of one section are most of the time used in the following section, so read those pages in the correct order. Some pages may contain too many details for your level of interest or competence: just skip them for now. You will be able to get back to the theory later if you need. |
The goal of these introduction tutorials is to guide you through most of the features of the software. All the pages use the same example dataset. '''The results of one section are most of the time used in the following section''', so read these pages in the correct order. <<TAG(Advanced)>> Some pages may contain too many details for your level of interest or competence. The sections marked as '''[Advanced]''' are not required for you to follow the tutorials until the end. You can skip them the first time you go through the documentation. You will be able to get back to the theory later if you need. |
| Line 13: | Line 15: |
| If you are interested only in EEG or intra-cranial recordings, don't think that an MEG-based tutorial is not adapted for you. Most of the practical aspects of the data manipulation is very similar in EEG and MEG. Start by reading those introduction tutorials, then go through the tutorial "EEG and Epilepsy" to get some more details about the processing steps that are specific for EEG. | You will observe '''minor differences''' between the screen captures presented in these pages and what you obtain on your computer: different colormaps, different values, etc. The software being constantly improved, some results changed since we produced the illustrations. When the changes are minor and the interpretation of the figures remain the same, we don't necessarily update the images in the tutorial. If you are interested only in''' EEG or intra-cranial recordings''', don't think that a MEG-based tutorial is not adapted for you. Most of the practical aspects of the data manipulation is very similar in EEG and MEG. First start by reading these introduction tutorials using the MEG example dataset provided, then when you are familiar with the software, go through the tutorial "[[https://neuroimage.usc.edu/brainstorm/Tutorials/Epilepsy|EEG and Epilepsy]]" to get some more details about the processing steps that are specific for EEG, or read one of the SEEG/ECOG tutorials available in the section "Other analysis scenarios". |
| Line 18: | Line 22: |
| * One subject, two acquisition runs of 6 minutes each * Subject stimulated binaurally with intra-aural earphones * Each run contains 200 regular beeps and 40 easy deviant beeps * Recordings with a CTF MEG system with 275 axial gradiometers * Anatomy of the subject: 1.5T MRI, processed with FreeSurfer 5.3 |
* One subject, two acquisition runs of 6 minutes each. * Subject stimulated binaurally with intra-aural earphones. * Each run contains 200 regular beeps and 40 easy deviant beeps. * Recordings with a CTF MEG system with 275 axial gradiometers. * Anatomy of the subject: 1.5T MRI, processed with FreeSurfer 5.3. |
| Line 24: | Line 28: |
| * Full dataset description available on this page: [[DatasetAuditory|MEG auditory dataset]] | * Full dataset description available on this page: [[DatasetIntroduction|Introduction dataset]]. |
| Line 35: | Line 39: |
| * '''Windows''': My documents\brainstorm3 | * '''Windows''': Documents\brainstorm3 |
| Line 43: | Line 47: |
| * Managed automatically by the application: do not move, delete or add files by yourself. | * Managed by the application: do not move, delete or add files by yourself. |
| Line 45: | Line 49: |
| * '''Windows''': My documents\brainstorm_db | * '''Windows''': Documents\brainstorm_db |
| Line 51: | Line 55: |
| * Created automatically at Brainstorm startup. Typical location:<<BR>> * '''Windows''': C:\Documents and Settings\username\.brainstorm |
* Created at Brainstorm startup. Typical location:<<BR>> * '''Windows''': C:\Users\username\.brainstorm |
| Line 57: | Line 61: |
| * '''tmp/''': Temporary folder, cleaned every time Brainstorm is started.<<BR>>You may have to change the location of the temporary folder if you have a limited amount of storage or a limited quota in your home folder. * '''process/''': Personal plugins folder. * '''reports/''': Process reports. * '''openmeeg/''': OpenMEEG binaries (downloaded automatically when needed) * '''templates/''': Additional anatomy templates, saved as .zip files. |
* '''defaults/''': Anatomy templates downloaded by Brainstorm. |
| Line 63: | Line 63: |
| * '''plugins/''': Plugins downloaded by Brainstorm (see tutorial [[Tutorials/Plugins|Plugins]]). * '''process/''': Personal process folder (see tutorial [[Tutorials/TutUserProcess|How to write your own process]]). * '''reports/''': Execution reports (see tutorial [[http://neuroimage.usc.edu/brainstorm/Tutorials/PipelineEditor#Report_viewer|Run processes]]). * '''tmp/''': Temporary folder, emptied every time Brainstorm is started.<<BR>>You may have to change the location of the temporary folder if you have a limited amount of storage or a limited quota in your home folder (see below). |
|
| Line 70: | Line 74: |
| 1. If you haven't read in the installation instructions, do it now: [[Installation]]. | 1. If you haven't read the installation instructions, do it now: [[Installation]]. |
| Line 93: | Line 97: |
| The Brainstorm window described below is designed to remain on one side of the screen. All the space of the desktop that is not covered by this window will be used for opening other figures. Do not try to maximize this window, or the automatic management of the data figures might not work correctly. Keep it on one side of your screen, just large enough so you can read the file names in the database explorer. |
|
| Line 94: | Line 102: |
== The text is too small == If you have a high-resolution screen, the text and icons in the Brainstorm window may not scale properly, leading the interface to be impossible to use. Select the menu '''File > Edit preferences''', the slider at the bottom of the option window lets you increase the ratio of the Brainstorm interface. If it doesn't help, try changing the scaling options in your operating system preferences. . {{attachment:preferences.gif}} |
|
| Line 127: | Line 140: |
| 1. Edit the protocol name and enter: "'''TutorialAuditory'''".<<BR>>It will automatically update the anatomy and datasets paths. 1. Default properties for the subjects: These are the default settings that are used when creating new subjects. It is then possible to override those settings for each subject individually. |
1. Edit the protocol name and enter: "'''TutorialIntroduction'''".<<BR>>It will automatically update the anatomy and datasets paths. '''Do not edit manually''' these paths, unless you work with a non-standard database organization and know exactly what you are doing. 1. Default properties for the subjects: These are the default settings that are used when creating new subjects. It is then possible to override these settings for each subject individually. |
| Line 136: | Line 149: |
| * '''No, use one channel file per condition/run''':<<BR>>Select this if you may have different sensor positions for one subject. This is usually not the case in EEG, where the electrodes stay in place for all the experiment. In MEG, this is a common setting: one recording session is split in multiple acquisition runs, and the position of the subject's head in the MEG might be different between two runs. * '''Yes, use one channel file per subject''':<<BR>>This is a common setting for EEG. The electrodes are in the same position for all the files recorded on one subject. * '''Yes, use only one global channel file''':<<BR>>This is never a recommended setting. It could be used in the case of an EEG study where you use only standard EEG positions on a standard anatomy, but only if you are not doing any advanced source reconstruction. If you share the position of the electrodes between all the subjects, it will also share the source models, which are dependent on the quality of the recordings for each subject. This is complicated to understand at this level, it will make more sense later in the tutorials. |
* '''No, use one channel file per acquisition run''': Default for all studies<<BR>>__Different head positions__: Select this if you may have different head positions for one subject. This is usually not the case in EEG, where the electrodes stay in place for all the experiment. In MEG, this is a common setting: one recording session is split in multiple acquisition runs, and the position of the subject's head in the MEG might be different between two runs.<<BR>>__Different number of channels__: Another use case is when you have multiple recordings for the same subject that do not have the same number of channels. You cannot share the channel file if the list of channels is not strictly the same for all the files.<<BR>>__Different cleaning procedures__: If you are cleaning artifacts from each acquisition run separately using SSP or ICA projectors, you cannot share the channel file between them (the projectors are saved in the channel file). * '''Yes, use one channel file per subject''': Use with caution<<BR>>This can be a setting adapted to EEG: the electrodes are in the same position for all the files recorded on one subject, and the number of channels is the same for all the files. However, to use this option, you should not be using SSP/ICA projectors on the recordings, or they should be computed for all the files at once. This may lead to some confusion and sometimes to manipulation errors. For this reason, we decided not to recommend this setting. * '''Yes, use only one global channel file''': Not recommended<<BR>>This is never a recommended setting. It could be used in the case of an EEG study where you use only standard EEG positions on a standard anatomy, but only if you are not doing any advanced source reconstruction. If you share the position of the electrodes between all the subjects, it will also share the source models, which are dependent on the quality of the recordings for each subject. This is complicated to understand at this level, it will make more sense later in the tutorials. |
| Line 152: | Line 165: |
| * In the ''Anatomy ''view, there is a ''Default anatomy'' node. It contains the Colin27 anatomy, distributed by the Montreal Neurological Institute (MNI), which is one of the template anatomy folders that are distributed with Brainstorm. | * In the ''Anatomy ''view, there is a ''Default anatomy'' node. It contains the ICBM152 anatomy, distributed by the Montreal Neurological Institute (MNI), which is one of the template anatomy folders that are distributed with Brainstorm. |
| Line 160: | Line 173: |
| == Set up a backup == Just like any computer work, your Brainstorm database is always at risk. Software bugs, computer or network crashes and manipulation errors can cause the loss of months of data curation and computation. If the database structure gets corrupted or if you delete or modify accidentally some files, you might not be able to get your data back. __'''There is no undo button!'''__ You created your database, now take some time to find a way to make it safe. If you are not familiar with backuping systems, watch some online tutorials explaining how to set up an '''__automatic daily or weekly backup__ '''of your sensitive data. It might seem annoying and useless now, but could save you weeks in the future. |
|
| Line 161: | Line 179: |
| If the amount of storage space you have for your user folder is limited (less than 10Gb), you may have to change the temprorary folder used by Brainstorm. If you work on a centralized network where all the computers are sharing the same resources, the system admins may impose limited disk quotas to all users and encourage them to use local hard drives instead of the limited and shared user folder. The default temporary folder of Brainstorm is located in your user folder ($HOME/.brainstorm/tmp/), so when you import recordings or calculate large models, it may fill up quickly your limited quota and at some point block your user account. To prevent this, select the menu '''File > Edit preferences''' and set the temporary directory to a folder that is local to your computer, in which you won't suffer from any storage limitation. . {{attachment:preferences.gif||height="293",width="503"}} |
Some processes need to create temporary files on the hard drive. For example, when epoching MEG/EEG recordings, Brainstorm would first create a temporary folder "import_yymmdd_hhmmss", store all the epochs in it, then move them to the database when the epoching process is completed. The name of the temporary folder indicates its creation time (year/month/day_hour_minutes_seconds). At the end of the process, all the temporary files should be deleted automatically. The default temporary folder of Brainstorm is located in your user folder ('''$HOME/.brainstorm/tmp/'''), so before importing recordings or calculating large models, you have to make sure you have enough storage space available. If you work on a centralized network where all the computers are sharing the same resources, the system admins may impose limited disk quotas to all users and encourage them to use local hard drives instead of the limited and shared user folder. In such context, Brainstorm may quickly fill up your limited quota and at some point block your user account. If the amount of storage space you have for your user folder is limited (less than 10Gb), you may have to change the temporary folder used by Brainstorm. Select the menu '''File > Edit preferences''' and set the temporary directory to a folder that is local to your computer, in which you won't suffer from any storage limitation. If a process crashes or is killed before it deletes its temporary files, they would remain in the temporary folder until explicitly deleted. When starting Brainstorm, you would always get offered to delete the previous temporary files: always agree to it, unless they correspond to files generated by another session running simultaneously. Alternatively, you can delete these temporary files by clicking on the''' Empty''' button in the same preferences window. . {{attachment:preferences.gif||width="500",height="375"}} |
| Line 169: | Line 193: |
| * the '''program '''(brainstorm3), * the '''database '''(brainstorm_db), * your '''original recordings'''. * Never modify the contents of the database folder by yourself * Do not put the original recordings in any of the Brainstorm folders, import them with the interface <<EmbedContent("http://neuroimage.usc.edu/bst/get_prevnext.php?prev=Tutorials&next=Tutorials/ImportAnatomy")>> <<EmbedContent(http://neuroimage.usc.edu/bst/get_feedback.php?Tutorials/CreateProtocol)>> |
* the '''program '''(brainstorm3). * the '''database '''(brainstorm_db). * your '''original recordings.''' * Never modify the contents of the database folder by yourself. * Do not put the original recordings in any of the Brainstorm folders, import them with the interface. * Do not try to maximize the Brainstorm window: keep it small on one side of your screen. == Roadmap == The workflow described in these introduction tutorials include the following steps: * Importing the anatomy of the subjects, the definition of the sensors and the recordings. * Pre-processing, cleaning, epoching and averaging the EEG/MEG recordings. * Estimating sources from the imported recordings. * Computing measures from the brain signals of interest in sensor space or source space. {{attachment:workflow.gif}} <<TAG(Advanced)>> == Moving a database == If you are running out of disk space or need to share your database with someone else, you may need to copy or move your protocols to a different folder or drive. Each protocol is handled independently by Brainstorm, therefore in order to move the entire database folder (brainstorm_db), you need to repeat the operations below for each protocol in your database. ==== Copy the raw files ==== The original continuous files are not saved in the Brainstorm database. The "Link to raw files" depend on a static path on your local computer and cannot be moved easily to a new computer. You can copy them inside the database before moving the database to a different computer/hard drive using the menu: File > Export protocol > '''Copy raw files to database'''. This will make local copies in .bst format of all your original files. The resulting protocol would larger but portable. This can also be done file by file: right-click > File > '''Copy to database'''. ==== Export a protocol ==== The easiest option to share a protocol with a collaborator is to export it as a zip file. * '''Export''': Use the menu File > Export protocol > '''Export as zip file'''.<<BR>>Avoid using spaces and special characters in the zip file name. * '''Import''': Use the menu File > Load protocol > '''Load from zip file'''. <<BR>>The name of the protocol created in the brainstorm_db folder is the name of the zip file. If there is already a protocol with this label, Brainstorm would return an error. To import the protocol as a different name, you only need to rename the zip file before importing it. * '''Size limitation''': This solution is limited to smaller databases: creating zip files larger than a few Gb can take a lot of time or even crash. For larger databases, prefer the other options below. ==== Export a subject ==== Similar as the protocol export, but extracts only the files needed by a single subject. * '''Export''': Right-click on the subject > File > '''Export subject'''. * '''Import as new protocol''': Use the menu File > Load protocol > '''Load from zip file'''. * '''Import in an existing protocol''': Use the menu File > Load protocol > '''Import subject from zip'''. ==== Move a protocol ==== To move a protocol to a different location: 1. [Optional] Set up a backup of your entire brainstorm_db folder if your haven't done it yet. There will be no undo button to press if something bad happens. 1. [Optional] Copy the raw files to the database (see above) 1. '''Unload''': Menu File > Delete protocol > '''Only detach from database'''. 1. '''Move''': Move the entire protocol folder to a different location. Remember a protocol folder should be located in the "brainstorm_db" folder and should contain only two subfolders "data" and "anat". Never move or copy a single subject manually. 1. '''Load''': Menu File > Load protocol > '''Load from folder''' > Select the new location of the protocol 1. If you want to move the entire "brainstorm_db" folder at once, make sure you detach all the protocols in your Brainstorm installation first. ==== Duplicate a protocol ==== To duplicate a protocol in the same computer: * '''Copy''': Make a full copy of the protocol to duplicate in the brainstorm_db folder, e.g. TutorialIntroduction => TutorialIntroduction_copy. Avoid using any space or special character in the new folder name. * '''Load''': Menu File > Load protocol > '''Load from folder''' > Select the new protocol folder <<HTML(<!-- END-PAGE -->)>> <<EmbedContent("https://neuroimage.usc.edu/bst/get_prevnext.php?prev=Tutorials&next=Tutorials/ImportAnatomy")>> <<EmbedContent(https://neuroimage.usc.edu/bst/get_feedback.php?Tutorials/CreateProtocol)>> |
Tutorial 1: Create a new protocol
Authors: Francois Tadel, Elizabeth Bock, Sylvain Baillet
Contents
- How to read these tutorials
- Presentation of the experiment
- Brainstorm folders
- Starting Brainstorm for the first time
- Main interface window
- The text is too small
- Database structure
- Database files
- Create your first protocol
- Protocol exploration
- Set up a backup
- Changing the temporary folder
- Summary
- Roadmap
- Moving a database
How to read these tutorials
The goal of these introduction tutorials is to guide you through most of the features of the software. All the pages use the same example dataset. The results of one section are most of the time used in the following section, so read these pages in the correct order.
Some pages may contain too many details for your level of interest or competence. The sections marked as [Advanced] are not required for you to follow the tutorials until the end. You can skip them the first time you go through the documentation. You will be able to get back to the theory later if you need.
Please follow first these tutorials with the data we provide. This way you will be able to focus on learning how to use the software. It is better to start with some data that is easy to analyze. After going through all the tutorials, you should be comfortable enough with the software to start analyzing your own recordings.
You will observe minor differences between the screen captures presented in these pages and what you obtain on your computer: different colormaps, different values, etc. The software being constantly improved, some results changed since we produced the illustrations. When the changes are minor and the interpretation of the figures remain the same, we don't necessarily update the images in the tutorial.
If you are interested only in EEG or intra-cranial recordings, don't think that a MEG-based tutorial is not adapted for you. Most of the practical aspects of the data manipulation is very similar in EEG and MEG. First start by reading these introduction tutorials using the MEG example dataset provided, then when you are familiar with the software, go through the tutorial "EEG and Epilepsy" to get some more details about the processing steps that are specific for EEG, or read one of the SEEG/ECOG tutorials available in the section "Other analysis scenarios".
Presentation of the experiment
All the introduction tutorials are based on a simple auditory oddball experiment:
- One subject, two acquisition runs of 6 minutes each.
- Subject stimulated binaurally with intra-aural earphones.
- Each run contains 200 regular beeps and 40 easy deviant beeps.
- Recordings with a CTF MEG system with 275 axial gradiometers.
Anatomy of the subject: 1.5T MRI, processed with FreeSurfer 5.3.
- More details will be given about this dataset along the process.
Full dataset description available on this page: Introduction dataset.
Brainstorm folders
Brainstorm needs different directories to work properly. If you put everything in the same folder, you would run into many problems. Try to understand this organization before creating a new database.
1. Program directory: "brainstorm3"
- Contains all the program files: Matlab scripts, compiled binaries, templates, etc.
- There is no user data in this folder.
- You can delete it and replace it with a newer version at anytime, your data will be safe.
- Recommended location:
Windows: Documents\brainstorm3
Linux: /home/username/brainstorm3
MacOS: Documents/brainstorm3
2. Database directory: "brainstorm_db"
- Created by user.
- Contains all the Brainstorm database files.
- Managed by the application: do not move, delete or add files by yourself.
- Recommended location:
Windows: Documents\brainstorm_db
Linux: /home/username/brainstorm_db
MacOS: Documents/brainstorm_db
3. User directory: ".brainstorm"
Created at Brainstorm startup. Typical location:
Windows: C:\Users\username\.brainstorm
Linux: /home/username/.brainstorm
MacOS: /Users/username/.brainstorm
- Contains:
brainstorm.mat: Brainstorm user preferences.
defaults/: Anatomy templates downloaded by Brainstorm.
mex/: Some mex files that have to be recompiled.
plugins/: Plugins downloaded by Brainstorm (see tutorial Plugins).
process/: Personal process folder (see tutorial How to write your own process).
reports/: Execution reports (see tutorial Run processes).
tmp/: Temporary folder, emptied every time Brainstorm is started.
You may have to change the location of the temporary folder if you have a limited amount of storage or a limited quota in your home folder (see below).
4. Original data files:
- Recordings you acquired and you want to process with Brainstorm.
Put them wherever you want but not in any of the previous folders.
Starting Brainstorm for the first time
If you haven't read the installation instructions, do it now: Installation.
Start Brainstorm from Matlab or with the compiled executable.
BST> Starting Brainstorm:
BST> =================================
BST> Version: 28-Jan-2015
BST> Checking internet connectivity... ok
BST> Compiling main interface files...
BST> Emptying temporary directory...
BST> Deleting old process reports...
BST> Loading configuration file...
BST> Initializing user interface...
BST> Starting OpenGL engine... hardware
BST> Reading plugins folder...
BST> Loading current protocol...
BST> =================================
- Read and accept the license file.
- Select your Brainstorm database directory (brainstorm_db).
If you do something wrong and don't know how to go back, you can always re-initialize Brainstorm by typing "brainstorm reset" in the Matlab command window, or by clicking on [Reset] in the software preferences (menu File > Edit preferences).
Main interface window
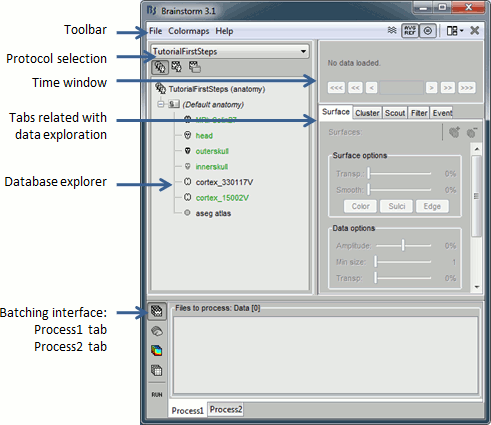
The Brainstorm window described below is designed to remain on one side of the screen. All the space of the desktop that is not covered by this window will be used for opening other figures.
Do not try to maximize this window, or the automatic management of the data figures might not work correctly. Keep it on one side of your screen, just large enough so you can read the file names in the database explorer.
The text is too small
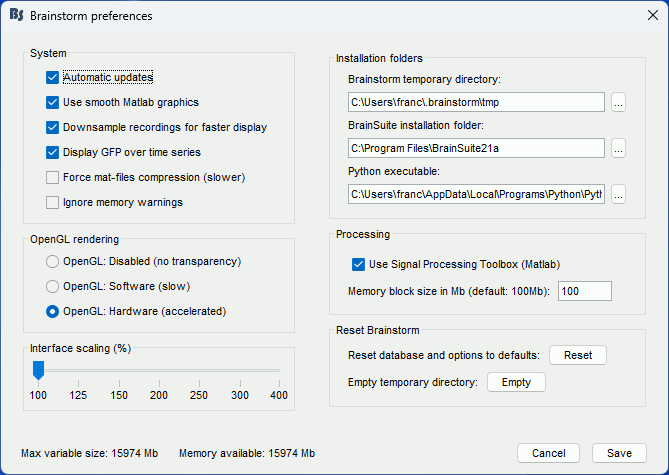
If you have a high-resolution screen, the text and icons in the Brainstorm window may not scale properly, leading the interface to be impossible to use. Select the menu File > Edit preferences, the slider at the bottom of the option window lets you increase the ratio of the Brainstorm interface. If it doesn't help, try changing the scaling options in your operating system preferences.
Database structure
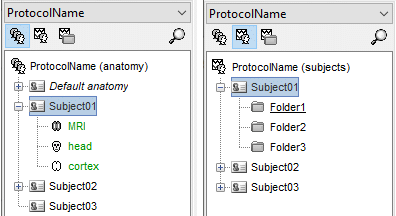
Brainstorm allows you to organize your recordings and analysis with three levels of definition:
Protocol
- Group of datasets that have to be processed or displayed together.
- A protocol can include one or several subjects.
Some people would prefer to call this experiment or study.
- You can only open one protocol at a time.
- Your Brainstorm database is a collection of protocols.
Subject
- A person who participated in a given protocol.
- A subject contains two categories of information: anatomy and functional data.
Anatomy: Includes at least an MRI volume and some surfaces extracted from the MRI.
Functional data: Everything that is related with the MEG/EEG acquisition.
- For each subject, it is possible to use either the actual MRI of the person or one of the anatomy templates available in Brainstorm.
Sub-folders
- For each subject, the functional files can be organized in different sub-folders.
- These folders can represent different recordings sessions (aka acquisition runs) or different experimental conditions.
The current structure of the database does not allow more than one level of sub-folders for each subject. It is not possible to organize the files by session AND by condition.
Database files
- The database folder "brainstorm_db" is managed completely from the graphic user interface (GUI).
- All the files in the database have to be imported through the GUI. Do not try to copy files by yourself in the brainstorm_db folder, it won't work.
- Everything in this folder is stored in Matlab .mat format, with the following architecture:
Anatomy data: brainstorm_db/protocol_name/anat/subject_name
Functional data: brainstorm_db/protocol_name/data/subject_name/subfolder/
- Most of the files you see in the database explorer in Brainstorm correspond to files on the hard drive, but there is no one-to-one correspondence. There is extra information stored in each directory, to save properties, comments, default data, links between different items, etc. This is one of the reasons for which you should not try to manipulate directly the files in the Brainstorm database directory.
- The structure of the database is saved in the user preferences, so when you start the program or change protocol, there is no need to read again all the files on the hard drive.
If Brainstorm or Matlab crashes before the database structure is correctly saved, the files that are displayed in the Brainstorm database explorer may differ from what is actually on the disk. When this happens, you can force Brainstorm to rebuild the structure from the files on the hard drive: right-click on a folder > Reload.
Create your first protocol
Menu File > New protocol.
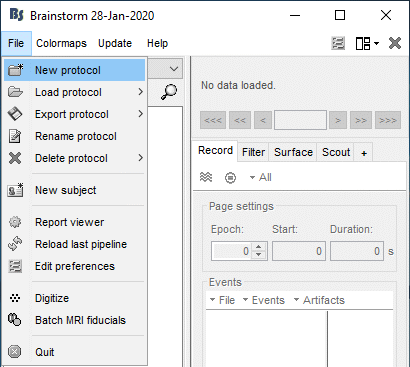
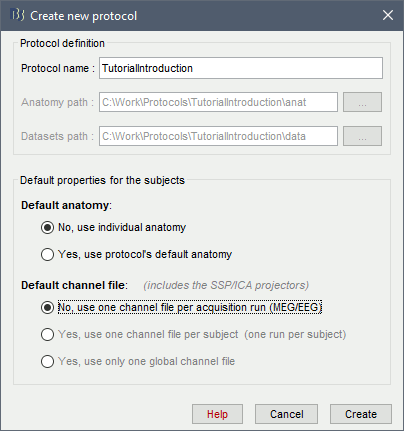
Edit the protocol name and enter: "TutorialIntroduction".
It will automatically update the anatomy and datasets paths. Do not edit manually these paths, unless you work with a non-standard database organization and know exactly what you are doing.- Default properties for the subjects: These are the default settings that are used when creating new subjects. It is then possible to override these settings for each subject individually.
Default anatomy: (MRI and surfaces)
No, use individual anatomy:
Select when you have individual MRI scans for all the participants of your study.Yes, use default anatomy:
Select when you do not have individual scans for the participants, and you would like to use one of the anatomy templates available in Brainstorm.
Default channel file: (Sensors names and positions)
No, use one channel file per acquisition run: Default for all studies
Different head positions: Select this if you may have different head positions for one subject. This is usually not the case in EEG, where the electrodes stay in place for all the experiment. In MEG, this is a common setting: one recording session is split in multiple acquisition runs, and the position of the subject's head in the MEG might be different between two runs.
Different number of channels: Another use case is when you have multiple recordings for the same subject that do not have the same number of channels. You cannot share the channel file if the list of channels is not strictly the same for all the files.
Different cleaning procedures: If you are cleaning artifacts from each acquisition run separately using SSP or ICA projectors, you cannot share the channel file between them (the projectors are saved in the channel file).Yes, use one channel file per subject: Use with caution
This can be a setting adapted to EEG: the electrodes are in the same position for all the files recorded on one subject, and the number of channels is the same for all the files. However, to use this option, you should not be using SSP/ICA projectors on the recordings, or they should be computed for all the files at once. This may lead to some confusion and sometimes to manipulation errors. For this reason, we decided not to recommend this setting.Yes, use only one global channel file: Not recommended
This is never a recommended setting. It could be used in the case of an EEG study where you use only standard EEG positions on a standard anatomy, but only if you are not doing any advanced source reconstruction. If you share the position of the electrodes between all the subjects, it will also share the source models, which are dependent on the quality of the recordings for each subject. This is complicated to understand at this level, it will make more sense later in the tutorials.
In the context of this study, we are going to use the following settings:
No, use individual anatomy: Because we have access to a T1 MRI scan of the subject.
No, use one channel file per condition/run: The typical MEG setup.
Click on [Create].
Protocol exploration
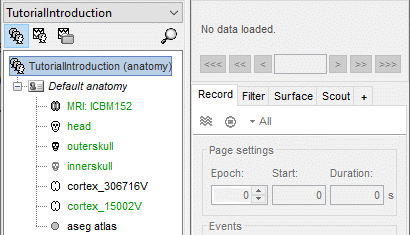
The protocol is created and you can now see it in the database explorer. It is represented by the top-most node in the tree.
- You can switch between anatomy and functional data with the three buttons just above the database explorer. Read the tooltips of the buttons to see which one does what.
In the Anatomy view, there is a Default anatomy node. It contains the ICBM152 anatomy, distributed by the Montreal Neurological Institute (MNI), which is one of the template anatomy folders that are distributed with Brainstorm.
The Default anatomy node contains the MRI and the surfaces that are used for the subjects without an individual anatomy, or for registering multiple subjects to the same anatomy for group analysis.
There are no subjects in the database yet, so the Functional data views are empty.
Everything you can do with an object in the database explorer (anatomy files, subjects, protocol) is accessible by right-clicking on it.
Set up a backup
Just like any computer work, your Brainstorm database is always at risk. Software bugs, computer or network crashes and manipulation errors can cause the loss of months of data curation and computation. If the database structure gets corrupted or if you delete or modify accidentally some files, you might not be able to get your data back. There is no undo button!
You created your database, now take some time to find a way to make it safe. If you are not familiar with backuping systems, watch some online tutorials explaining how to set up an automatic daily or weekly backup of your sensitive data. It might seem annoying and useless now, but could save you weeks in the future.
Changing the temporary folder
Some processes need to create temporary files on the hard drive. For example, when epoching MEG/EEG recordings, Brainstorm would first create a temporary folder "import_yymmdd_hhmmss", store all the epochs in it, then move them to the database when the epoching process is completed. The name of the temporary folder indicates its creation time (year/month/day_hour_minutes_seconds). At the end of the process, all the temporary files should be deleted automatically.
The default temporary folder of Brainstorm is located in your user folder ($HOME/.brainstorm/tmp/), so before importing recordings or calculating large models, you have to make sure you have enough storage space available.
If you work on a centralized network where all the computers are sharing the same resources, the system admins may impose limited disk quotas to all users and encourage them to use local hard drives instead of the limited and shared user folder. In such context, Brainstorm may quickly fill up your limited quota and at some point block your user account.
If the amount of storage space you have for your user folder is limited (less than 10Gb), you may have to change the temporary folder used by Brainstorm. Select the menu File > Edit preferences and set the temporary directory to a folder that is local to your computer, in which you won't suffer from any storage limitation.
If a process crashes or is killed before it deletes its temporary files, they would remain in the temporary folder until explicitly deleted. When starting Brainstorm, you would always get offered to delete the previous temporary files: always agree to it, unless they correspond to files generated by another session running simultaneously. Alternatively, you can delete these temporary files by clicking on the Empty button in the same preferences window.
Summary
- Different folders for:
the program (brainstorm3).
the database (brainstorm_db).
your original recordings.
- Never modify the contents of the database folder by yourself.
- Do not put the original recordings in any of the Brainstorm folders, import them with the interface.
- Do not try to maximize the Brainstorm window: keep it small on one side of your screen.
Roadmap
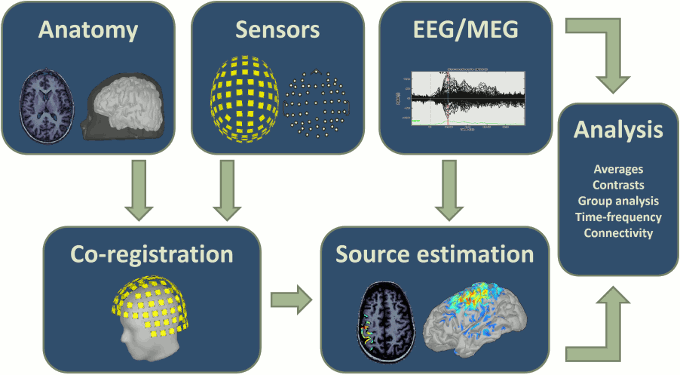
The workflow described in these introduction tutorials include the following steps:
- Importing the anatomy of the subjects, the definition of the sensors and the recordings.
- Pre-processing, cleaning, epoching and averaging the EEG/MEG recordings.
- Estimating sources from the imported recordings.
- Computing measures from the brain signals of interest in sensor space or source space.
Moving a database
If you are running out of disk space or need to share your database with someone else, you may need to copy or move your protocols to a different folder or drive. Each protocol is handled independently by Brainstorm, therefore in order to move the entire database folder (brainstorm_db), you need to repeat the operations below for each protocol in your database.
Copy the raw files
The original continuous files are not saved in the Brainstorm database. The "Link to raw files" depend on a static path on your local computer and cannot be moved easily to a new computer. You can copy them inside the database before moving the database to a different computer/hard drive using the menu: File > Export protocol > Copy raw files to database. This will make local copies in .bst format of all your original files. The resulting protocol would larger but portable. This can also be done file by file: right-click > File > Copy to database.
Export a protocol
The easiest option to share a protocol with a collaborator is to export it as a zip file.
Export: Use the menu File > Export protocol > Export as zip file.
Avoid using spaces and special characters in the zip file name.Import: Use the menu File > Load protocol > Load from zip file.
The name of the protocol created in the brainstorm_db folder is the name of the zip file. If there is already a protocol with this label, Brainstorm would return an error. To import the protocol as a different name, you only need to rename the zip file before importing it.Size limitation: This solution is limited to smaller databases: creating zip files larger than a few Gb can take a lot of time or even crash. For larger databases, prefer the other options below.
Export a subject
Similar as the protocol export, but extracts only the files needed by a single subject.
Export: Right-click on the subject > File > Export subject.
Import as new protocol: Use the menu File > Load protocol > Load from zip file.
Import in an existing protocol: Use the menu File > Load protocol > Import subject from zip.
Move a protocol
To move a protocol to a different location:
- [Optional] Set up a backup of your entire brainstorm_db folder if your haven't done it yet. There will be no undo button to press if something bad happens.
- [Optional] Copy the raw files to the database (see above)
Unload: Menu File > Delete protocol > Only detach from database.
Move: Move the entire protocol folder to a different location. Remember a protocol folder should be located in the "brainstorm_db" folder and should contain only two subfolders "data" and "anat". Never move or copy a single subject manually.
Load: Menu File > Load protocol > Load from folder > Select the new location of the protocol
- If you want to move the entire "brainstorm_db" folder at once, make sure you detach all the protocols in your Brainstorm installation first.
Duplicate a protocol
To duplicate a protocol in the same computer:
Copy: Make a full copy of the protocol to duplicate in the brainstorm_db folder, e.g. TutorialIntroduction => TutorialIntroduction_copy. Avoid using any space or special character in the new folder name.
Load: Menu File > Load protocol > Load from folder > Select the new protocol folder

