|
Size: 4921
Comment:
|
Size: 13804
Comment:
|
| Deletions are marked like this. | Additions are marked like this. |
| Line 31: | Line 31: |
| === Create new subject === | |
| Line 35: | Line 36: |
| * Create a new subject: * Right-click on the TutorialEpimap folder > '''New subject''' > '''Subject01''' * Keep the default options you defined for the protocol. * Import the pre-implantation MRI scan: * Switch to the "anatomy" view of the protocol. * Right-click on the subject node > '''Import MRI''':<<BR>>Set the file format: "All MRI file (subject space)"<<BR>>Select the file: '''tutorial_epimap/anat/MRI/3DT1pre_deface.nii''' |
* Right-click on the TutorialEpimap folder > '''New subject''' > '''Subject01''' * Keep the default options you defined for the protocol. |
| Line 42: | Line 39: |
| * Do you want to apply the transformation to the MRI file? '''YES''' * The MRI viewer opens automatically. Click on "[[http://neuroimage.usc.edu/brainstorm/Tutorials/ImportAnatomy#MNI_transformation|Click here to compute MNI transformation]]". It computes an affine transformation between the subject space and the MNI ICBM152 space, and sets default positions for all the anatomical landmarks.<<BR>> {{attachment:mni_transformation.gif}} * Click on [Save] to close the MRI viewer. |
=== Pre-implantation MRI === * Switch to the "anatomy" view of the protocol. * Right-click on the subject node > '''Import MRI''':<<BR>>Set the file format: "All MRI file (subject space)"<<BR>>Select the file: '''tutorial_epimap/anat/MRI/3DT1pre_deface.nii''' |
| Line 46: | Line 43: |
| * Import the post-implantation MRI scan: * Right-click on the subject node > '''Import MRI''':<<BR>>Select the file: '''tutorial_epimap/anat/MRI/3DT1post_deface.nii''' * Do you want to apply the transformation to the MRI file? '''YES''' * How to register the new volume: '''Ignore'''<<BR>>The two volumes have already been coregistered with SPM. See the section [[http://neuroimage.usc.edu/brainstorm/Tutorials/Epileptogenicity#Volume%20coregistration|Volume coregistration]] for more details on this option. * Reslice the volume: '''YES''' * The MRI viewer opens automatically, showing the post-implantation volume as an overlay layer on top of the previous volume. Adjust the transparency and amplitude threshold of this layer in the section Data options in the Surface tab. Use this display to validate that the coregistration of the two volume is correct, all the parts of the head must align well. <<BR>><<BR>> {{attachment:anat_overlay.gif||width="591",height="277"}} * Generate default cortex and head surfaces for this subject: * Right-click on the pre-implantation MRI > '''SPM canonical surfaces'''. * Leave the default option selected (20484). This represents the resolution of SPM template surface used in this process. The higher the better, but it will slow down significantly the computation of the epileptogenicity maps. * These surfaces will be used later, in the computation of the epileptogenicity maps. Read the advanced sections of this page for information on [[http://neuroimage.usc.edu/brainstorm/Tutorials/Epileptogenicity#Importing_realistic_surfaces|how to use realistic surfaces]] from BrainVISA or FreeSurfer.<<BR>><<BR>>{{attachment:anat_canonical.gif}} |
* Do you want to apply the transformation to the MRI file? '''YES''' * The MRI viewer opens automatically. Click on "[[http://neuroimage.usc.edu/brainstorm/Tutorials/ImportAnatomy#MNI_transformation|Click here to compute MNI transformation]]". It computes an affine transformation between the subject space and the MNI ICBM152 space, and sets default positions for all the anatomical landmarks.<<BR>> {{attachment:mni_transformation.gif}} * Click on [Save] to close the MRI viewer. === Post-implantation MRI === * The pre-implantation MRI will be used as the anatomical reference for this subject. We will now import a second scan done after the SEEG implantation, on which we can see the SEEG electrodes and contacts. In this dataset, the post-implantation volume is another T1 MRI scan (contacts hyposignal appear in black), but it is more commonly a CT scan (contacts hypersignal appear in white). * Right-click on the subject node > '''Import MRI''':<<BR>>Select the file: '''tutorial_epimap/anat/MRI/3DT1post_deface.nii''' * Do you want to apply the transformation to the MRI file? '''YES'''<<BR>>This will reorient the MRI in Brainstorm's standard orientation, so you can see the coronal/sagittal/axial views correctly oriented. * How to register the new volume? '''IGNORE'''<<BR>>The two volumes have already been coregistered with SPM. See the section [[http://neuroimage.usc.edu/brainstorm/Tutorials/Epileptogenicity#Volume_coregistration|Volume coregistration]] for more details on this option. * Reslice the volume? '''YES'''<<BR>>This will rewrite the volume with the orientation and resolution of the pre-implantation MRI, so that the two volumes can be overlaid in the MRI viewer. You may answer no to this question when the resolution of the pre-implantation MRI is very low and/or when you want to edit the positions of the fiducials in the original post-implantation volume (CT or MRI). * The MRI viewer opens automatically, showing the post-implantation volume as an colored layer on top of the previous volume. Adjust the transparency and amplitude threshold of this layer in the section Data options in the Surface tab, adjust its colormap with the popup menu of the figure. Use this display to validate that the coregistration of the two volume is correct, all the parts of the head must align well. <<BR>><<BR>> {{attachment:anat_overlay.gif||width="591",height="277"}} === Generate default surfaces === * Right-click on the pre-implantation MRI > '''SPM canonical surfaces'''. * Leave the default option selected (20484). This represents the resolution of SPM template surface used in this process. The higher the better, but it will slow down significantly the computation of the epileptogenicity maps. * These surfaces will be used later, in the computation of the epileptogenicity maps. Read the advanced sections of this page for information on [[http://neuroimage.usc.edu/brainstorm/Tutorials/Epileptogenicity#Importing_realistic_surfaces|how to use realistic surfaces]] from BrainVISA or FreeSurfer.<<BR>><<BR>> {{attachment:anat_canonical.gif||width="598",height="161"}} |
| Line 58: | Line 61: |
| === Link the recordings === * Switch to the "functional data" view (2nd button, on top of the database explorer). * Right-click on the subject folder > '''Review raw file''': * Select the file format: "'''SEEG: Deltamed/Micromed/...'''" * Select all the SEEG recordings: '''tutorial_epimap/seeg/*.TRC''' * The new files "Link to raw file" let you access directly the contents of the original SEEG files. The menu "Review raw file" does not actually copy any data to the database. [[http://neuroimage.usc.edu/brainstorm/Tutorials/ChannelFile#Review_vs_Import|More information]]. <<BR>><<BR>> {{attachment:import_link.gif||width="634",height="202"}} === Import the contacts positions === * The channel files "Micromed channels" contain the name of the channels, but not their positions. We need to import or edit separately the positions of the SEEG contacts.<<BR>> * Click on the [+] next to the three SZ folders, select all the channel files simultaneously. * Right-click one channel file > '''Add EEG positions''' > '''Import from file''': * Select the file format: "'''EEG: ASCII: Name, XYZ (*.*)'''" * Select the file: '''tutorial_epimap/anat/implantation/elec_pos_patient.txt '''<<BR>><<BR>> {{attachment:import_pos_file.gif||width="585",height="178"}} * Select a scaling factor: '''0.1''' (keep the default selection)<<BR>>The positions in this text file are in millimeters, while the expected unit for "EEG: ASCII" is the centimeter. This option means that the values will be interpreted as 0.1*cm, ie. millimeters. <<BR>><<BR>> {{attachment:import_pos_factor.gif||width="407",height="111"}} * Apply MRI transformation? '''YES'''<<BR>>This will interpret the coordinates in the text file as positions in the referential defined by the voxel-to-world transformation (vox2ras) transformation available in the MRI, if available (in NIfTI format, this corresponds to matrices qform or sform). If you answer no here, it would load the positions as [[CoordinateSystems|Brainstorm SCS coordinates]] and try to realign them based on the NAS/LPA/RPA landmarks. <<BR>><<BR>> {{attachment:import_pos_transf.gif||width="345",height="98"}} * At the end you get a report indicating how many channels from the SEEG recordings were attributed a new 3D position. The channels are matched by name: the position file you import must include the labels of the electrodes and they must be named exactly in the the same way as in your recordings. * The type of the channels for which a position was not found is set to '''EEG_NO_LOC''', so they are ignored when you process the SEEG channels. In this example dataset, the channels that are not found are "fz" and "cz", which are indeed not SEEG contacts. * You should always validate that the type of all the channels has been detected correctly. Right-click on a channel file > '''Edit channel file'''.<<BR>><<BR>> {{attachment:import_pos_edit.gif||width="595",height="120"}} * '''MNI coordinates''': Note that you can also import contact positions in MNI coordinates. In this example dataset includes the positions, they are available in the file "elec_pos_patient.txt". To import this file correctly, make sure you select a file format that explicitely mentions MNI coordinates. In this example, it would be: "EEG: ASCII: Name, XYZ'''_MNI''' (*.*)". * If you don't have the positions for the SEEG contacts, or if they don't look correctly aligned, you can directly place them in the MRI viewer. See the section [[http://neuroimage.usc.edu/brainstorm/Tutorials/Epileptogenicity#Editing_the_contacts_positions|Editing the contacts positions]]. == Display the depth electrodes == === 3D figures === * Right-click on the channel file > '''Display sensors''' > Explore all the options available. {{attachment:display_menu.gif}} * You can render the SEEG depth electrodes in 3D together with the subject surfaces, pre- or post-implantation volumes. You can add more anatomy elements to the figure with the button "Add a surface" at the top-right of the Surface tab. For more help: [[http://neuroimage.usc.edu/brainstorm/Tutorials/ExploreAnatomy#MRI_in_3D|Display the anatomy]]. <<BR>><<BR>> {{attachment:display_3d.gif||width="507",height="273"}} * Click on contact to select it, right-click on the figure to get its name: {{attachment:display_selectchan.gif||width="408",height="247"}} === Panel iEEG === * When opening SEEG/ECOG recordings, the panel iEEG is added to the Brainstorm window. You can use it to edit the display properties of the depth electrodes. In this interface, "'''electrode'''" refers to entire depth electrode implanted in the head of the patient while "'''contact'''" refers to recordings sites on the electrode. There are multiple contacts on an electrode, and one contact corresponds to one channel of data in the channel file and the recordings. <<BR>><<BR>> {{attachment:panel_ieeg.gif||width="611",height="319"}} * SEEG depth electrodes are graphical objects, they are defined independently from the SEEG contacts available in the channel file and recordings. A contact/channel is associated to a depth electrode using the '''Group''' property of the channel, accessible with a right-click on the channel file > '''Edit channel file'''. * In this example, the depth electrodes available in the panel iEEG have been detected automatically based on the names and positions of the data channels. In the convention used here, the contact names must start with one or more letters (the name of the electrode) followed by a number representing the index of the contact on the electrode. Contact #1 is at the tip of the electrode, and is therefore the deeper contact of the electrode. If the convention used in your recordings is different, you may have to edit the electrodes properties in order to get them displayed correctly. * Buttons in the toolbar: * '''Add an electrode''': Adds an entry for a new depth electrode. The new electrode will not be displayed until you set its properties and position. This will not add or remove SEEG contacts or channels of data. * '''Remove selected electrodes''': Deletes a depth electrode from the list, but does not modify the list of SEEG contacts or channels of data. * '''Set color for selected electrodes''': Self explanatory. * '''Show/hide selected electrodes''': To hide an electrode in the 3D figures and MRI viewers, select it in the list then click on this button. Select all the electrodes with the standard shortcut Ctrl+A. * '''Display contacts as''': Depth electrodes / Spheres. * '''Contacts > Set default positions''': For each of the selected electrodes, the current positions of the SEEG contacts are discarded and replaced with the default positions of the contacts on the electrode. The properties used for setting the position of the contacts are the contact spacing, the tip of the electrode and the entry point in the skull. Contact #i is placed along the electrode at (i-1)*contact_spacing millimeters for the tip of the electrode. * '''Contacts > Project on electrode''': For each of the selected electrodes, the contacts are projected orthogonally on the electrode. This menu can be useful for aligning contacts that were marked one by one. * '''Contacts > Save modifications''': Save the current modifications to the channel file. Otherwise, the modifications are saved only when you close the figure (dialog box "Save modifications to channel file?") * '''Contacts > Export contacts positions''': Save the 3D positions of the SEEG contacts in the current channel file in one of the file formats supported by Brainstorm. === MRI Viewer === == Display the SEEG recordings == |
|
| Line 64: | Line 111: |
| == Guidelines panel == Easy way for reproducing all these steps == On the hard drive == IntraElectrodes structure |
|
| Line 65: | Line 118: |
| == Editing the contacts positions == == Creating a new implantation file == Same as previous section, but not starting from an existing of contacts. |
SEEG epileptogencity maps
[TUTORIAL UNDER DEVELOPMENT: NOT READY FOR PUBLIC USE]
Authors: Francois Tadel, Olivier David.
This tutorial introduces some concepts that are specific to the management of SEEG recordings in the Brainstorm environment, and explains how to compute maps of epileptogenicity from ictal recordings. It is based on a clinical case from the Grenoble University Hospital, France.
Note that the operations used here are not detailed, the goal of this tutorial is not to introduce Brainstorm to new users. For in-depth explanations of the interface and theoretical foundations, please refer to the introduction tutorials.
Contents
Dataset description
License
This tutorial dataset (EEG and MRI data) remains property of the Grenoble University Hospital, France. Its use and transfer outside the ImaGIN and Brainstorm tutorials, e.g. for research purposes, is prohibited without written consent. For questions, please contact Olivier David, PhD ( olivier.david@inserm.fr ).
Clinical description
This dataset includes recordings for a patient that was not reported in the above article, but are part of the same study. The patient presents a focal epilepsy of the left temporo-occipital junction, MRI-negative, and was implanted in the surrounding areas. The subfolder "seeg" contains the recordings of three seizures, all of them showing a propagation of high-frequency oscillations from the lesion towards the temporal lobe, bilaterally.
SEEG recordings
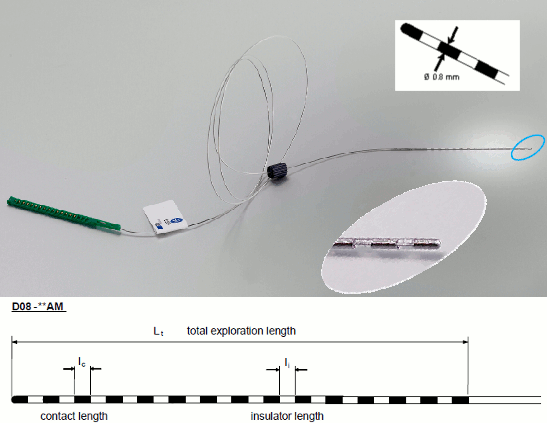
The depth electrodes used in this example dataset are DIXI D08-**AM Microdeep electrodes, with the following specifications:
- Diameter: 0.8 mm
- Contact length: 2 mm
- Insulator length: 1.5 mm
- Distance between the center of two contacts: 3.5 mm
- Between 8 and 18 contacts on each electrode
Files
The dataset we distribute with this tutorial follows the Brain Imaging Data Structure (BIDS) standard for neuroimaging data organization. This specification was first established for MRI and fMRI (Gorgolewski, 2016) and then refined with an extension dedicated to iEEG (Holdgraf, 2019). The files that will be imported in this tutorial are the following:
tutorial_epimap_bids/
derivatives/: Everything that cannot be considered as raw data
brainvisa/sub-01_ses-pre/: Result of the BrainVISA 4.5 segmentation for the pre-implantation T1 MRI.
sub-01/: Raw data for subject 01
ses-preimp/: Imaging exams performed before the implantation of the sEEG.
anat/sub-01_ses-preimp_T1w.nii.gz: T1-weighted MRI pre-implantation
ses-postimp/: Exams performed with the sEEG devices implanted.
anat/sub-01_ses-postimp_T1w.nii.gz: T1-weighted MRI post-implantation
ieeg/..._task-seizure_run-0*_ieeg.eeg: Three seizure recordings in BrainVision file format, one seizure per file (with the header files .vhdr and .vmrk)
ieeg/..._space-IXI549Space_electrodes.tsv: Position of the contacts in MNI space (SPM12 Segment non-linear normalization)
ieeg/..._space-ScanRAS_electrodes.tsv: Position of the contacts in world coordinates, relative to the post-implantation T1 MRI.
All the anatomical images have been de-identified with mri_deface from FreeSurfer 6.
References
The acquisition methodology is described in the following articles:
David O, Blauwblomme T, Job AS, Chabardès S, Hoffmann D, Minotti L, Kahane P, Imaging the seizure onset zone with stereo-electroencephalography, Brain. 2011 Oct;134(10):2898-911
Lamarche F, Job AS, Deman P, Bhattacharjee M, Hoffmann D, Gallazzini-Crépin C, Bouvard S, Minotti L, Kahane P, David O, Correlation of FDG-PET hypometabolism and SEEG epileptogenicity mapping in patients with drug-resistant focal epilepsy, Epilepsia. 2016 Dec; 57(12):2045–2055
Download and installation
How to get the example dataset:
Requirements: You have already followed all the introduction tutorials and you have a working copy of Brainstorm installed on your computer.
Go to the Download page of this website, and download the file: tutorial_epimap.zip
- Unzip it in a folder that is not in any of the Brainstorm folders (program folder or database folder)
Files included in this package:
- anat/MRI/3DT1pre_deface.nii: Subject MRI before SEEG implantation
- anat/MRI/3DT1post_deface.nii: Subject MRI after SEEG implantation
- anat/MRI/brainvisa: Cortical surface extracted with BrainVISA 4.5
- anat/implantation/*: Positions of the SEEG contacts in various formats (MNI or subject space)
- seeg/SZ*.TRC: Seizure recordings in Micromed format, one seizure per file
MRI scans were de-identified with FreeSurfer's mri_deface.
Import the anatomy
Create new subject
- Start Brainstorm (Matlab scripts or stand-alone version).
Select the menu File > Create new protocol. Name it "TutorialEpimap" and select the options:
"No, use individual anatomy",
"No, use one channel file per acquisition run".
Right-click on the TutorialEpimap folder > New subject > Subject01
- Keep the default options you defined for the protocol.
Pre-implantation MRI
- Switch to the "anatomy" view of the protocol.
Right-click on the subject node > Import MRI:
Set the file format: "All MRI file (subject space)"
Select the file: tutorial_epimap/anat/MRI/3DT1pre_deface.niiDo you want to apply the transformation to the MRI file? YES
The MRI viewer opens automatically. Click on "Click here to compute MNI transformation". It computes an affine transformation between the subject space and the MNI ICBM152 space, and sets default positions for all the anatomical landmarks.

- Click on [Save] to close the MRI viewer.
Post-implantation MRI
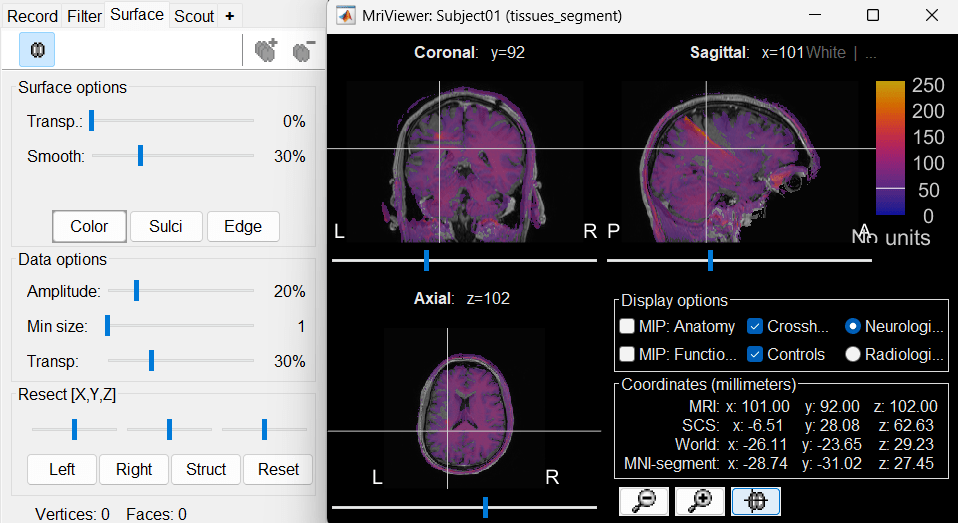
- The pre-implantation MRI will be used as the anatomical reference for this subject. We will now import a second scan done after the SEEG implantation, on which we can see the SEEG electrodes and contacts. In this dataset, the post-implantation volume is another T1 MRI scan (contacts hyposignal appear in black), but it is more commonly a CT scan (contacts hypersignal appear in white).
Right-click on the subject node > Import MRI:
Select the file: tutorial_epimap/anat/MRI/3DT1post_deface.niiDo you want to apply the transformation to the MRI file? YES
This will reorient the MRI in Brainstorm's standard orientation, so you can see the coronal/sagittal/axial views correctly oriented.How to register the new volume? IGNORE
The two volumes have already been coregistered with SPM. See the section Volume coregistration for more details on this option.Reslice the volume? YES
This will rewrite the volume with the orientation and resolution of the pre-implantation MRI, so that the two volumes can be overlaid in the MRI viewer. You may answer no to this question when the resolution of the pre-implantation MRI is very low and/or when you want to edit the positions of the fiducials in the original post-implantation volume (CT or MRI).The MRI viewer opens automatically, showing the post-implantation volume as an colored layer on top of the previous volume. Adjust the transparency and amplitude threshold of this layer in the section Data options in the Surface tab, adjust its colormap with the popup menu of the figure. Use this display to validate that the coregistration of the two volume is correct, all the parts of the head must align well.
Generate default surfaces
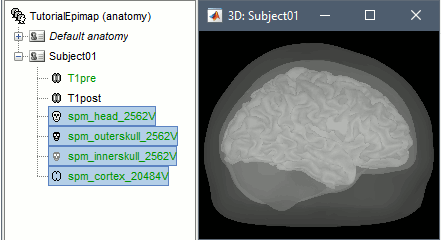
Right-click on the pre-implantation MRI > SPM canonical surfaces.
- Leave the default option selected (20484). This represents the resolution of SPM template surface used in this process. The higher the better, but it will slow down significantly the computation of the epileptogenicity maps.
These surfaces will be used later, in the computation of the epileptogenicity maps. Read the advanced sections of this page for information on how to use realistic surfaces from BrainVISA or FreeSurfer.
Access the recordings
Link the recordings
- Switch to the "functional data" view (2nd button, on top of the database explorer).
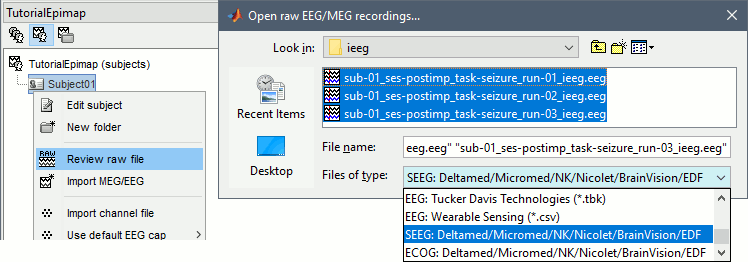
Right-click on the subject folder > Review raw file:
Select the file format: "SEEG: Deltamed/Micromed/..."
Select all the SEEG recordings: tutorial_epimap/seeg/*.TRC
The new files "Link to raw file" let you access directly the contents of the original SEEG files. The menu "Review raw file" does not actually copy any data to the database. More information.
Import the contacts positions
The channel files "Micromed channels" contain the name of the channels, but not their positions. We need to import or edit separately the positions of the SEEG contacts.
- Click on the [+] next to the three SZ folders, select all the channel files simultaneously.
Right-click one channel file > Add EEG positions > Import from file:
Select the file format: "EEG: ASCII: Name, XYZ (*.*)"
Select the file: tutorial_epimap/anat/implantation/elec_pos_patient.txt

Select a scaling factor: 0.1 (keep the default selection)
The positions in this text file are in millimeters, while the expected unit for "EEG: ASCII" is the centimeter. This option means that the values will be interpreted as 0.1*cm, ie. millimeters.

Apply MRI transformation? YES
This will interpret the coordinates in the text file as positions in the referential defined by the voxel-to-world transformation (vox2ras) transformation available in the MRI, if available (in NIfTI format, this corresponds to matrices qform or sform). If you answer no here, it would load the positions as Brainstorm SCS coordinates and try to realign them based on the NAS/LPA/RPA landmarks.

- At the end you get a report indicating how many channels from the SEEG recordings were attributed a new 3D position. The channels are matched by name: the position file you import must include the labels of the electrodes and they must be named exactly in the the same way as in your recordings.
The type of the channels for which a position was not found is set to EEG_NO_LOC, so they are ignored when you process the SEEG channels. In this example dataset, the channels that are not found are "fz" and "cz", which are indeed not SEEG contacts.
You should always validate that the type of all the channels has been detected correctly. Right-click on a channel file > Edit channel file.

MNI coordinates: Note that you can also import contact positions in MNI coordinates. In this example dataset includes the positions, they are available in the file "elec_pos_patient.txt". To import this file correctly, make sure you select a file format that explicitely mentions MNI coordinates. In this example, it would be: "EEG: ASCII: Name, XYZ_MNI (*.*)".
If you don't have the positions for the SEEG contacts, or if they don't look correctly aligned, you can directly place them in the MRI viewer. See the section Editing the contacts positions.
Display the depth electrodes
3D figures
Right-click on the channel file > Display sensors > Explore all the options available.
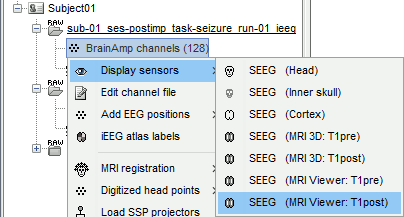
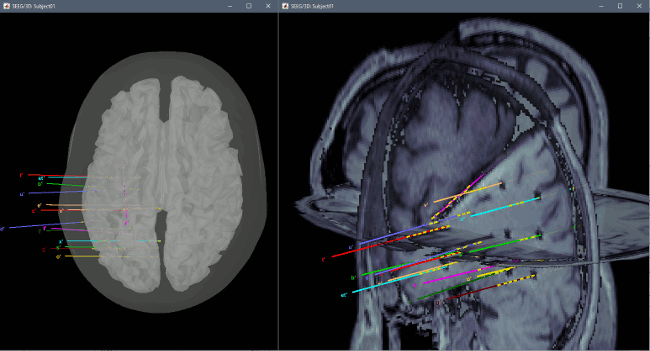
You can render the SEEG depth electrodes in 3D together with the subject surfaces, pre- or post-implantation volumes. You can add more anatomy elements to the figure with the button "Add a surface" at the top-right of the Surface tab. For more help: Display the anatomy.
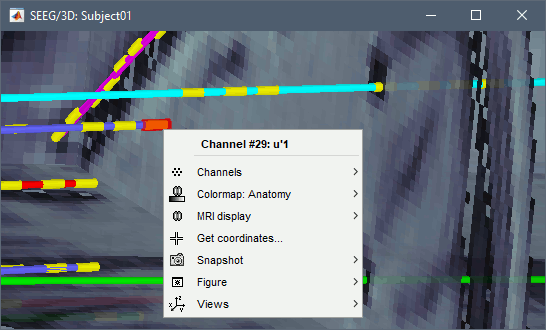
Click on contact to select it, right-click on the figure to get its name:
Panel iEEG
When opening SEEG/ECOG recordings, the panel iEEG is added to the Brainstorm window. You can use it to edit the display properties of the depth electrodes. In this interface, "electrode" refers to entire depth electrode implanted in the head of the patient while "contact" refers to recordings sites on the electrode. There are multiple contacts on an electrode, and one contact corresponds to one channel of data in the channel file and the recordings.
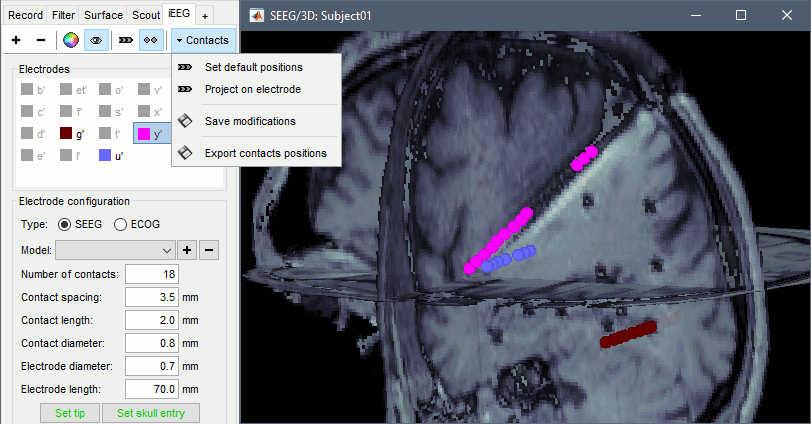
SEEG depth electrodes are graphical objects, they are defined independently from the SEEG contacts available in the channel file and recordings. A contact/channel is associated to a depth electrode using the Group property of the channel, accessible with a right-click on the channel file > Edit channel file.
- In this example, the depth electrodes available in the panel iEEG have been detected automatically based on the names and positions of the data channels. In the convention used here, the contact names must start with one or more letters (the name of the electrode) followed by a number representing the index of the contact on the electrode. Contact #1 is at the tip of the electrode, and is therefore the deeper contact of the electrode. If the convention used in your recordings is different, you may have to edit the electrodes properties in order to get them displayed correctly.
- Buttons in the toolbar:
Add an electrode: Adds an entry for a new depth electrode. The new electrode will not be displayed until you set its properties and position. This will not add or remove SEEG contacts or channels of data.
Remove selected electrodes: Deletes a depth electrode from the list, but does not modify the list of SEEG contacts or channels of data.
Set color for selected electrodes: Self explanatory.
Show/hide selected electrodes: To hide an electrode in the 3D figures and MRI viewers, select it in the list then click on this button. Select all the electrodes with the standard shortcut Ctrl+A.
Display contacts as: Depth electrodes / Spheres.
Contacts > Set default positions: For each of the selected electrodes, the current positions of the SEEG contacts are discarded and replaced with the default positions of the contacts on the electrode. The properties used for setting the position of the contacts are the contact spacing, the tip of the electrode and the entry point in the skull. Contact #i is placed along the electrode at (i-1)*contact_spacing millimeters for the tip of the electrode.
Contacts > Project on electrode: For each of the selected electrodes, the contacts are projected orthogonally on the electrode. This menu can be useful for aligning contacts that were marked one by one.
Contacts > Save modifications: Save the current modifications to the channel file. Otherwise, the modifications are saved only when you close the figure (dialog box "Save modifications to channel file?")
Contacts > Export contacts positions: Save the 3D positions of the SEEG contacts in the current channel file in one of the file formats supported by Brainstorm.
MRI Viewer
Display the SEEG recordings
.
.
.
Guidelines panel
Easy way for reproducing all these steps
On the hard drive
IntraElectrodes structure
Volume coregistration
Editing the contacts positions
Creating a new implantation file
Same as previous section, but not starting from an existing of contacts.

