|
Size: 35
Comment:
|
Size: 3484
Comment:
|
| Deletions are marked like this. | Additions are marked like this. |
| Line 1: | Line 1: |
| Describe Tutorials/NIRSTORM here. | = NIRSTORM: a Brainstorm plugin specialized in the analysis of fNIRS data = {{attachment:logo_nirstorm.png||width="40%"}} Author: Édouard Delaire, Lea Larreur, Dr. Zhengchen Cai, Dr. Christophe Grova This tutorial aims to introduce NIRSTORM. NISTORM is a plug-in dedicated to the analysis of functional near-infrared spectroscopy (fNIRS) data inside Brainstorm. This tutorial will cover three main aspects of NIRSTORM: 1. Data importation and preprocessing 1. Data analysis at the channel level 1. Data analysis on the cortical surface. This tutorial assumes that you are already familiar with the Brainstorm environment. If you are not, we encourage you to follow the tutorial 1 to 23. <<TableOfContents(3,2)>> == Introduction == === Presentation of the experiment === The data presented in this tutorial correspond to a finger tapping task perform by one subject using their left, non-dominant hand. NIRS montage was done to target the subject right-motor cortex. Data description: • One subject, one run of 19 minutes acquired with a sampling rate of 10Hz on a CW fNIRS Brainsight device (Rogue-Research Inc., Montreal, Canada) • Finger tapping task: 20 blocks of 10 seconds each, with a rest period of 30 to 60 seconds. • 3 sources, 15 detectors, and 1 proximity detector. • 2 wavelengths: 685nm and 830nm • 3T MRI anatomy processed by FreeSurfer 5.3.0. Download nirstorm_tutorial_2024.zip from https://osf.io/md54y/?view_only=0d8ad17d1e1449b5ad36864eeb3424ed === Setup === You can install NIRSTORM manually from Brainstorm directly. For that, go to Plug-ins > fNIRS > nirstorm. {{attachment:figure1_nirstorm_install.png||width="100%"}} == Data Importation == * Start Brainstorm (Matlab scripts or stand-alone version) * Select the menu File > Create new protocol. Name it "'''TutorialNIRS'''" and select the options: * "'''No, use individual anatomy'''", * "'''No, use one channel file per acquisition run (MEG/EEG)'''". <<BR>>In term of sensor configuration, NIRS is similar to EEG and the placement of optodes may change between subjects. Also, the channel definition will change during data processing, that's why you should always use one channel file per acquisition run, even if the optode placement does not change. === Import the anatomy === * Switch to the "anatomy" view of the protocol. * Right-click on the TutorialNIRS folder > '''New subject''' > sub-01 * Leave the default options you set for the protocol * Right-click on the subject node > '''Import anatomy folder''': * Set the file format: "Freesurfer + volumes atlases" * Select the folder: ''' nirstorm_tutorial_2024/derivatives/FreeSurfer/sub-01''' * Number of vertices of the cortex surface: 15000 (default value) * Answer "yes" when asked to apply the transformation. * Set the 3 required fiducial points, indicated below in (x,y,z) MRI coordinates. You can right-click on the MRI viewer > Edit fiducial positions > MRI coordinates, and copy-paste the following coordinates in the corresponding fields. Click [Save] when done. * NAS: 131, 213, 117 * LPA: 51, 116, 80 * RPA: 208, 117, 86 * AC: 131, 128, 130 * PC: 129, 103, 124 * IH: 133, 135, 176 For more information about importing subject anatomy, consult: https://neuroimage.usc.edu/brainstorm/Tutorials/ImportAnatomy === Access the recording === === Review of recording === |
NIRSTORM: a Brainstorm plugin specialized in the analysis of fNIRS data

Author: Édouard Delaire, Lea Larreur, Dr. Zhengchen Cai, Dr. Christophe Grova
This tutorial aims to introduce NIRSTORM. NISTORM is a plug-in dedicated to the analysis of functional near-infrared spectroscopy (fNIRS) data inside Brainstorm.
This tutorial will cover three main aspects of NIRSTORM:
- Data importation and preprocessing
- Data analysis at the channel level
- Data analysis on the cortical surface.
This tutorial assumes that you are already familiar with the Brainstorm environment. If you are not, we encourage you to follow the tutorial 1 to 23.
Contents
Introduction
Presentation of the experiment
The data presented in this tutorial correspond to a finger tapping task perform by one subject using their left, non-dominant hand. NIRS montage was done to target the subject right-motor cortex.
Data description:
• One subject, one run of 19 minutes acquired with a sampling rate of 10Hz on a CW fNIRS Brainsight device (Rogue-Research Inc., Montreal, Canada)
• Finger tapping task: 20 blocks of 10 seconds each, with a rest period of 30 to 60 seconds.
• 3 sources, 15 detectors, and 1 proximity detector.
• 2 wavelengths: 685nm and 830nm
• 3T MRI anatomy processed by FreeSurfer 5.3.0.
Download nirstorm_tutorial_2024.zip from https://osf.io/md54y/?view_only=0d8ad17d1e1449b5ad36864eeb3424ed
Setup
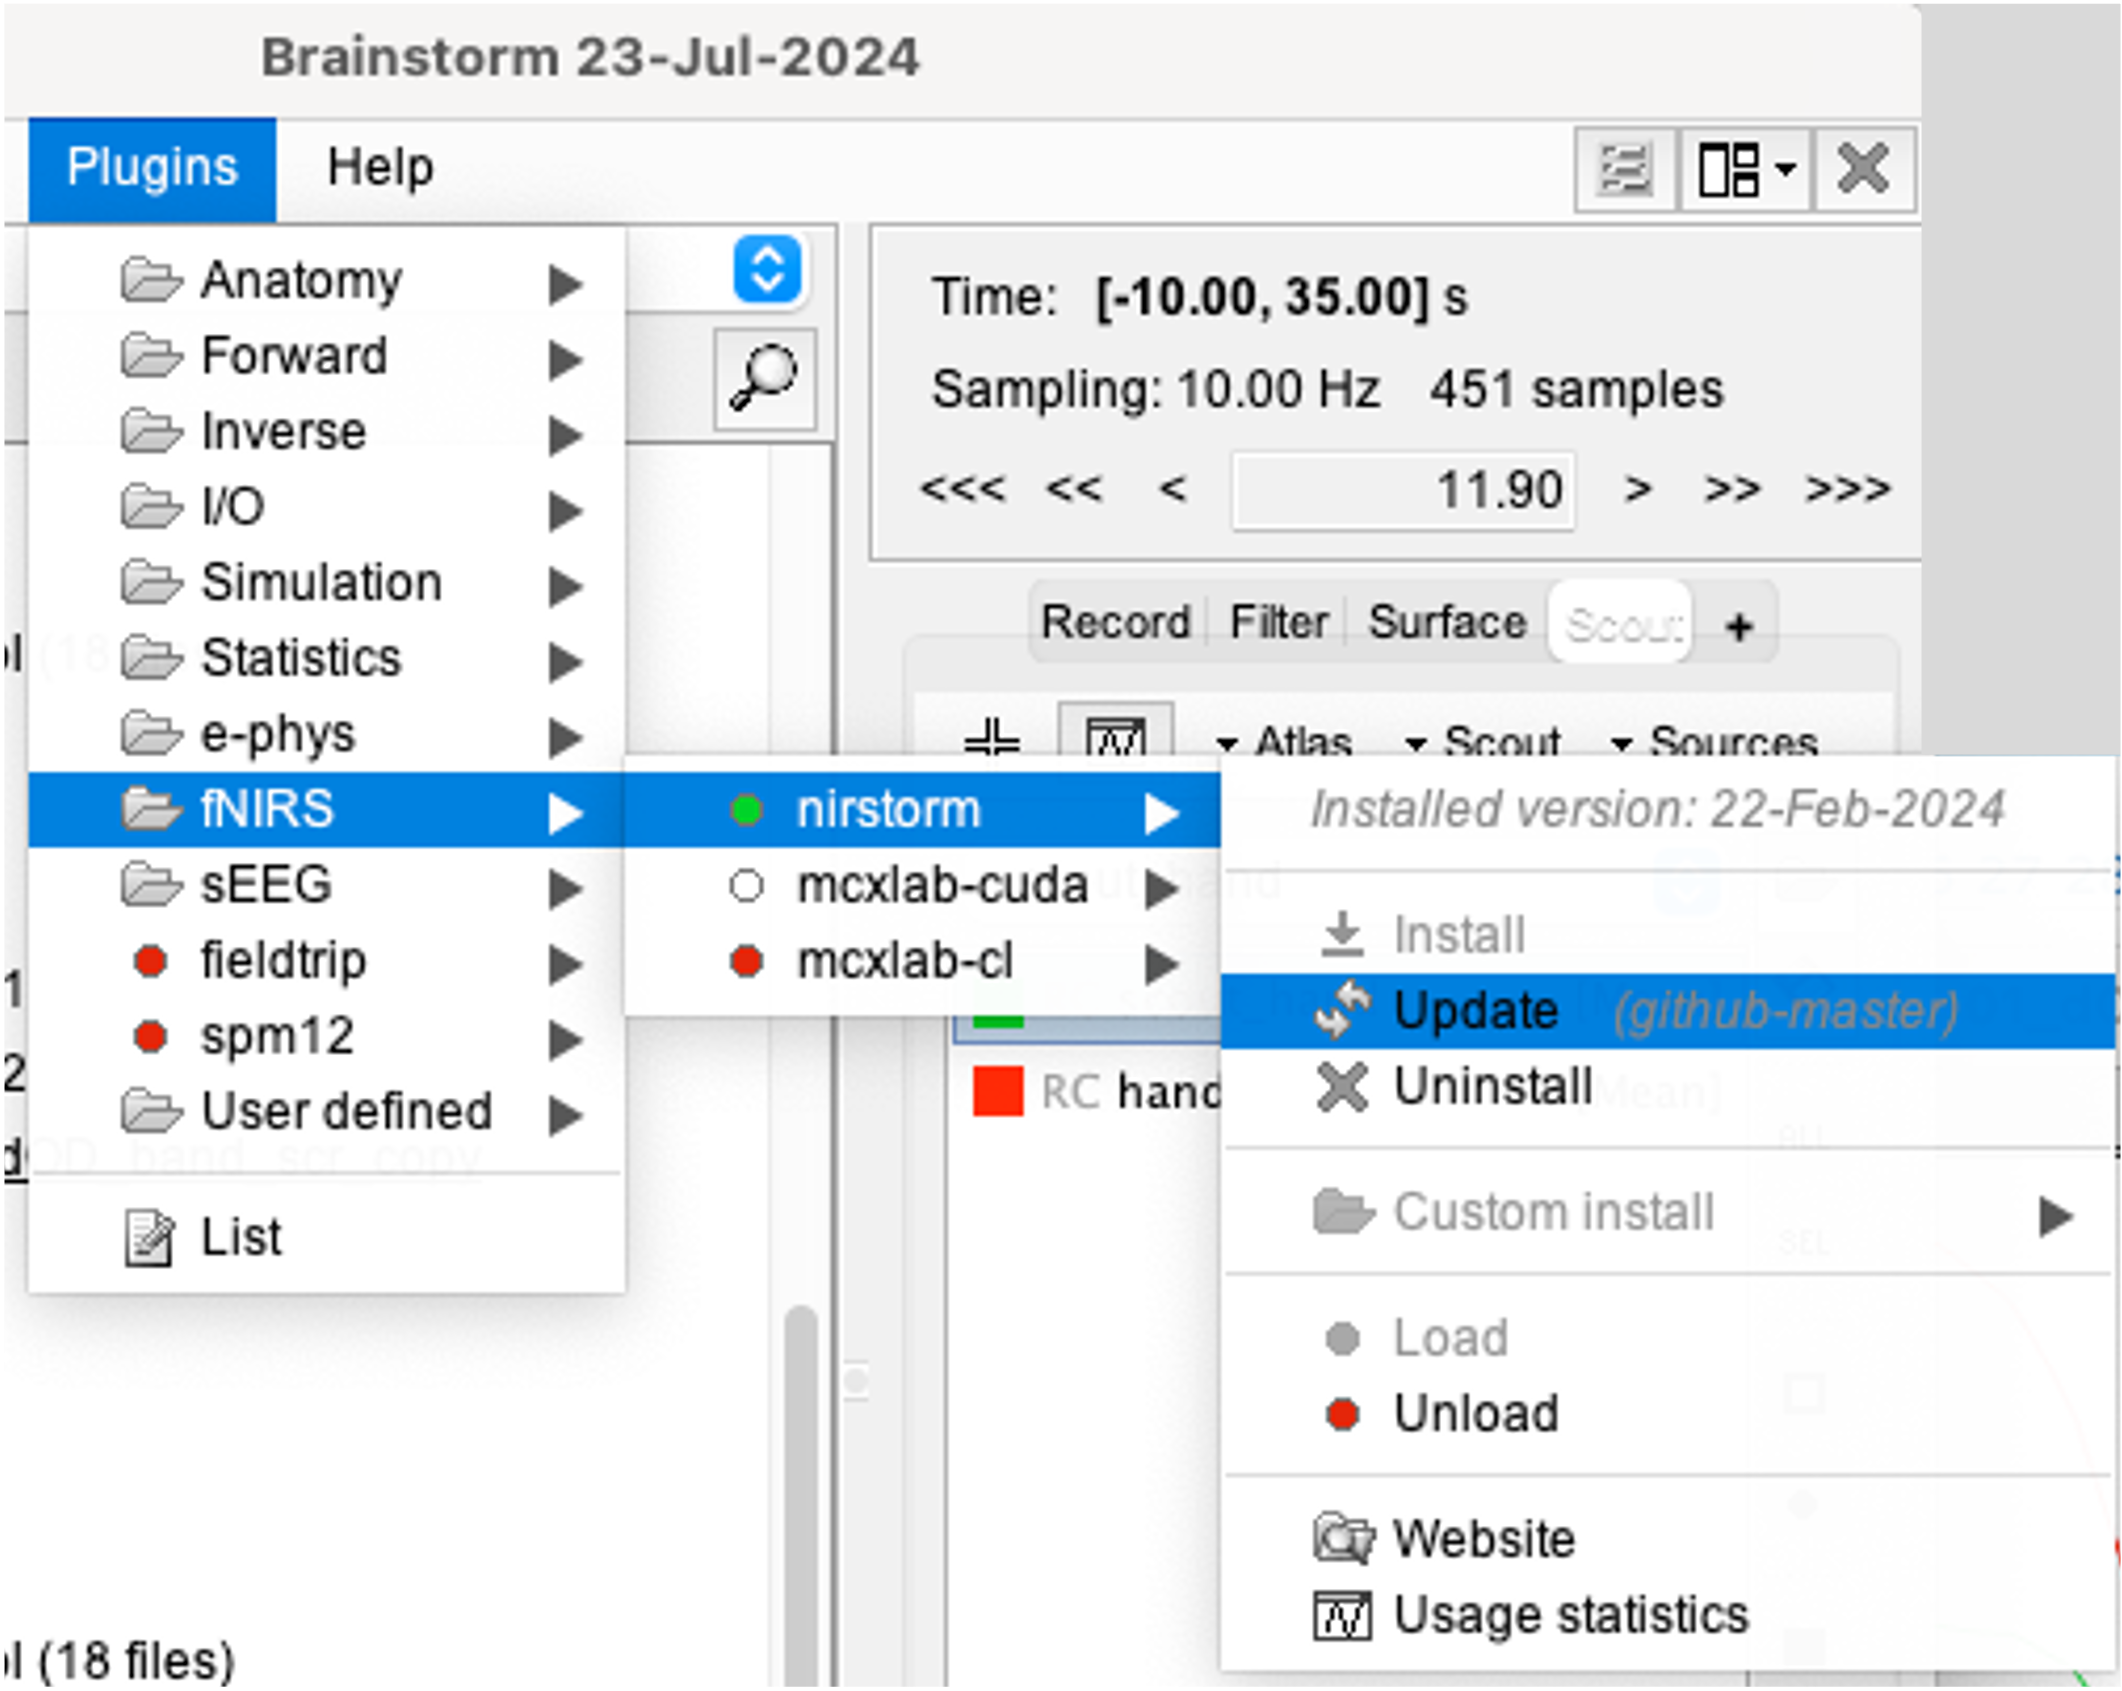
You can install NIRSTORM manually from Brainstorm directly. For that, go to Plug-ins > fNIRS > nirstorm.

Data Importation
- Start Brainstorm (Matlab scripts or stand-alone version)
Select the menu File > Create new protocol. Name it "TutorialNIRS" and select the options:
"No, use individual anatomy",
"No, use one channel file per acquisition run (MEG/EEG)".
In term of sensor configuration, NIRS is similar to EEG and the placement of optodes may change between subjects. Also, the channel definition will change during data processing, that's why you should always use one channel file per acquisition run, even if the optode placement does not change.
Import the anatomy
- Switch to the "anatomy" view of the protocol.
Right-click on the TutorialNIRS folder > New subject > sub-01
- Leave the default options you set for the protocol
Right-click on the subject node > Import anatomy folder:
- Set the file format: "Freesurfer + volumes atlases"
Select the folder: nirstorm_tutorial_2024/derivatives/FreeSurfer/sub-01
- Number of vertices of the cortex surface: 15000 (default value)
- Answer "yes" when asked to apply the transformation.
Set the 3 required fiducial points, indicated below in (x,y,z) MRI coordinates. You can right-click on the MRI viewer > Edit fiducial positions > MRI coordinates, and copy-paste the following coordinates in the corresponding fields. Click [Save] when done.
- NAS: 131, 213, 117
- LPA: 51, 116, 80
- RPA: 208, 117, 86
- AC: 131, 128, 130
- PC: 129, 103, 124
- IH: 133, 135, 176
For more information about importing subject anatomy, consult: https://neuroimage.usc.edu/brainstorm/Tutorials/ImportAnatomy
Access the recording
