MRI segmentation with CIVET
Authors: Francois Tadel
The CIVET pipeline can be used to extract the cortical envelope from a T1 MRI. The process is fully automatic and the results can be imported in Brainstorm with just a few mouse clicks. For more information, visit the CIVET website.
Contents
Running CIVET
CIVET is currently not available for download. It is available via the CBRAIN interface, linking high-performance computing (HPC) facilities across Canada and across the world. CBRAIN provides a web-based interface for configuring and running CIVET on large datasets. Subscription to external users is made possible via collaborative projects.
For detailed instructions on how to run CIVET: visit the CIVET website.
Importing the results in Brainstorm
- Switch to the anatomy side of the database explorer
- Create a new subject, set the default anatomy option to "No, use individual anatomy"
Right-click on the subject > Import anatomy folder...
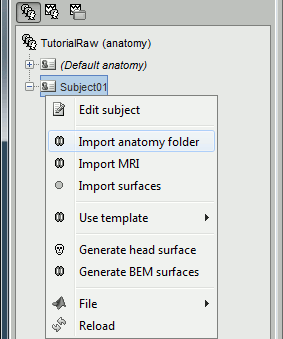
Select the file format "CIVET folder" and select the top folder of your subject segmentation.
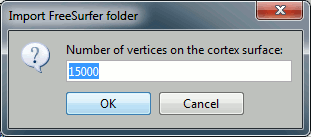
To import the cortical thickness maps at the same time, you can select the format "CIVET folder + Thickness maps" instead.Then you're prompted for the number of vertices you want in the final cortex surface. This will by extension define the number of dipoles to estimate during the source estimation process. By default we set this value to 15000 for the entire brain (it means 7500 for each hemisphere).
The MRI Viewer appears, and a help window asks you to validate the orientation of the MRI and to define the 6 fiducial points. If something doesn't look right at this step, for instance if the MRI is not presented with a correct orientation, you should stop this automatic import process and follow the manual instructions in the basic tutorial pages.
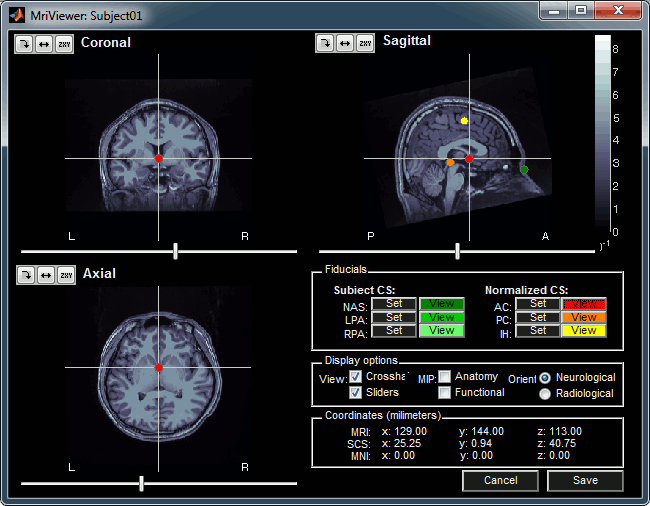
Place the six fiducials. If you need help, refer to this page: CoordinateSystems
- Click on Save to keep your modifications, and the automatic import will go on.
- The files that are imported from the subject_id folder are the following:
/final/*_t1_final.mnc (T1 MRI volume)
/surfaces/*_gray_surface_left_*.obj (gray/csf interface, left hemisphere)
/surfaces/*_gray_surface_right_*.obj (gray/csf interface, right hemisphere)
/surfaces/*_white_surface_left_*.obj (white matter, left hemisphere)
/surfaces/*_white_surface_right_*.obj (white matter, right hemisphere)
/surfaces/*_mid_surface_left_*.obj (mid-surface, left hemisphere)
/surfaces/*_mid_surface_right_*.obj (mid-surface, right hemisphere)
/thickness/*_native_rms_tlink_30mm_*.txt (cortical thickness map, left/right)
- The successive steps that are automatically performed by Brainstorm:
- Import all the surfaces (left/right, white/pial/mid)
- Downsample each hemisphere to the number specified in the options (by default 7500, half of the total default number 15000)
- Merge left and right hemispheres for the two surface types: white matter, mid-surface and cortex envelope
- Delete all the unnecessary surfaces
- Generate a head surface from the MRI
- Read the cortical thickness maps
The files you can see in the database explorer at the end:
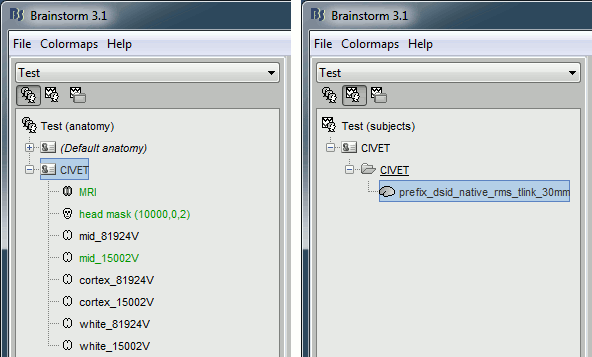
MRI: The T1 MRI of the subject, imported from the MINC file format (.mnc)
head mask (10000,0,2): Scalp surface generated by Brainstorm. The numbers indicate the parameters that were automatically used for this head: vertices=10000, erode factor=0, fill holes=2 (these are detailed later)
mid_80000V: High-resolution mid-surface surface that was generated by CIVET (intermediate between the pial and the white surfaces)
mid_15000V: Low-resolution mid-surface surface, downsampled using the reducepatch function from Matlab (it keeps a meaningful subset of vertices from the original surface). It appears in green in the database explorer, ie. it is going to be used as the default by the processes that require a cortex surface.
cortex_300000V: High-resolution pial surface from CIVET
cortex_15000V: Low-resolution pial surface, processed with reducepatch
white_300000V: High-resolution white matter envelope from CIVET
white_15000V: Low-resolution white matter, processed with reducepatch
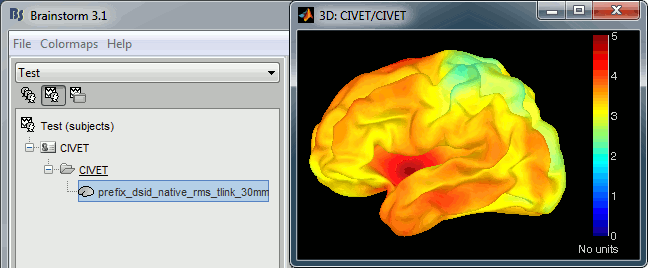
CIVET/native_rms_tlink_30mm: Cortical thickness maps
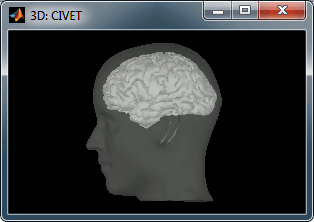
A figure is automatically shown at the end of the process, to check visually that the low-resolution cortex and head surfaces were properly generated and imported. If it doesn't look like the following picture, do not go any further in your source analysis, fix the anatomy first.
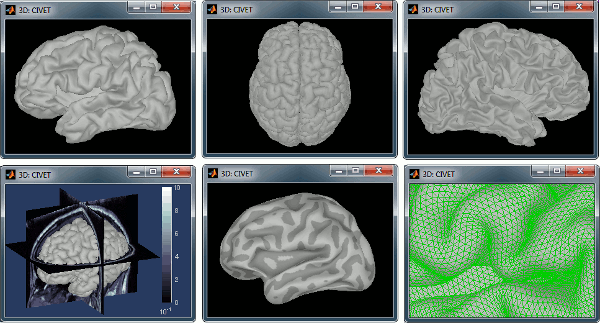
You can review the mid/gray/white surfaces in all sorts of way, as illustrated in ?this tutorial.
Handling errors
How to check the quality of the result
It's hard to estimate what would be a good cortical reconstruction. What you are trying to spot at this level is mostly the obvious errors, like when the early stages of the brain extraction didn't perform well, just with a visual inspection. Play with the Smooth slider in the Surface tab. If it looks like a brain (two separate hemispheres) in both smooth and original views, it is probably ok.
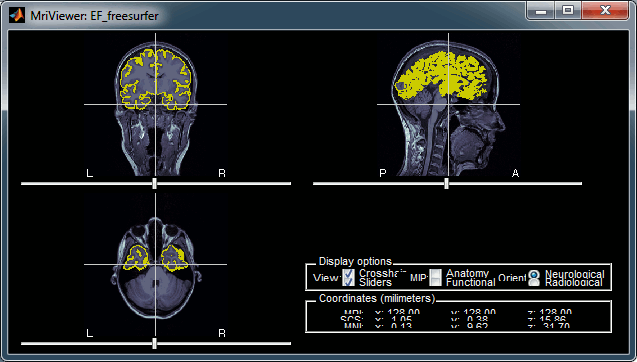
Display the cortex surface on top of the MRI slices, to make sure that they are well aligned, that the surface follows well the folds, and that left and right were not flipped: right-click on the low-resolution cortex > MRI registration > Check MRI/surface registration...
The cortex looks bad
It is critical to get a good cortex surface for source estimation. If the final cortex surface looks bad, it means that something didn't work well somewhere along the pipeline.
No guidelines on how to fix the results yet: contact the developers.
The head surface looks bad
It is not mandatory to have a perfect head surface to use any of the Brainstorm features: you don't necessarily have to recognize the face (for the anonymity of the figures, it can be even better if you don't).
The head surface is important mostly for the alignment of the MEG sensors and the MRI. If you digitized the head shape with a Polhemus device, you can automatically align the head surface (hence the MRI) with the MEG sensors (in the same referential as the Polhemus points). The quality of this automatic registrations depends on the quality of both surfaces: the Polhemus head shape (green points) and the head surface from the MRI (grey surface). If you placed lots of points on the nose but your head surface doesn't have a nose, these points are not going to help. Except for that, a nice head shape is mainly useful for producing nicer figures.
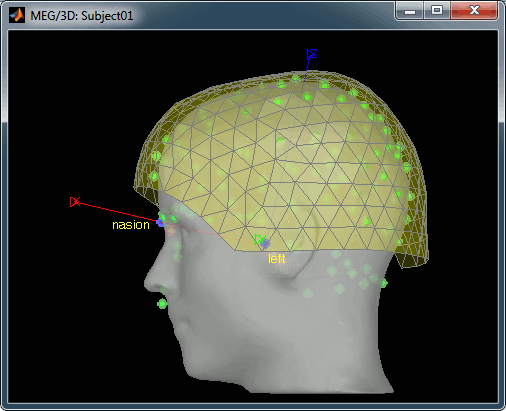
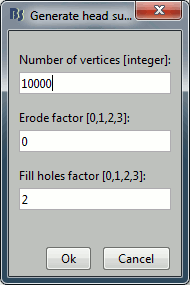
If the default head surface looks bad, you can try generating another one: right-click on the subject folder > Generate head surface. The options are:
Number of vertices: Number of points that are kept from the initial isosurface computed from the MRI. Increasing this number may increase the quality of the final surface.
Erode factor: Number of pixels to erode after the first binary threshold of the MRI. Increasing this number removes small components that are connected to the head.
Fill holes factor: Number of dimensions in which the holes should be identified and closed. Increasing this number removes more of the cavities of the head surface (0=no correction, 1=removes holes inside the surface, 3=closes all the features that make the surface non-convex)
Cortical thickness
The cortical thickness can be saved as a cortical map in the database (a "results" file). This result is generated when using the file format "CIVET folder + Thickness maps" in the Import anatomy folder selection.
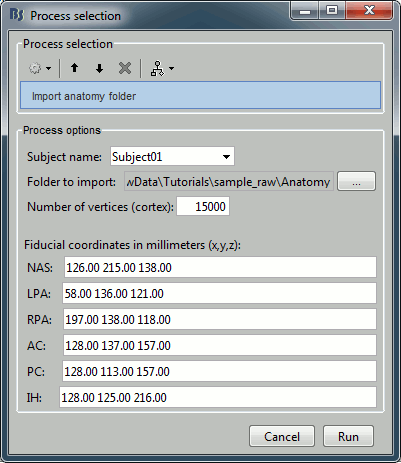
Running the folder import as a process
You can import the CIVET folders from scripts, but you have to provide manually the position for all the fiducial points: process Import > Import anatomy > Import anatomy folder.
The corresponding process function is: brainstorm3/toolbox/process/functions/process_import_anatomy.m
Manual import of the anatomy
In case you need to import the MRI, surfaces and atlases separately instead of using the menu "Import anatomy folder", here is the sequence of operations to perform to get to the same result:
From the Anatomy side of the database explorer: create a subject.
Right-click on the subject folder > Import MRI > Select "/final/prefix_dsid_t1_final.mnc"
- Set the 6 fiducial points, save
Right-click on the subject folder > Import surfaces > Select the MNI OBJ file format > Select simultaneously from the "surfaces" folder: *_gray_surface_left_*, *_white_surface_left_*, *_mid_surface_left_*
Select all the surfaces, right-click > Less vertices > 7500 vertices > Select the first option "Matlab reducepatch"
Select gray_left and gray_right, right-click > Merge surfaces: Generates a surface cortex_80000V
Select mid_left and mid_right, right-click > Merge surfaces: Generates a surface cortex_80000V
Select white_left and white_right, right-click > Merge surfaces: Generates a surface white_80000V
Select gray_left_7500V and gray_right_7500V, right-click > Merge surfaces: Generates a surface cortex_15000V
Select mid_left_7500V and mid_right_7500V, right-click > Merge surfaces: Generates a surface cortex_15000V
Select white_left_7500V and white_right_7500V, right-click > Merge surfaces: Generates a surface white_15000V
- Delete all the separate hemispheres
- Double-click on mid_15000V to set it as the default cortex
- Go to the functional view of the protocol, create a condition "CIVET". Leave your mouse for a second over the new folder, an note the study index (iStudy).
- From the Matlab command window, you can import the thickness maps with the following call:
ThickFile = import_sources(iStudy, CortexHiFile, ThickLhFile, ThickRhFile, 'FS');
CortexHiFile = full path to the high-res mid-surface file (right-click > File > Copy file path to clipboard)
ThickLhFile = full path to the /thickness/*_native_rms_tlink_30mm_left.txt file
ThickRhFile = full path to the /thickness/*_native_rms_tlink_30mm_right.txt file
