|
Size: 4057
Comment:
|
Size: 6249
Comment:
|
| Deletions are marked like this. | Additions are marked like this. |
| Line 7: | Line 7: |
== Cite FastSurfer == If you use FastSurfer for MRI segmentation, please cite the following article in your publications: Henschel L, Conjeti S, Estrada S, Diers K, Fisch B, Reuter M<<BR>>[[https://www.sciencedirect.com/science/article/pii/S1053811920304985?via%3Dihub|FastSurfer - A fast and accurate deep learning based neuroimaging pipeline]]<<BR>>'''NeuroImage''', Oct 2020 |
|
| Line 97: | Line 102: |
| Add the following lines at the end of the file '''$HOME/.bashrc''': {{{ # Add FastSurfer to PATH export PATH="$HOME/FastSurfer:$PATH" }}} |
|
| Line 101: | Line 112: |
| --sid PD --sd /home/ftadel/segmentation/fastsurfer_db --parallel --threads 4 | --sid PD --sd /home/ftadel/segmentation/fastsurfer_db --batch 4 --parallel --threads 4 |
| Line 103: | Line 114: |
| This default configuration would run FastSurfer on the CPU. If you have access to GPU resources and have the CUDA libraries installed on your system, you could make FastSurfer run much faster. See the documentation on the [[https://github.com/deep-mi/FastSurfer#usage|FastSurfer GitHub repository]]. == Run FastSurfer from Brainstorm == * Switch to the anatomy side of the database explorer. * Create a new subject, set the default anatomy option to "No, use individual anatomy". * Import the T1 MRI for this subject. * Set the [[https://neuroimage.usc.edu/brainstorm/Tutorials/ImportAnatomy#Fiducial_points|fiducial points]] manually (NAS/LPA/RPA) or [[https://neuroimage.usc.edu/brainstorm/Tutorials/ImportAnatomy#MNI_normalization|compute the MNI normalization]]. * Right-click on the MRI > '''MRI segmentation > FastSurfer'''. Three options can be selected interactively: the extra [[https://github.com/Deep-MI/FastSurfer#usage|command-line parameters]], the output folder (default: $HOME/.brainstorm/tmp/fastsurfer), and the number of final vertices in the final cortex surface.<<BR>><<BR>>{{attachment:fast_menu.gif}} * Alternatively, use the process: '''Import anatomy > Segment MRI with FastSurfer'''.<<BR>><<BR>>{{attachment:fast_process.gif}} * If you run the segmentation process from Brainstorm, the import will be done automatically. Otherwise, the output of the FastSurfer segmentation is compatible with FreeSurfer and can be imported with the menu Import anatomy folder, as illustrated in the [[https://neuroimage.usc.edu/brainstorm/Tutorials/LabelFreeSurfer#Import_the_results_in_Brainstorm|FreeSurfer tutorial]]. |
MRI segmentation with FastSurfer
Authors: Francois Tadel
The open-source software FastSurfer can be used to extract the cortical envelope from a T1 MRI and register it to an atlas. The process is fully automatic, the results are compatible with FreeSurfer. If you are using FastSurfer, please cite the appropriate references. Note that this software is available only for Linux and MacOS.
Cite FastSurfer
If you use FastSurfer for MRI segmentation, please cite the following article in your publications:
Henschel L, Conjeti S, Estrada S, Diers K, Fisch B, Reuter M
FastSurfer - A fast and accurate deep learning based neuroimaging pipeline
NeuroImage, Oct 2020
Install FastSurfer
The most complicated task will be to install FastSurfer. Unfortunately, Brainstorm cannot do that automatically yet. If you are using Ubuntu 20, you may try the procedure below. Otherwise, refer to the intructions in the FastSurfer GitHub repository.
Install pyenv: Python 3.6
From a terminal, install the required packages:
$ sudo apt-get install -y make build-essential libssl-dev zlib1g-dev \
  libbz2-dev libreadline-dev libsqlite3-dev wget curl llvm libncurses5-dev \
  libncursesw5-dev xz-utils tk-dev libffi-dev liblzma-dev python-openssl
Install pyenv:
$ curl https://pyenv.run | bash
Add the following lines at the end of the file $HOME/.bashrc:
# Load pyenv-virtualenv automatically
export PATH="$HOME/.pyenv/bin:$HOME/.pyenv/shims:$PATH"
eval "$(pyenv init -)"eval "$(pyenv virtualenv-init -)"
Start a new terminal, install Python 3.6 and create a new virtual environment for FastSurfer:
$ pyenv install 3.6.15
$ pyenv global 3.6.15
$ pyenv virtualenv fastsurfer
For complete and updated installation instruction, see the pyenv repository.
Install FreeSurfer 6.0.1
Note that FastSurfer works only with FreeSurfer 6. Newer versions of FreeSurfer are not supported at the moment. If you try using FreeSurfer 7, you would get an error message when running recon-surf.
Install the required packages:
$ apt-get -y install bc binutils libgomp1 perl psmisc sudo tar tcsh unzip \
             uuid-dev vim-common libjpeg62-dev
Download and install FreeSurfer 6.0.1:
$ cd ~/
$ wget https://surfer.nmr.mgh.harvard.edu/pub/dist/freesurfer/6.0.1/freesurfer-Linux-centos6_x86_64-stable-pub-v6.0.1.tar.gz
$ tar xzvf freesurfer-Linux-centos6_x86_64-stable-pub-v6.0.1.tar.gz
$ sudo mkdir /usr/local/freesurfer
$ sudo mv freesurfer /usr/local/freesurfer/6.0.1
Obtain a license.txt file from this page, and copy it to the installation folder:
$ cp license.txt /usr/local/freesurfer/6.0.1/
Add the following lines at the end of the file $HOME/.bashrc:
# FreeSurfer
export FREESURFER_HOME=/usr/local/freesurfer/6.0.1/
source $FREESURFER_HOME/SetUpFreeSurfer.sh
Close the terminal and open a new one, you should see the following message:
-------- freesurfer-Linux-centos6_x86_64-stable-pub-v6.0.1-f53a55a --------
Setting up environment for FreeSurfer/FS-FAST (and FSL)
FREESURFER_HOME   /usr/local/freesurfer/6.0.1
FSFAST_HOME       /usr/local/freesurfer/6.0.1/fsfast
FSF_OUTPUT_FORMAT nii.gz
SUBJECTS_DIR      /usr/local/freesurfer/6.0.1/subjects
MNI_DIR           /usr/local/freesurfer/6.0.1/mni
For complete and updated installation instructions, see the FreeSurfer wiki.
Install FastSurfer
Clone the FastSurfer GitHub repository:
$ cd ~/
$ git clone https://github.com/Deep-MI/FastSurfer.git
Install the required packages:
$ sudo apt install libblas-dev liblapack-dev libatlas-base-dev gfortran
$ cd FastSurfer
$ pip install -r requirements.txt
Add the following lines at the end of the file $HOME/.bashrc:
# Add FastSurfer to PATH
export PATH="$HOME/FastSurfer:$PATH"
Execute FastSurfer manually:
$ ./run_fastsurfer.sh --t1 /home/ftadel/segmentation/freesurfer_db/PD/mri/orig/001.mgz \
  --sid PD --sd /home/ftadel/segmentation/fastsurfer_db --batch 4 --parallel --threads 4
This default configuration would run FastSurfer on the CPU. If you have access to GPU resources and have the CUDA libraries installed on your system, you could make FastSurfer run much faster. See the documentation on the FastSurfer GitHub repository.
Run FastSurfer from Brainstorm
- Switch to the anatomy side of the database explorer.
- Create a new subject, set the default anatomy option to "No, use individual anatomy".
- Import the T1 MRI for this subject.
Set the fiducial points manually (NAS/LPA/RPA) or compute the MNI normalization.
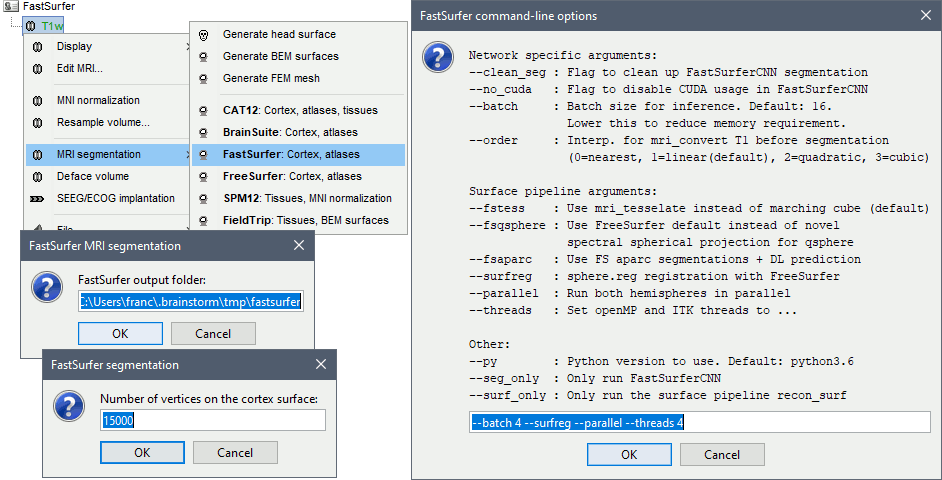
Right-click on the MRI > MRI segmentation > FastSurfer. Three options can be selected interactively: the extra command-line parameters, the output folder (default: $HOME/.brainstorm/tmp/fastsurfer), and the number of final vertices in the final cortex surface.

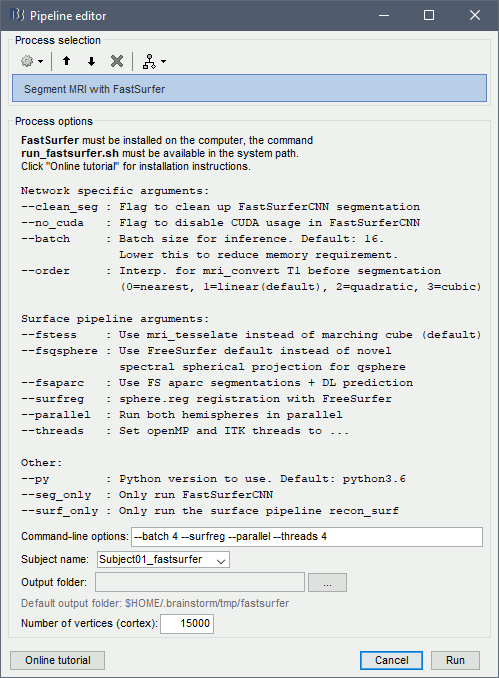
Alternatively, use the process: Import anatomy > Segment MRI with FastSurfer.

If you run the segmentation process from Brainstorm, the import will be done automatically. Otherwise, the output of the FastSurfer segmentation is compatible with FreeSurfer and can be imported with the menu Import anatomy folder, as illustrated in the FreeSurfer tutorial.
