|
Size: 7516
Comment:
|
Size: 16482
Comment:
|
| Deletions are marked like this. | Additions are marked like this. |
| Line 1: | Line 1: |
| ## page was renamed from Tutorials/TutFirstStart = Tutorials: First steps = |
= Tutorial 2: First steps = ''Authors: Francois Tadel, Sylvain Baillet'' |
| Line 5: | Line 6: |
| <<TableOfContents(2)>> == Running Brainstorm for the first time == 1. Start Matlab, go to brainstorm3 directory, and type "brainstorm3" in Matlab command window. 1. With some Matlab installations, you may observe an error message in the command window, about the compilation of the MEX files. Some files from the permutation tests functions need to be compiled on your own operating system, and you may not be able to use some statistical tests if you have such an error. You may ignore this problem, it will be fixed later. 1. The ''Licence Agreement'' will be display. Read the licence file, and click on "Agree" if you agree with it. 1. If you have two screens on your computer, you may have a message asking if you want to use your second screen. You can try to say yes: you will have the Brainstorm window on primary screen and the data figures on the secondary one). If does not work properly, go to the menu Options > GUI, and uncheck the menu "Use two screens when available". 1. Then you will be asked to specify Brainstorm database directory. Read carefully the ''Important notes'' and then create or select an empty directory to store your Brainstorm database (for instance "''brainstorm_database''", or "''brainstorm_protocols''"). 1. After a last message asking you to create or load a protocol, you should see the main Brainstorm window |
<<TableOfContents(2,2)>> == Starting Brainstorm for the first time == 1. Start Matlab, go to brainstorm3 directory, and type "brainstorm" in Matlab command window.<<BR>> {{{ BST> Starting Brainstorm: BST> ================================= BST> Version: 3.1.130731 (31-Jul-2013) BST> Checking internet connectivity... ok BST> Compiling main interface files... BST> Emptying temporary directory... BST> Deleting old process reports... BST> Loading configuration file... BST> Loading default channel selections... BST> Initializing user interface... BST> Starting OpenGL engine... BST> Reading plugins folder... BST> ================================= }}} 1. Read and accept the license file. 1. Specify Brainstorm database directory. Read carefully what is written in the [[Tutorials/BstFolders|previous chapter]]. Safe choices are for example: * '''Windows''': My documents\brainstorm_db * '''Linux''': /home/username/brainstorm_db * '''MacOS''': Documents/brainstorm_db |
| Line 19: | Line 35: |
| 1. Click on the ''Protocol selection'' drop list, and select ''Create new protocol''. 1. Edit the protocol name and enter: "!TutorialFirstSteps". It will automatically update the paths (''Anatomy path'' and ''Datasets path''. 1. Select the "''MNI Colin27''" as the default anatomy. * This anatomy (MRI & surfaces) will be available if needed by all the subjects in the protocol. * This can be changed later, using the "''Use default''" menu in the subjects' popup menu. 1. ''Subjects configuration'' panel: * These are the default settings that will be applied when creating new subjects. It is then possible to override those settings for each subject. |
1. Click on the File menu, and select, and select ''New protocol''.<<BR>><<BR>> {{attachment:menuFile.gif}} 1. Edit the protocol name and enter: "!TutorialFirstSteps". It will automatically update the paths (''Anatomy path'' and ''Datasets path''). 1. ''Default properties for the subjects'': * These are the default settings that are used when creating new subjects. It is then possible to override those settings for each subject individually. |
| Line 30: | Line 43: |
| * The option selected for ''Default channel file'' is not important because we are not going to import recordings (and channel files, ie. files that describe each sensor: position, orientation, name...). This point will be described in another tutorial. | * The option ''Default channel file'' is a bit more complicated to understand. It defines at what level we want to define the sensors information (position, orientation, name...) in the database. To make you data management more efficient, you can in some cases use the same ''channel file'' for all the subjects, or for all the folders within one subject. For more information on this option, click on the '''Help button'''. * In this specific case, this option is not relevant because we are not going to import any recordings. |
| Line 34: | Line 49: |
| 1. Confirm that you want to create the directories 1. The ''MRI Viewer'' window opens automatically and displays the Colin27 brain, and a message box informs you that you should select some points on the MRI. Those fiducial points are used to register the MRI with the MEG or EEG sensors, when you import recordings. We don't need to define them now, because we are not going to import any recordings in this turorial, but let's play with the MRI Viewer Viewer. == MRI Viewer and fiducials selection == {{attachment:mriViewer.gif}} * You can navigate through the volume by clicking anywhere in the slices, or by using the sliders below each image. * There are four small buttons above each image. They may be useful when you import your own MR volumes, if they are not oriented in the way Brainstorm want them (e.g. you see the ''Sagittal ''title on top of the coronal view; or the small white "''P''", which is supposed to indicate the posterior part of the head, points the nose). Leave your mouse a few seconds over button one to read their description tooltip. Click on them and try to understand what they are doing. * Images' contrast can be changed with the mouse: click and hold the right button on one image, and move your mouse up and down (this operation will be later referred as ''right-click+move''). |
== Protocol exploration == The protocol is created and you can now see it in the database explorer. It is represented by the top-most node in the tree. * You can switch between anatomy and functional data with the first three buttons in the toolbar. There are no subjects in the database yet, so the ''Functional data'' views are empty. However, in the ''Anatomy ''view, there is a ''(Default anatomy)'' node; it contains the MRI and the surfaces that can be used by default for the subjects without individual anatomy. * The default anatomy used in Brainstorm is based on the ''Colin27 ''MRI volume provided by the Montreal Neurological Institute (MNI): an average of 27 T1 scans of Colin Holmes brain ([[http://www.bic.mni.mcgill.ca/~louis/stx_history.html|more info]]). * The cortex surfaces here were extracted from this average MRI with !FreeSurfer. * The inner and outer skull surfaces were generated with Brainstorm. * Display the ''Anatomy ''view, and click on the small "+" to expand the contents of the ''(Default anatomy)'' node. There is one MRI and several surfaces, identified by different icons. * Everything you can do with a node (anatomy files, subjects, protocol) is accessible by right-clicking on it. Take a few minutes to explore all the popup menus by yourself. Don't be afraid of clicking everywhere, at this point you cannot damage anything. . {{attachment:treeNewProtocol.gif}} == Fiducials selection (MRI Viewer) == A few more details about the MRI and the fiducials: Right-click on the MRI file > Edit MRI... . {{attachment:mriViewer.gif}} * Navigate in the volume by clicking anywhere in the slices, or by using the sliders below each image. * Once you have clicked on any orientation, you can use the '''mouse wheel''' to move to the next/previous slice in the same orientation. * '''Zoom '''in and out with the magnifying glass buttons at the bottom of the figure * There are three small buttons above each image. They may be useful when you import your own MR volumes, if they are not oriented in the way Brainstorm wants them (e.g. you see the ''Sagittal ''title on top of the coronal view; or the small white "''P''", which is supposed to indicate the posterior part of the head, points the nose). Leave your mouse a few seconds over any button to read its description tooltip. Click on them and try to understand what they are doing. * Image contrast can be changed with the mouse: click and hold the right button on one image, and move your mouse up and down (this operation will be later referred as ''right-click+move''). * Right-clicking in any view shows a popup menu that will be described in the following tutorials. |
| Line 45: | Line 78: |
| * Three to define the [[CoordinateSystems|Subject Coordinate System (SCS)]]: Nasion (NAS), Left pre-auricular point (LPA), Right pre-auricular point (RPA), * Three to define the[[CoordinateSystems|Talairach coordinate system]] (referred here as ''Normalized CS''): Anterior commissure (AC), Posterior commissure (PC), and any Interhemispheric point (IH).<<BR>> => To know more about [[CoordinateSystems|how to define the fiducial points]]. * To define a point, position the three views a the point your want to define (pointed by the 3 crosses), and click on the ''Set ''button. Later you can click on ''View ''to move the views to this point again. * You can see that all the points are already defined on this MRI, but you should '''always '''check their positions. For many reasons, each research group has a different way to define those points. So you may not position the ears or the nasion exactly the same way as we do. So do not hesitate to move the fiducials to better fit your needings; if not the results might be much less accurate. * The coordinates panel shows the (x,y,z) coordinates in all the coordinate systems managed by Brainstorm: MRI, SCS, and Talairach. * Once you're done, click on ''Cancel ''(unless you really want to save all your experimentations). == Protocol exploration == The protocol is created and you can now see it in the database explorer, in Brainstorm window. It is represented by the top-most node in the tree. . {{attachment:treeNewProtocol.gif}} * You can switch between anatomy and functional data with the first three buttons in the toolbar. They are no subjects in the database yet, so the ''Functional data'' views are completely empty. However, in the ''Anatomy ''view, there is a ''(Default anatomy)'' node; it contains the MRI and surfaces that can be used by default for the subjects without individual anatomy. * Display the ''Anatomy ''view, click on the small "+" to expand the contents of the ''(Default anatomy)'' node. There is one MRI and several surfaces, identified by different icons. * All you can do with each node (anatomy files, subjects, protocol), is accessible by right-click on it. Take 10 minutes to explore all the popup menus by yourself. Don't be afraid to click everywhere you want, at this point you cannot damage anything. * If you explored well, you should have found the "''New subject''" menu in the protocol's popup menu. Click on it. ||<tablewidth="200px"^ #ffffff> <<BR>> {{attachment:menuNewSubject.gif}} || {{attachment:createNewSubject.gif}} || * <<BR>><<BR>> |
* Three to define the Subject Coordinate System (SCS):<<BR>>Nasion (NAS), Left pre-auricular point (LPA), Right pre-auricular point (RPA) * Three to define the Normalized coordinate system (NCS):<<BR>>Anterior commissure (AC), Posterior commissure (PC), and any Interhemispheric point (IH) * More information on how to define the fiducial points on the CoordinateSystems page. * To define a point, position the three views at the point your want to define (pointed by the 3 crosses), and click on the ''Set ''button. Later you can click on ''View ''to move the views to this point again. * You can see that all the points are already defined on this MRI, but you should always check their positions. For many reasons, each research group has a different way to define those points. So you may not position the ears or the nasion exactly the same way as we do. Do not hesitate to move the fiducials to better fit your needs. * The ''Display options'' panel allows to hide some of the components. If the ''MIP/Anatomy ''checkbox is selected, the Maximum Intensity Power is displayed instead of the regular slices: At each point, the value displayed is the maximum value across all the slices. * The ''Coordinates ''panel shows the (x,y,z) coordinates in the coordinate systems managed by Brainstorm: MRI and SCS. * Once you're done, click on ''Cancel ''(unless you really want to save all your experiments). == MRI visualization == There are many different ways to display the MR volumes. Right click on the ''T1-MRI'' in ''Default anatomy'', menu ''Display''. Just click everywhere and try all the options by yourself, it is the best way to learn.<<BR>><<BR>> {{attachment:popupMri.gif}} ==== MRI Viewer ==== Already introduced in this tutorial<<BR>>It is the default visualization mode; when you double-click on the MRI file, it brings up the MRI Viewer. ==== Axial / coronal / sagittal slices ==== {{attachment:mriSlicesContact.gif||height="231",width="210"}} * '''Zoom''': mouse wheel (or two finger-move on a !MacBook pad) * '''Move '''in zoomed image: click + move * '''Adjust contrast''': right click + move up/down * Colormap selection in menu * Save as image in menu ==== 3D orthogonal slices ==== ||<tablewidth="200px"> {{attachment:mriSlices3d.gif||height="229",width="292"}} || {{attachment:menuShortcut.gif}} || * Simple mouse operations * '''Rotate''': click + move * '''Zoom''': mouse wheel (two finger-move on a !MacBook pad) * '''Move object''': left+right click + move * '''Move MRI slices''': right click + move along direction of the slice<<BR>>(or use the ''Resect ''panel in the ''Surface ''tab) * '''Colormap contrast/brightness''': click on the colorbar, and move up/down (brightness) or left/right (contrast) * '''Reset view''': double click * '''Reset colormap''': double-click on the colorbar * Popup operations (right-click on the figure) * '''Colormap''': Full ''Anatomy ''colormap edition (detailed in next tutorial) * '''MRI Display''': For now, contains only the MIP option (Maximum Intensity Power). If checked, for each orientation: displays the maximum along all the slices instead of the proper slice. * '''Get coordinates''': Pick a point in any 3D view and get its coordinates * '''Snapshots''': save images or movies from this figure * '''Figure''': change background color, display axes and menus for an advanced figure editing and management using Matlab tools. * '''Views''': configure camera position with predefined settings. * Keyboard shortcuts: * Notice the indications in the right part of the popup menu (''CTRL+A'' in front of ''Figures>Axes'', ''"1"'' in front of ''Views>Left''), they represent the keyboard shortcut for each menu. * '''Views shortcuts (0,1,2...9 and "=")''': Remember them, they will be very useful when exploring the cortical sources. It is much faster to press a key to switch from left to right hemisphere, than having to rotate the brain with the mouse. * Surfaces tab (in the Brainstorm main window): * This panel is primarily dedicated to the surfaces display, but some controls can also be useful for the 3D MRI view. * ''Transparency ''slider * ''Smooth ''slider: it changes the threshold applied to the MRI slices. If you set it zero, you will see the full slices, as extracted from the volume. * ''Resect ''panel: you can change the position of the slices with the three sliders. == Surfaces visualization == There is only one way to display the surfaces: in 3D figures. To display a surface you can either double-click on it or right-click > Display. * The mouse and keyboard operations are the same described for the 3D MRI display also apply here. * If you display two surfaces from the same subject, they will be displayed on the same figure. * Surfaces tab: more options are available<<BR>><<BR>> {{attachment:panelSurfaces.gif}} * Open the ''Cortex ''surface and try all the buttons and sliders. Then do the same with the ''Scalp ''surface (''Head''). All the controls should have some effect on the display, except the sliders in the "''Data options''" panel. They are useful only when some additional data is mapped on the surfaces. * Multiple surfaces: If you have more than one surface in a figure, you need to select the surface you want to edit before changing its properties. The list of the available surfaces is displayed on top of the ''Surfaces ''tab. * You can also quickly add or remove surfaces in any 3D figure with the top-right buttons of the ''Surfaces ''tab. == Coordinates tab == * Close all the figures. Open the cortex surface again. * Right-click on the 3D figure, select "Get coordinates". A new window appears. * Click anywhere on the cortex surface: a big yellow cross appears, and the coordinates of the point are displayed in all the available coordinates systems (see page: CoordinateSystems) * MRI: MR volume, in millimeters (multiplied with the Voxsize field in the MRI file). * SCS: Subject Coordinates System, in millimeters * MNI: Montreal Neurological Institute standard coordinates * You can click on "View / MRI" to see where this point is located in the MRI, using the MRI Viewer. <<BR>><<BR>> {{attachment:panelCoord.gif}} {{attachment:panelCoordPt.gif}} == Create a subject == If you explored well, you should have found the "''New subject''" menu in the protocol's popup menu. ||<tablewidth="200px"#ffffff style="vertical-align:top; "> {{attachment:menuNewSubject.gif}} || {{attachment:createNewSubject.gif}} || |
| Line 75: | Line 162: |
| * But you can also override here the protocol's defaults regarding the sharing of anatomy and channel file between subjects and conditions. For the example, leave selected the "''Yes, use default anatomy''" option. The click on ''Save''. | * But you can also override here the protocol's defaults regarding the sharing of anatomy and channel file between subjects and conditions. For the example, leave selected the "''Yes, use default anatomy''" option. Then click on ''Save''. |
| Line 79: | Line 166: |
| * In the Anatomy view, the subject node only contains a link called (Default anatomy). It is here just to remind that the subject is using the default ''MNI Colin27'' anatomy.<<BR>> {{attachment:subjectDefaultAnat.gif}} == Surface visualization == |
* In the Anatomy view, the subject node only contains a link called (Default anatomy). It is here just to remind that the subject is using the default ''MNI Colin27'' anatomy.<<BR>><<BR>> {{attachment:subjectDefaultAnat.gif}} == Change the default anatomy == When you create a new protocol, the program makes a copy of the Colin27 anatomy and sets it as the default for the protocol. It means that you will be able to use the Colin27 brain as a substitute for the subjects without an individual MRI, or as the common brain for group analysis. Other sets of MRI+surfaces are available to replace the Colin27 anatomy. Right-click on ''(Default anatomy)'' > Use template. If a package is not currently available on your system, it will be downloaded from the Brainstorm website and saved in $HOME/.brainstorm/templates. The available options are: * '''Colin27''': Average of 27 scans of the same head, processed with !FreeSurfer 5.3: [[http://www.bic.mni.mcgill.ca/ServicesAtlases/Colin27|more information]] * '''Colin27_2012''': Previous version of the default anatomy distributed with Brainstorm * '''ICBM152''': Non-linear average of 152 subjects, processed with !FreeSurfer 5.3: [[http://www.bic.mni.mcgill.ca/ServicesAtlases/ICBM152NLin2009|more information]] * '''FSAverage''': Average of 40 subjects using a spherical averaging described in [[http://nmr.mgh.harvard.edu/~fischl/reprints/morphing_human_brain_mapping_reprint.pdf|(Fischl et al. 1999)]].<<BR>>It is the default !FreeSurfer brain: please [[https://surfer.nmr.mgh.harvard.edu/registration.html|register here]] if you are using it. * '''Infant7w''': 7-week infant brain with the antomical atlas presented in [[http://www.sciencedirect.com/science/article/pii/S105381191400411X|(Kabdebon et al. 2014)]]. They all include the following information: * T1 MRI volume * Cortex surface: high-resolution (~300.000 vertices) and low-resolution (15.000 vertices) * Head surface: based on the head used for FSAverage in the MNE software * !FreeSurfer spherical registration of each hemisphere, with which we can co-register the individual brains processed with !FreeSurfer with the selected default anatomy * !FreeSurfer surface-based atlases: Desikan-Killiany, Destrieux, Brodman, Mindboggle<<BR>>(plus Yeo2011 and PALS for FSAverage only) The atlases will be discussed in the following tutorials. For more information on the interactions between !FreeSurfer and Brainstorm: [[Tutorials/LabelFreeSurfer|read this tutorial]]. {{attachment:changeDefault.gif|changeDefault1.gif}} If you click on any of the download options, it downloads it into your $HOME/.brainstorm/templates folder: {{attachment:changeDefault2.gif}} Then the list of files in the (default anatomy) folder is replaced with the new template. {{attachment:changeDefault3.gif}} == Modify the default MRI fiducials == The fiducial points (Nasion, LPA, RPA) used in your recordings might not be the same as the ones used in the anatomy templates in Brainstorm (Colin27, ICBM152, FSAverage). By default, the LPA/RPA points are defined at the junction between the tragus and the helix, as represented with the red dot in the [[http://neuroimage.usc.edu/brainstorm/CoordinateSystems|Coordinates systems page]]. If you want to use an anatomy template but you are using a different convention when digitizing the position of those points, you have to modify the default positions of the template with the MRI Viewer. * Go to the anatomy view * In (default anatomy), right-click on the MRI > Edit MRI * Modify the position of the fiducial points to match your own convention * Click on [Save], it will update the surfaces to match the new coordinate system == Feedback == <<EmbedContent(http://neuroimage.usc.edu/brainstorm3_register/get_feedback.php?Tutorials/TutFirstSteps)>> == Next == Now you know how to create a protocol with a default anatomy, and visualize MR volumes and surfaces. Next step: how to [[Tutorials/TutImportAnatomy|import an individual anatomy]] for a subject. |
Tutorial 2: First steps
Authors: Francois Tadel, Sylvain Baillet
Objectives: Create a protocol with one subject, that uses the default anatomy Colin27.
Contents
Starting Brainstorm for the first time
Start Matlab, go to brainstorm3 directory, and type "brainstorm" in Matlab command window.
BST> Starting Brainstorm:
BST> =================================
BST> Version: 3.1.130731 (31-Jul-2013)
BST> Checking internet connectivity... ok
BST> Compiling main interface files...
BST> Emptying temporary directory...
BST> Deleting old process reports...
BST> Loading configuration file...
BST> Loading default channel selections...
BST> Initializing user interface...
BST> Starting OpenGL engine...
BST> Reading plugins folder...
BST> =================================
- Read and accept the license file.
Specify Brainstorm database directory. Read carefully what is written in the ?previous chapter. Safe choices are for example:
Windows: My documents\brainstorm_db
Linux: /home/username/brainstorm_db
MacOS: Documents/brainstorm_db
Main interface window
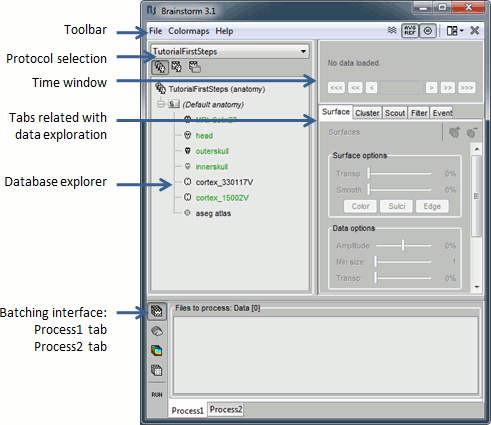
Create first protocol
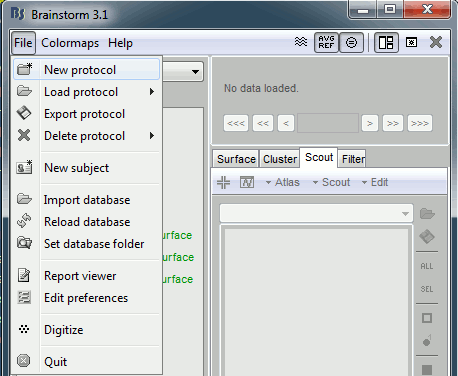
Click on the File menu, and select, and select New protocol.
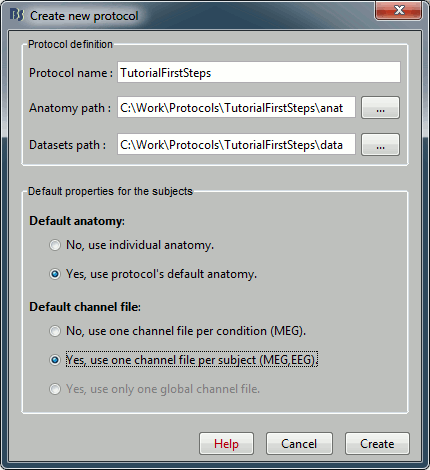
Edit the protocol name and enter: "TutorialFirstSteps". It will automatically update the paths (Anatomy path and Datasets path).
Default properties for the subjects:
- These are the default settings that are used when creating new subjects. It is then possible to override those settings for each subject individually.
Our objective is to create one subject that uses the default anatomy Colin27, so select the option "Yes, use protocol's default anatomy".
The option Default channel file is a bit more complicated to understand. It defines at what level we want to define the sensors information (position, orientation, name...) in the database. To make you data management more efficient, you can in some cases use the same channel file for all the subjects, or for all the folders within one subject. For more information on this option, click on the Help button.
- In this specific case, this option is not relevant because we are not going to import any recordings.
Once you get something like the following figure, click on Create.
Protocol exploration
The protocol is created and you can now see it in the database explorer. It is represented by the top-most node in the tree.
You can switch between anatomy and functional data with the first three buttons in the toolbar. There are no subjects in the database yet, so the Functional data views are empty. However, in the Anatomy view, there is a (Default anatomy) node; it contains the MRI and the surfaces that can be used by default for the subjects without individual anatomy.
The default anatomy used in Brainstorm is based on the Colin27 MRI volume provided by the Montreal Neurological Institute (MNI): an average of 27 T1 scans of Colin Holmes brain (more info).
The cortex surfaces here were extracted from this average MRI with FreeSurfer.
- The inner and outer skull surfaces were generated with Brainstorm.
Display the Anatomy view, and click on the small "+" to expand the contents of the (Default anatomy) node. There is one MRI and several surfaces, identified by different icons.
- Everything you can do with a node (anatomy files, subjects, protocol) is accessible by right-clicking on it. Take a few minutes to explore all the popup menus by yourself. Don't be afraid of clicking everywhere, at this point you cannot damage anything.
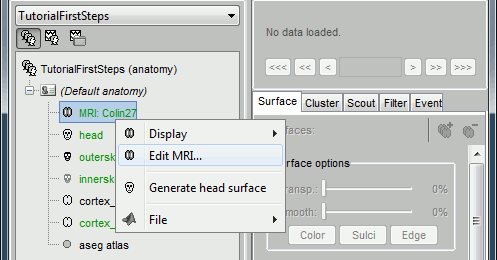
Fiducials selection (MRI Viewer)
A few more details about the MRI and the fiducials: Right-click on the MRI file > Edit MRI...
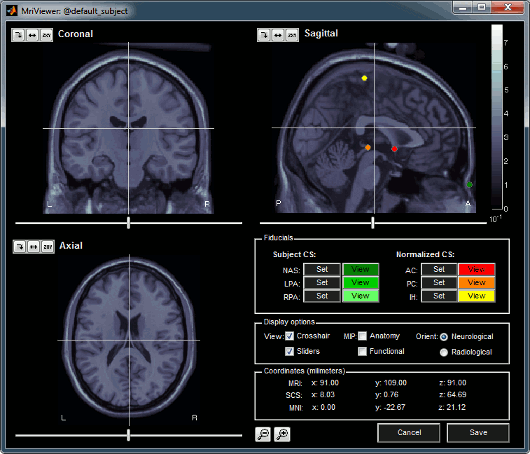
- Navigate in the volume by clicking anywhere in the slices, or by using the sliders below each image.
Once you have clicked on any orientation, you can use the mouse wheel to move to the next/previous slice in the same orientation.
Zoom in and out with the magnifying glass buttons at the bottom of the figure
There are three small buttons above each image. They may be useful when you import your own MR volumes, if they are not oriented in the way Brainstorm wants them (e.g. you see the Sagittal title on top of the coronal view; or the small white "P", which is supposed to indicate the posterior part of the head, points the nose). Leave your mouse a few seconds over any button to read its description tooltip. Click on them and try to understand what they are doing.
Image contrast can be changed with the mouse: click and hold the right button on one image, and move your mouse up and down (this operation will be later referred as right-click+move).
- Right-clicking in any view shows a popup menu that will be described in the following tutorials.
- You can define six points on the MRI:
Three to define the Subject Coordinate System (SCS):
Nasion (NAS), Left pre-auricular point (LPA), Right pre-auricular point (RPA)Three to define the Normalized coordinate system (NCS):
Anterior commissure (AC), Posterior commissure (PC), and any Interhemispheric point (IH)More information on how to define the fiducial points on the CoordinateSystems page.
To define a point, position the three views at the point your want to define (pointed by the 3 crosses), and click on the Set button. Later you can click on View to move the views to this point again.
- You can see that all the points are already defined on this MRI, but you should always check their positions. For many reasons, each research group has a different way to define those points. So you may not position the ears or the nasion exactly the same way as we do. Do not hesitate to move the fiducials to better fit your needs.
The Display options panel allows to hide some of the components. If the MIP/Anatomy checkbox is selected, the Maximum Intensity Power is displayed instead of the regular slices: At each point, the value displayed is the maximum value across all the slices.
The Coordinates panel shows the (x,y,z) coordinates in the coordinate systems managed by Brainstorm: MRI and SCS.
Once you're done, click on Cancel (unless you really want to save all your experiments).
MRI visualization
There are many different ways to display the MR volumes. Right click on the T1-MRI in Default anatomy, menu Display. Just click everywhere and try all the options by yourself, it is the best way to learn.
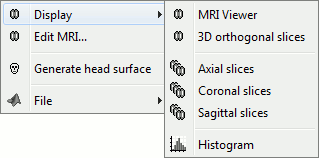
MRI Viewer
Already introduced in this tutorial
It is the default visualization mode; when you double-click on the MRI file, it brings up the MRI Viewer.
Axial / coronal / sagittal slices
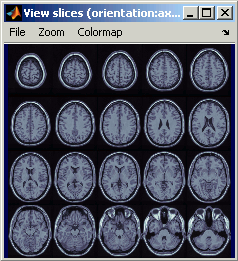
Zoom: mouse wheel (or two finger-move on a MacBook pad)
Move in zoomed image: click + move
Adjust contrast: right click + move up/down
- Colormap selection in menu
- Save as image in menu
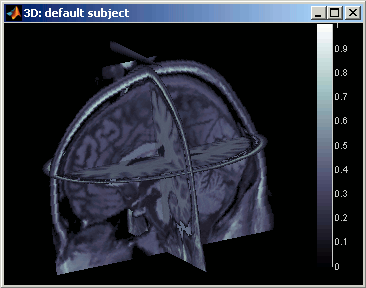
3D orthogonal slices
|
|
- Simple mouse operations
Rotate: click + move
Zoom: mouse wheel (two finger-move on a MacBook pad)
Move object: left+right click + move
Move MRI slices: right click + move along direction of the slice
(or use the Resect panel in the Surface tab)Colormap contrast/brightness: click on the colorbar, and move up/down (brightness) or left/right (contrast)
Reset view: double click
Reset colormap: double-click on the colorbar
- Popup operations (right-click on the figure)
Colormap: Full Anatomy colormap edition (detailed in next tutorial)
MRI Display: For now, contains only the MIP option (Maximum Intensity Power). If checked, for each orientation: displays the maximum along all the slices instead of the proper slice.
Get coordinates: Pick a point in any 3D view and get its coordinates
Snapshots: save images or movies from this figure
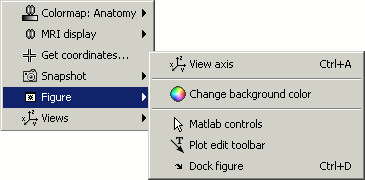
Figure: change background color, display axes and menus for an advanced figure editing and management using Matlab tools.
Views: configure camera position with predefined settings.
- Keyboard shortcuts:
Notice the indications in the right part of the popup menu (CTRL+A in front of Figures>Axes, "1" in front of Views>Left), they represent the keyboard shortcut for each menu.
Views shortcuts (0,1,2...9 and "="): Remember them, they will be very useful when exploring the cortical sources. It is much faster to press a key to switch from left to right hemisphere, than having to rotate the brain with the mouse.
- Surfaces tab (in the Brainstorm main window):
- This panel is primarily dedicated to the surfaces display, but some controls can also be useful for the 3D MRI view.
Transparency slider
Smooth slider: it changes the threshold applied to the MRI slices. If you set it zero, you will see the full slices, as extracted from the volume.
Resect panel: you can change the position of the slices with the three sliders.
Surfaces visualization
There is only one way to display the surfaces: in 3D figures. To display a surface you can either double-click on it or right-click > Display.
- The mouse and keyboard operations are the same described for the 3D MRI display also apply here.
- If you display two surfaces from the same subject, they will be displayed on the same figure.
Surfaces tab: more options are available
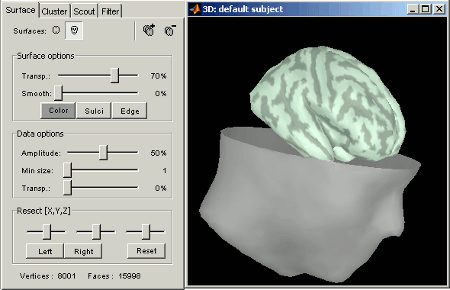
Open the Cortex surface and try all the buttons and sliders. Then do the same with the Scalp surface (Head). All the controls should have some effect on the display, except the sliders in the "Data options" panel. They are useful only when some additional data is mapped on the surfaces.
Multiple surfaces: If you have more than one surface in a figure, you need to select the surface you want to edit before changing its properties. The list of the available surfaces is displayed on top of the Surfaces tab.
You can also quickly add or remove surfaces in any 3D figure with the top-right buttons of the Surfaces tab.
Coordinates tab
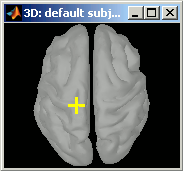
- Close all the figures. Open the cortex surface again.
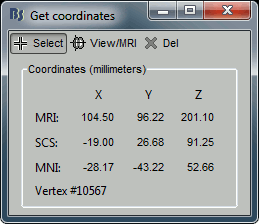
- Right-click on the 3D figure, select "Get coordinates". A new window appears.
Click anywhere on the cortex surface: a big yellow cross appears, and the coordinates of the point are displayed in all the available coordinates systems (see page: CoordinateSystems)
- MRI: MR volume, in millimeters (multiplied with the Voxsize field in the MRI file).
- SCS: Subject Coordinates System, in millimeters
- MNI: Montreal Neurological Institute standard coordinates
You can click on "View / MRI" to see where this point is located in the MRI, using the MRI Viewer.
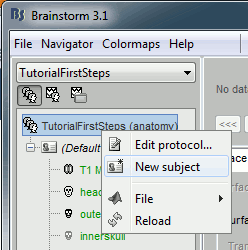
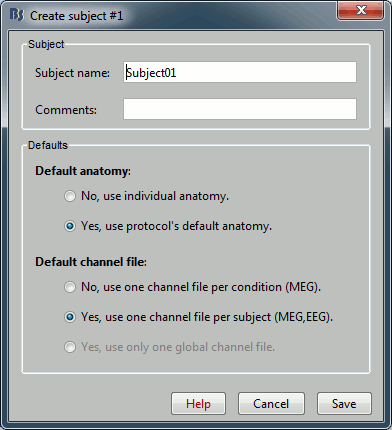
Create a subject
If you explored well, you should have found the "New subject" menu in the protocol's popup menu.
|
|
- Usually, the only thing you need to do here is to edit the name of the subject.
But you can also override here the protocol's defaults regarding the sharing of anatomy and channel file between subjects and conditions. For the example, leave selected the "Yes, use default anatomy" option. Then click on Save.
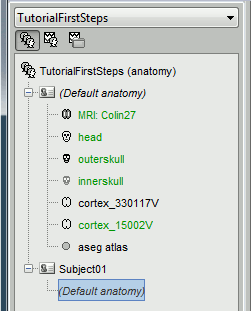
You should see a the new subject in both Anatomy and Functional data views.
In the Anatomy view, the subject node only contains a link called (Default anatomy). It is here just to remind that the subject is using the default MNI Colin27 anatomy.
Change the default anatomy
When you create a new protocol, the program makes a copy of the Colin27 anatomy and sets it as the default for the protocol. It means that you will be able to use the Colin27 brain as a substitute for the subjects without an individual MRI, or as the common brain for group analysis.
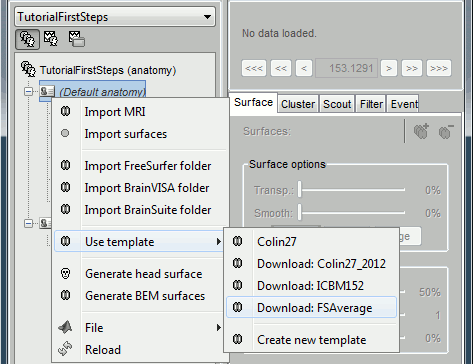
Other sets of MRI+surfaces are available to replace the Colin27 anatomy. Right-click on (Default anatomy) > Use template. If a package is not currently available on your system, it will be downloaded from the Brainstorm website and saved in $HOME/.brainstorm/templates. The available options are:
Colin27: Average of 27 scans of the same head, processed with FreeSurfer 5.3: more information
Colin27_2012: Previous version of the default anatomy distributed with Brainstorm
ICBM152: Non-linear average of 152 subjects, processed with FreeSurfer 5.3: more information
FSAverage: Average of 40 subjects using a spherical averaging described in (Fischl et al. 1999).
It is the default FreeSurfer brain: please register here if you are using it.Infant7w: 7-week infant brain with the antomical atlas presented in (Kabdebon et al. 2014).
They all include the following information:
- T1 MRI volume
- Cortex surface: high-resolution (~300.000 vertices) and low-resolution (15.000 vertices)
- Head surface: based on the head used for FSAverage in the MNE software
FreeSurfer spherical registration of each hemisphere, with which we can co-register the individual brains processed with FreeSurfer with the selected default anatomy
FreeSurfer surface-based atlases: Desikan-Killiany, Destrieux, Brodman, Mindboggle
(plus Yeo2011 and PALS for FSAverage only)
The atlases will be discussed in the following tutorials. For more information on the interactions between FreeSurfer and Brainstorm: read this tutorial.
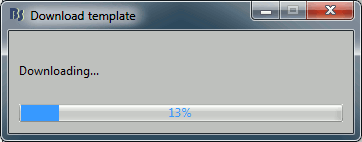
If you click on any of the download options, it downloads it into your $HOME/.brainstorm/templates folder:
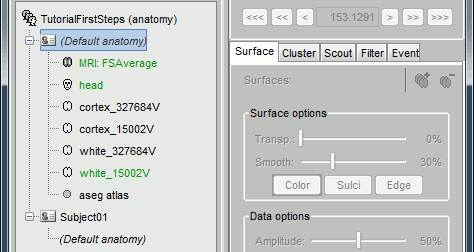
Then the list of files in the (default anatomy) folder is replaced with the new template.
Modify the default MRI fiducials
The fiducial points (Nasion, LPA, RPA) used in your recordings might not be the same as the ones used in the anatomy templates in Brainstorm (Colin27, ICBM152, FSAverage). By default, the LPA/RPA points are defined at the junction between the tragus and the helix, as represented with the red dot in the Coordinates systems page.
If you want to use an anatomy template but you are using a different convention when digitizing the position of those points, you have to modify the default positions of the template with the MRI Viewer.
- Go to the anatomy view
In (default anatomy), right-click on the MRI > Edit MRI
- Modify the position of the fiducial points to match your own convention
- Click on [Save], it will update the surfaces to match the new coordinate system
Feedback
Next
Now you know how to create a protocol with a default anatomy, and visualize MR volumes and surfaces.
Next step: how to ?import an individual anatomy for a subject.

