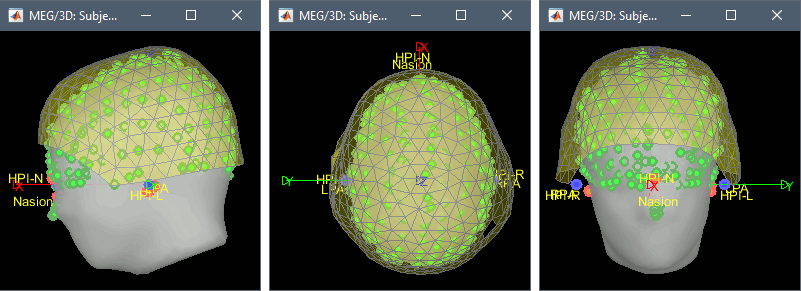
|
Size: 3066
Comment:
|
Size: 6313
Comment:
|
| Deletions are marked like this. | Additions are marked like this. |
| Line 1: | Line 1: |
| = Warping default anatomy = The best results for source localization are obtained with an individual anatomy of each subject, that are processed to extract the cortex and the scalp surface. Unfortunately, scanning a subject in an MRI costs in time and money, and may not be available for the source analysis. In this case, it was already explained in the previous tutorials that you can use the default anatomy Colin27. But for subjects that have head shapes that are really different from Colin Holme's, the localization errors can be really big. |
= Warping the anatomy templates = ''Authors: Francois Tadel, John C Mosher'' |
| Line 4: | Line 4: |
| For this purpose, Brainstorms offers an intermediate solution: Creating a pseudo-individual anatomy based on the head points that were digitized with a magnetic tracking system before the MEG acquisition. Those points really represent the shape of the head of the subject, they can be used to scale and deform the Colin27 MRI and surfaces. | The best results for source localization are obtained with an individual anatomy of each subject, that are processed to extract the cortex and the scalp surface. Unfortunately, scanning a subject in an MRI costs in time and money, and may not be available for the source analysis. You can use a template anatomy (ICBM152, Colin27 or other), but for subjects with head shapes that are very different from the template the localization errors can be large. For this purpose, Brainstorms offers an intermediate solution: Creating a pseudo-individual anatomy based on the head points that were digitized before the MEG/EEG acquisition. These points really represent the shape of the head of the subject, they can be used to scale and deform the template MRI and surfaces. <<TableOfContents(2,2)>> == Prepare the anatomy template == The anatomical landmarks (NAS, LPA, RPA) defined when digitizing the head shape must be the same as the ones used in the default anatomy of the protocol ([[Tutorials/DefaultAnatomy|Colin27, ICBM152, FSAverage]]). By default, the LPA/RPA points are defined at the junction between the tragus and the helix, as represented with the red dot in the [[CoordinateSystems|Coordinates systems page]]. If you want to use an anatomy template but used a different convention when digitizing the position of these points, you have to modify the default positions of the template with the MRI Viewer. * Go to the anatomy view. * In (default anatomy), right-click on the MRI > Edit MRI. * Modify the position of the fiducial points to match your own convention. * Click on [Save], it will update the surfaces to match the new coordinate system. |
| Line 7: | Line 21: |
| We are going to test that feature in the protocol ''!TutorialRaw'', created in the tutorial [[Tutorials/TutRawViewer|Review continuous recordings and edit markers]], because it contains a reasonable amount of head points, and it should be already in your database. | We are going to test this feature with the protocol TutorialIntroduction (from the [[http://neuroimage.usc.edu/brainstorm/Tutorials#Get_started|introduction tutorials]]). |
| Line 9: | Line 23: |
| 1. Select protocol ''!TutorialRaw'', and select the view "Functional data (sorted by subjects)" 1. Create a new subject "!SubjectWarp". Select the option "'''Yes, use default anatomy'''" and '''"Yes, use one channel file per subject"'''. 1. Copy the channel file from ''Subject01/(Common files)'' to ''!SubjectWarp/(Common files)'': Use either the keyboard shortcuts Ctrl+C and Ctrl+V, or the popup menus ''File > Copy/Paste''. |
* Select the protocol TutorialIntroduction, and select the view "Functional data (sorted by subjects)". * Create a new subject "SubjectWarp": * '''Yes, use default anatomy,''' * '''No, use one channel file per acquisition run.''' * Right-click on SubjectWrap > '''Review raw file'''. * Select the file format: "'''MEG/EEG: CTF (*.ds...)'''" * Select the folders: '''sample_introduction/data/''' * After creating the link to the recordings, it should display the current registration: head surface from the ICBM152 template (grey surface) and head shape from the Polhemus digitizer (green points). <<BR>><<BR>> {{attachment:treeBefore.gif}} |
| Line 13: | Line 32: |
| {{attachment:treeBefore.gif}} | == Edit the initial MRI/MEG registration == The warping process is very sensitive to the initial position of the head points relatively to the scalp surface. You really want to make sure that the alignment is correct before running the deformation of the default anatomy, and fix it if necessary. We do not recommend to use the automatic registration at this point, because we are trying to align these points on a completely different head shape. We are going to edit the registration manually. |
| Line 15: | Line 35: |
| == Check MRI/MEG registration == This process is very sensitive to the initial position of the head points relatively to the scalp surface. You really want to make sure that the alignment is correct before running the deformation of the default anatomy, and fix it if necessary. * Right-click on SubjectWarp's channel file > '''MRI registration > Check'''. * The initial alignment is very bad and has to be fixed. We do not recommend to use the automatic registration at this point, because we are trying to align those points on a completely different head shape. We are going to fix the position manually. * Close the figure, and this time select: '''MRI registration > Edit'''. * Use . {{attachment:refineBefore.gif}} {{attachment:refineAfter.gif}} |
* Right-click on the channel file > '''MRI registration > Check'''. * The grey surface is the template head surface and the green points represent the head points we digitized from the head of our subject. The initial alignment is not too bad but can be improved. The most common reason for this bad alignment is the size difference between the subject and the template head. Close this figure. * Right-click on the channel file > '''MRI registration > Edit'''. * Use all the buttons in the toolbar to find an acceptable alignment. You can hide the MEG helmet (first button in the toolbar) and make the head surface more transparent (use the transparency slider in the Surface tab of the Brainstorm window) if it is easier for you to see what is happening. * The head of the subject is smaller than the template, therefore most of the head points should be "inside" the template head surface at the end of the registration. * The nasion/left/right fiducial points are displayed for the template anatomy (blue) and the subject (red), this is a precious information to control that you are not going too far in your re-alignment. * Click on the OK button in the toolbar when you're done. Answer yes to confirm the modifications. <<BR>><<BR>> {{attachment:refineAfter.gif}}<<BR>> |
| Line 26: | Line 44: |
| Right-click on the channel file > Head points > Warp > Deform default anatomy to fit these points. | Right-click on the channel file > Digitized head points > Warp > Deform default anatomy to fit these points. |
| Line 30: | Line 48: |
| Go in the Anatomy view of the protocol (first button on top of the database explorer). All the files from the default anatomy MNI/Colin27, MRI and surfaces, have been deformed to fit the head points from the channel file of !SubjectWarp. The following figures represent the anatomy before (left) and after (right). | You get two questions asked: First the method to use: * Scale: a simple scaling does not deform the template anatomy, it just scales it to match in size the subject's head along the three axis (x,y,w). * Warp: this option deforms the MRI and all the surfaces of the template to match the shape of defined by the digitized head points (works only if there are enough points, and if the sampling is quite regular on the head surface). * Select "Warp". . {{attachment:optionsWarp.gif}} If you have some misplaced points in your list of digitized head points, you can skip these outliers in the deformation and get a smoother results. Unless you have a lot of bad points or very few points, you can leave this default to 2% of the points. . {{attachment:optionsOutliers.gif}} Go in the Anatomy view of the protocol (first button on top of the database explorer). All the files from the default anatomy, MRI and surfaces, have been deformed to fit the head points from the channel file of SubjectWarp. . {{attachment:treeAfter.gif}} The following figures represent the anatomy before (left) and after (right). Don't worry about the alien shape of the head: the parts of the head shape that are poorly deformed (the lower part of the head) are the regions where there were no head points. What matters is the shape of the cortical surface, which looks really good in this case. |
| Line 33: | Line 67: |
| . | |
| Line 35: | Line 68: |
| == Feedback == <<EmbedContent(http://neuroimage.usc.edu/brainstorm3_register/get_feedback.php?Tutorials/TutWarping)>> |
You can do a final check to verify that the generated surfaces match the head points. Right-click on the channel file > MRI registration > Check. . {{attachment:checkFinal.gif}} <<EmbedContent(http://neuroimage.usc.edu/bst/get_feedback.php?Tutorials/TutWarping)>> |
Warping the anatomy templates
Authors: Francois Tadel, John C Mosher
The best results for source localization are obtained with an individual anatomy of each subject, that are processed to extract the cortex and the scalp surface. Unfortunately, scanning a subject in an MRI costs in time and money, and may not be available for the source analysis. You can use a template anatomy (ICBM152, Colin27 or other), but for subjects with head shapes that are very different from the template the localization errors can be large.
For this purpose, Brainstorms offers an intermediate solution: Creating a pseudo-individual anatomy based on the head points that were digitized before the MEG/EEG acquisition. These points really represent the shape of the head of the subject, they can be used to scale and deform the template MRI and surfaces.
Contents
Prepare the anatomy template
The anatomical landmarks (NAS, LPA, RPA) defined when digitizing the head shape must be the same as the ones used in the default anatomy of the protocol (Colin27, ICBM152, FSAverage). By default, the LPA/RPA points are defined at the junction between the tragus and the helix, as represented with the red dot in the Coordinates systems page.
If you want to use an anatomy template but used a different convention when digitizing the position of these points, you have to modify the default positions of the template with the MRI Viewer.
- Go to the anatomy view.
In (default anatomy), right-click on the MRI > Edit MRI.
- Modify the position of the fiducial points to match your own convention.
- Click on [Save], it will update the surfaces to match the new coordinate system.
Prepare the subject
We are going to test this feature with the protocol TutorialIntroduction (from the introduction tutorials).
Select the protocol TutorialIntroduction, and select the view "Functional data (sorted by subjects)".
Create a new subject "SubjectWarp":
Yes, use default anatomy,
No, use one channel file per acquisition run.
Right-click on SubjectWrap > Review raw file.
Select the file format: "MEG/EEG: CTF (*.ds...)"
Select the folders: sample_introduction/data/
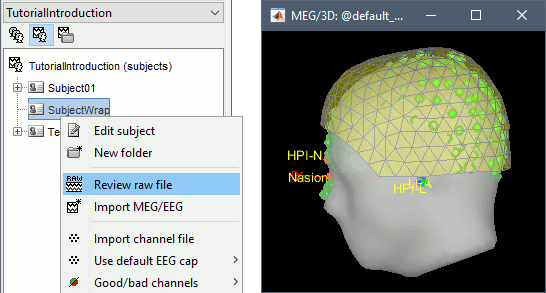
After creating the link to the recordings, it should display the current registration: head surface from the ICBM152 template (grey surface) and head shape from the Polhemus digitizer (green points).
Edit the initial MRI/MEG registration
The warping process is very sensitive to the initial position of the head points relatively to the scalp surface. You really want to make sure that the alignment is correct before running the deformation of the default anatomy, and fix it if necessary. We do not recommend to use the automatic registration at this point, because we are trying to align these points on a completely different head shape. We are going to edit the registration manually.
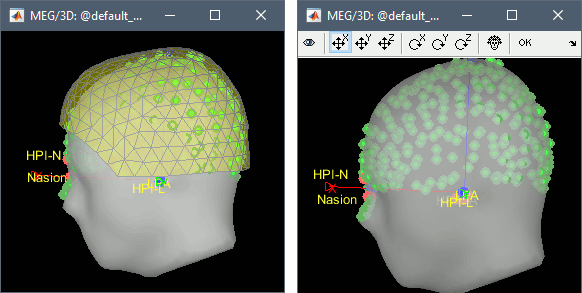
Right-click on the channel file > MRI registration > Check.
- The grey surface is the template head surface and the green points represent the head points we digitized from the head of our subject. The initial alignment is not too bad but can be improved. The most common reason for this bad alignment is the size difference between the subject and the template head. Close this figure.
Right-click on the channel file > MRI registration > Edit.
- Use all the buttons in the toolbar to find an acceptable alignment. You can hide the MEG helmet (first button in the toolbar) and make the head surface more transparent (use the transparency slider in the Surface tab of the Brainstorm window) if it is easier for you to see what is happening.
- The head of the subject is smaller than the template, therefore most of the head points should be "inside" the template head surface at the end of the registration.
- The nasion/left/right fiducial points are displayed for the template anatomy (blue) and the subject (red), this is a precious information to control that you are not going too far in your re-alignment.
Click on the OK button in the toolbar when you're done. Answer yes to confirm the modifications.
Warping anatomy
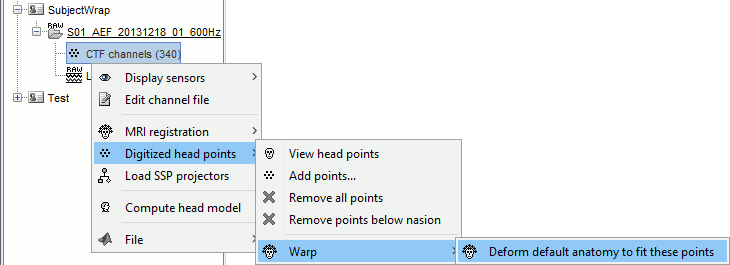
Right-click on the channel file > Digitized head points > Warp > Deform default anatomy to fit these points.
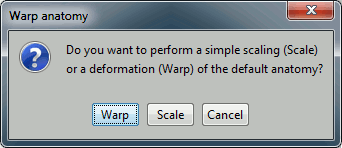
You get two questions asked: First the method to use:
- Scale: a simple scaling does not deform the template anatomy, it just scales it to match in size the subject's head along the three axis (x,y,w).
- Warp: this option deforms the MRI and all the surfaces of the template to match the shape of defined by the digitized head points (works only if there are enough points, and if the sampling is quite regular on the head surface).
- Select "Warp".
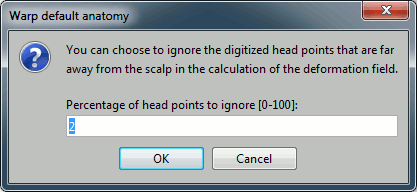
If you have some misplaced points in your list of digitized head points, you can skip these outliers in the deformation and get a smoother results. Unless you have a lot of bad points or very few points, you can leave this default to 2% of the points.
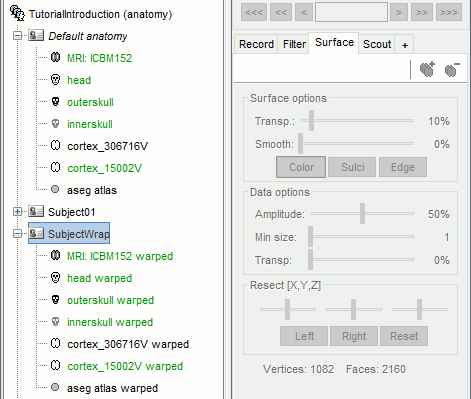
Go in the Anatomy view of the protocol (first button on top of the database explorer). All the files from the default anatomy, MRI and surfaces, have been deformed to fit the head points from the channel file of SubjectWarp.
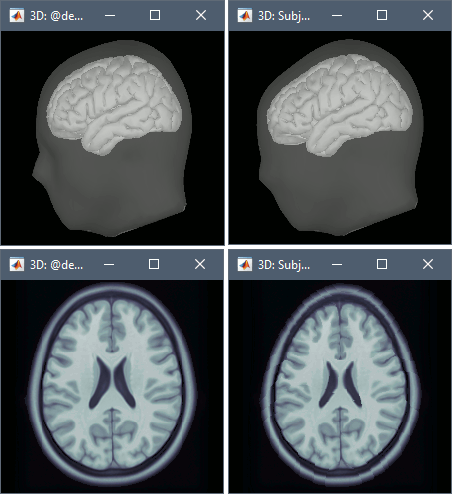
The following figures represent the anatomy before (left) and after (right). Don't worry about the alien shape of the head: the parts of the head shape that are poorly deformed (the lower part of the head) are the regions where there were no head points. What matters is the shape of the cortical surface, which looks really good in this case.
You can do a final check to verify that the generated surfaces match the head points. Right-click on the channel file > MRI registration > Check.

