|
Size: 9691
Comment:
|
Size: 15532
Comment:
|
| Deletions are marked like this. | Additions are marked like this. |
| Line 2: | Line 2: |
| The free software !FreeSurfer can be used to extract brain and head surfaces from a T1 MRI. It also automatically registers the individual cortex surfaces to two atlases (Desikan-Killiany and Destrieux). The process is fully automatic and the results can be imported in Brainstorm with just a few mouse clicks. | The open-source software !FreeSurfer can be used to extract the cortical envelope from a T1 MRI. It also registers the individual cortex surfaces to surface-based anatomical atlases (Desikan-Killiany, Destrieux, Brodmann). The process is fully automatic and the results can be imported in Brainstorm with just a few mouse clicks. |
| Line 5: | Line 5: |
| 1. Downloading and installing !FreeSurfer is very easy. It just takes some time because the distribution package is huge (get ready to download several Gb).<<BR>>Just follow the instructions: http://surfer.nmr.mgh.harvard.edu/fswiki/DownloadAndInstall 1. Set up the !FreeSurfer environment: * setenv FREESURFER_HOME /.../local/freesurfer * setenv SUBJECTS_DIR /.../data/freesurfer/subjects * setenv FUNCTIONALS_DIR /.../data/freesurfer/sessions * cd /.../local/freesurfer * source !FreeSurferEnv.csh |
1. Downloading and installing !FreeSurfer is very easy. It just takes some time because the distribution package is huge (get ready to download several Gb). You have two options: you have a Linux system and you want to install !FreeSurfer, or you don't and you want to run !FreeSurfer in a Linux virtual machine.<<BR>>Just follow the instructions: http://surfer.nmr.mgh.harvard.edu/fswiki/DownloadAndInstall 1. Set up the !FreeSurfer in a '''csh/tcsh''' environment: run the following lines, or add them at the end of your $HOME/.cshrc script for permanent change. If you're not sure what csh is: type "echo $SHELL" to know what is the name of the shell that you use. If it says "/bin/tcsh" or "/bin/csh", this is for you. {{{ setenv FREESURFER_HOME /.../local/freesurfer setenv SUBJECTS_DIR /.../data/freesurfer/subjects setenv FUNCTIONALS_DIR /.../data/freesurfer/sessions source /.../local/freesurfer/FreeSurferEnv.csh }}} 1. Set up the !FreeSurfer environment in a '''bash''' environment (add those lines at the end of your $HOME/.bashrc script): {{{ export FREESURFER_HOME=/.../local/freesurfer export SUBJECTS_DIR=/.../data/ftadel/freesurfer export FUNCTIONALS_DIR=/.../data/ftadel/freesurfer source $FREESURFER_HOME/FreeSurferEnv.sh }}} |
| Line 14: | Line 22: |
| * recon-all -i <mri_file> -subjid <subject_id> * recon-all -all -subjid <subject_id> 1. Leave your office, come back the next day. The process is fully automatic, but quite resource-consuming. 1. Done. Everything is ready to be imported in Brainstorm. The results are usually perfect, but depending on the quality of the structural MR, it may fail. Because of this unpredictable behavior, you always need to check visually the final surfaces. The !FreeSurfer wiki suggests that you check all the steps with !FreeSurfer. We suggest instead that you load it all in Brainstorm and go back to the manual checking/editing only if it looks bad. |
{{{ recon-all -i <mri_file> -subjid <subject_id> recon-all -all -subjid <subject_id> }}} 1. Go home, come back the next day. The process is fully automatic, but quite resource-consuming. 1. Done. Everything is ready to be imported in Brainstorm. The results are usually good, but depending on the quality of the structural MR, it may fail. Because of this unpredictable behavior, you always need to check visually the final surfaces. The !FreeSurfer wiki suggests that you check all the steps with !FreeSurfer. We suggest instead that you load it all in Brainstorm and go back to the manual checking/editing only if it looks bad. |
| Line 19: | Line 29: |
| 1. More questions about !FreeSurfer: Use the text box on the top right corner of the previous page to search the wiki. | |
| Line 24: | Line 33: |
| 1. Right-click on the subject > Import !FreeSurfer folder...<<BR>><<BR>> {{attachment:import1.gif|importAnnot1.gif}} <<BR>><<BR>> | 1. Right-click on the subject > Import !FreeSurfer folder...<<BR>><<BR>> {{attachment:import1.gif}} <<BR>><<BR>> |
| Line 26: | Line 35: |
| 1. Then you're prompted for the number of vertices you want in the final cortex surface. This will by extension define the number of dipoles to estimate during the source estimation process. By default we set this value to 15000 for the entire brain (it means 7500 for each hemisphere).<<BR>><<BR>> {{attachment:nVertices.gif|importAnnot1.gif}} <<BR>><<BR>> 1. The MRI Viewer appears, and a help window asks you to validate the orientation of the MRI and to define the 6 fiducial points. If something doesn't look right at this step, for instance if the MRI is presented with a correct orientation, you should stop this automatic import process and follow the manual instructions in the basic tutorial pages. <<BR>><<BR>> {{attachment:mriviewer.gif|importAnnot1.gif}} <<BR>><<BR>> |
1. Then you're prompted for the number of vertices you want in the final cortex surface. This will by extension define the number of dipoles to estimate during the source estimation process. By default we set this value to 15000 for the entire brain (it means 7500 for each hemisphere).<<BR>><<BR>> {{attachment:nVertices.gif}} <<BR>><<BR>> 1. The MRI Viewer appears, and a help window asks you to validate the orientation of the MRI and to define the 6 fiducial points. If something doesn't look right at this step, for instance if the MRI is not presented with a correct orientation, you should stop this automatic import process and follow the manual instructions in the basic tutorial pages. <<BR>><<BR>> {{attachment:mriviewer.gif}} <<BR>><<BR>> |
| Line 32: | Line 41: |
| * /surf/'''lh.pial''' (grey/csf interface, left hemisphere) * /surf/'''rh.pial''' (grey/csf interface, right hemisphere) * /surf/'''lh.smoothwm''' (white matter, left hemisphere) * /surf/'''rh.smoothwm''' (white matter, right hemisphere) * /label/'''lh.*.annot''' (atlases: left hemisphere) * /label/'''rh.*.annot''' (atlases: right hemisphere) 1. The successive steps that are performed by Brainstorm: |
* /mri/'''aseg.mgz''' (segmentation of subcortical structures) * /surf/'''?h.pial''' (grey/csf interface) * /surf/'''?h.smoothwm''' (grey/white matter interface) * /surf/'''?h.sphere.reg''' (registered parametrized sphere, for subject co-registration) * /label/'''?h.*.annot''' (cortical surface-based atlases) * /surf/'''?h.thickness''' (cortical thickness map: option available only in the "process" version) 1. The successive steps that are performed automatically by Brainstorm: |
| Line 41: | Line 50: |
| * Load the registered spheres for the the left and right hemisperes | |
| Line 44: | Line 54: |
| * Generate a head surface from the MRI (this is not done by !FreeSurfer) 1. The files you can see in the database explorer in the end: <<BR>><<BR>> {{attachment:checkDb.gif|importAnnot1.gif}} <<BR>><<BR>> * '''MGH MRI''': The T1 MRI of the subject, imported from the MGH file format (.mgz) |
* Generate a head surface from the MRI * Read the sub-cortical atlas aseg.mgz as a set of labelled surfaces 1. The files you can see in the database explorer at the end: <<BR>><<BR>> {{attachment:checkDb.gif}} <<BR>><<BR>> * '''MRI''': The T1 MRI of the subject, imported from the MGH file format (.mgz) |
| Line 48: | Line 59: |
| * '''cortex_300000V''': High-resolution cortex surface that was generated by !FreeSurfer, that contains usually between 200,000 and 300,000 vertices. | * '''cortex_300000V''': High-resolution cortex surface that was generated by !FreeSurfer, that contains usually between 200,000 and 300,000 vertices.This one appears in green, it means that is going to be used as the default by the processes that require a cortex surface. |
| Line 52: | Line 63: |
| 1. A figure is automatically shown at the end of the process, to check visually that the cortex and head surfaces were properly generated and imported. If it doesn't look like the following picture, do not go any further in your source analysis, fix the anatomy first.<<BR>><<BR>> {{attachment:checkResult.gif|importAnnot1.gif}} <<BR>><<BR>> 1. 1. If it doesn'tlook good the options are 1. Description of head generation |
* '''aseg atlas''': Atlas of subcortical regions 1. A figure is automatically shown at the end of the process, to check visually that the low-resolution cortex and head surfaces were properly generated and imported. If it doesn't look like the following picture, do not go any further in your source analysis, fix the anatomy first.<<BR>><<BR>> {{attachment:checkResult.gif}} <<BR>><<BR>> == Handling errors == ==== How to check the quality of the result ==== It's hard to estimate what would be a good cortical reconstruction. What you are trying to spot at this level is mostly the obvious errors, like when the early stages of the brain extraction didn't perform well, just with a visual inspection. Play with the ''Smooth'' slider in the ''Surface ''tab. If it looks like a brain (two separate hemispheres) in both smooth and original views, it is probably ok. Display the cortex surface on top of the MRI slices, to make sure that they are well aligned, that the surface follows well the folds, and that left and right were not flipped: right-click on the low-resolution cortex > MRI registration > Check MRI/surface registration... {{attachment:checkAlign.gif}} ==== The cortex looks bad ==== It is critical to get a good cortex surface for source estimation. If the final cortex surface looks bad, it means that something didn't work well somewhere along the !FreeSurfer pipeline. You can refer to the following page to fix the problems manually:<<BR>>http://surfer.nmr.mgh.harvard.edu/fswiki/RecommendedReconstruction If after following those instructions you still don't manage to get good surfaces, you can try to run the automatic MRI segmentation from [[Tutorials/SegBrainVisa|BrainVISA]] or [[Tutorials/SegBrainSuite|BrainSuite]]. ==== The head surface looks bad ==== It is not mandatory to have a perfect head surface to use any of the Brainstorm features: you don't necessarily have to recognize the face (for the anonymity of the figures, it can be even better if you don't). The head surface is important mostly for the alignment of the MEG sensors and the MRI. If you digitized the head shape with a Polhemus device, you can align automatically the head surface (hence the MRI) with the MEG sensors (in the same referential as the Polhemus points). The quality of this automatic registrations depends on the quality of both surfaces: the Polhemus head shape (green points) and the head surface from the MRI (grey surface). If you placed lots of points on the nose but your head surface doesn't have a nose, those points are not going to help. Except for that, a nice head shape is mainly useful for producing nicer figures. {{attachment:checkAlignMeg.gif||height="243",width="298"}} If the default head surface looks bad, you can try generating another one: right-click on the subject folder > Generate head surface. The options are: * '''Number of vertices''': Number of points that are kept from the initial isosurface computed from the MRI. Increasing this number may increase the quality of the final surface. * '''Erode factor''': Number of pixels to erode after the first binary threshold of the MRI. Increasing this number removes small components that are connected to the head. * '''Fill holes factor''': Number of dimensions in which the holes should be identified and closed. Increasing this number removes more of the cavities of the head surface (0=no correction, 1=removes holes inside the surface, 3=closes all the features that make the surface non-convex)<<BR>><<BR>> {{attachment:generateHead.gif}} |
| Line 58: | Line 95: |
| Cortical parcellation: http://freesurfer.net/fswiki/CorticalParcellation | The default analysis pipeline in !FreeSurfer implements an automatic parcellation of the cortical surface in anatomical regions. The description of this feature is available here:<<BR>>http://freesurfer.net/fswiki/CorticalParcellation |
| Line 60: | Line 97: |
| 1. Process your subject MRI with the full !FreeSurfer T1 analysis pipeline 1. In Brainstorm, create a protocol and a subject, as explained in the introduction tutorials 1. Import the following files from the !FreeSurfer architecture: * MRI: /mri/T1.mgz * Head surface: /bem/wateshed/outer_skin_surface * Left hemisphere: /surf/lh.pial (or lh.smoothwm) * Right hemisphere: /surf/lh.pial (or lh.smoothwm)<<BR>><<BR>> 1. Add the atlas-based parcellations to each hemisphere <<BR>><<BR>> {{attachment:importAnnot1.gif}} * Right-click on "lh" > Labels > Import labels * Select one of the annotation files in the /label/ folder: * Destrieux atlas: lh.aparc.a2009s.annot * Desikan-Killiany atlas: lh.aparc.annot * Repeat the same operation for the right hemisphere * The .annot files are read with the !FreeSurfer read_annotation.m Matlab function, then converted to Brainstorm scouts, and saved in the surface files in the "Scout" field <<BR>><<BR>> 1. Downsample each hemisphere to 7500 vertices (the scouts will be downsampled accordingly)<<BR>>Right-click > Less vertices 1. Concatenate the two downsampled surfaces<<BR>>Select lh_7500 and rh_7500 > right-click > Merge surfaces 1. Rename the new surface into "cortex". This last surface contains all the scouts (ie. ROIs) defined for lh and rh, which will be loaded automatically when you display the surface in Brainstorm. 1. Double-click on "cortex", go to the Scout tab, and select a few scouts, to check that the .annot files where imported properly<<BR>><<BR>> {{attachment:importAnnot2.gif}} |
Those atlases are imported in Brainstorm as scouts (cortical regions of interest), and saved directly in the surface files. To check where they are saved: right-click on the low-resolution cortex file > File > View .mat file. You can see that 4 structures "Atlas" are available, the first one that has Name='User scouts', and the second one Name='Destrieux'.<<BR>><<BR>> {{attachment:viewMat.gif}} <<BR>><<BR>> To access them from the interface: 1. Double-click on the low-resolution cortex (works with the high-resolution too, it's just longer to display) 1. Go to the ''Scout'' tab, and click on the drop-down list to select another ''Atlas ''(ie group of scouts): * Destrieux atlas (*.aparc.a2009s.annot) * Desikan-Killiany atlas (*.aparc.annot) * Some Brodman areas (*.BA.annot) {{attachment:scoutTab.gif}} |
| Line 86: | Line 118: |
| {{attachment:dk_bs.gif}} | {{attachment:dk_bs.jpg}} |
| Line 90: | Line 122: |
| {{attachment:dk_bs2.gif}} | {{attachment:dk_bs2.jpg}} |
| Line 92: | Line 124: |
| == Parcellations for the default anatomy (MNI/Colin27) == The !FreeSurfer cortex and white matter surfaces are available in the standard distribution of Brainstorm, they come with the all the !FreeSurfer parcellations. You can use those surfaces instead of the default Brainstorm ones, which are created with BrainVISA, which do not include the Desikan-Killiany and Destrieux atlases. |
== Subcortical structures: aseg atlas == The file aseg.mgz contains a volume atlas of 40 subcortical regions. Brainstorm reads those volume labels and tesselates some of those regions, groups all the meshes in a large surface file where the regions are identified in an atlas called "Structures". It identifies: 8 bialateral structures (accumbens, amygdala, caudate, hippocampus, pallidum, putamen, thalamus, cerebellum) and 1 central structure (brainstem). |
| Line 95: | Line 127: |
| 1. In any protocol, go to the anatomy view, and select the "Default anatomy" folder.<<BR>><<BR>> {{attachment:defaultAnat.gif}} 1. If you do not see the surfaces "!FreeSurfer: cortex *" and "!FreeSurfer: white *", your protocol is not using the most recent version of the Brainstorm default anatomy. To update: * Make sure you are running the latest version of Brainstorm * Right-click on "Default anatomy" > Use default > MNI_Colin27 * Close the MRI Viewer when it opens. Now you should see all the !FreeSurfer surfaces 1. Make one of the !FreeSurfer surfaces as your default cortex surface (for instance, the downsampled grey/csf interface): * Right-click on "!FreeSurfer: cortex 15000V" > Set surface type > Cortex * Right-click on the top "cortex" file > Set surface type > Other (this is not necessary, but it avoids ambiguity) * To make sure that everything is updated properly: Right-click on "Default anatomy" > Reload<<BR>><<BR>> {{attachment:defaultAnat2.gif}} 1. Double-click on the new default cortex (!FreeSurfer: cortex 15000V) to open it 1. In the "Scout" tab, click on the "Load scout" button (on the right of the scouts list)<<BR>><<BR>> {{attachment:importScout.gif}} 1. In the list of available scout files, pick on that matches the surface that is currently displayed: '''scout_freesurfer_*_15000V.mat'''<<BR>><<BR>> {{attachment:figureCortex.gif}} 1. You can now run source analysis (computation forward and inverse models) using this new cortex surface, and use the !FreeSurfer atlases as regions of interest |
You can easily extract one structure (for example the brainstem or the cerebellum) by selecting the corresponding entries in the scouts list and selecting the menu Scout > Edit surface > Keep only selected scouts. It creates a new surface with only the selected regions. If you want to remove one or several structures, use the menu "Remove selected scouts" instead. Read more about the !FreeSurfer subcortical atlas on the software wiki: http://ftp.nmr.mgh.harvard.edu/fswiki/SubcorticalSegmentation {{attachment:aseg.gif}} == Registered sphere == The registered sphere is saved in each surface file in the field Reg.Sphere.Vertices. There is nothing that can be done with this information at this point, but it will become helpful when projecting the source results from the individual brains to the default anatomy of the protocol, for a group analysis of the results. Read more about the !FreeSurfer registration process on the software wiki: https://surfer.nmr.mgh.harvard.edu/fswiki/SurfaceRegAndTemplates == Cortical thickness == The cortical thickness can be saved as a cortical map in the database (a "results" file). This result is generated only when using the process version of the automated import (see following sections). == FSAverage template == == Running the folder import as a process == == Manual import of the anatomy == In case you need to import the MRI, surfaces and atlases separately instead of using the menu "Import !FreeSurfer folder", here is the sequence of operations to perform to get to the same result: 1. From the ''Anatomy'' side of the database explorer: create a subject. 1. Right-click on the subject folder > Import MRI > Select "mri/T1.mgz" 1. Set the 6 fiducial points, save 1. Right-click on the subject folder > Import surfaces > Select the !FreeSurfer file format > Select simultaneously from the "surf" folder: lh.pial, lh.smoothwm, rh.pial, rh.smoothwm 1. Double-click on lh.pial toi display it. In the scout tab: Atlas > Load atlas > select all the lh.*.annot files available in the label folder. Close the figure. 1. Repeat for the other surfaces: lh.smoothwm, rh.pial, rh.smoothwm 1. Right-click on lh.pial > MRI registration > Load !FreeSurfer sphere > Select "surf/lh.sphere.reg" 1. Repeat with the other surfaces (use rh.sphere.reg for the right hemisphere, white and pial surfaces) 1. Select all the surfaces, right-click > Less vertices > 7500 vertices > Select the first option "Matlab reducepatch" 1. Select lh.pial, rh.pial, right-click > Merge surfaces: Generates a surface cortex_250000V 1. Select lh.smoothwm, rh.smoothwm, right-click > Merge surfaces: Generates a surface white_250000V 1. Select lh.pial_7500V, rh.pial_7500V, right-click > Merge surfaces: Generates a surface cortex_15000V 1. Select lh.smoothwm_7500V, rh.smoothwm_7500V, right-click > Merge surfaces: Generates a surface white_15000V 1. Delete all the separate hemispheres: ?h.pial, ?h.smoothwm 1. Double-click on cortex_15000V to set it as the default cortex 1. Right-click on the subject folder > Import surfaces > Select the file format "Volume mask of atlas" > Select the file mri/aseg.mgz 1. Go to the functional view of the protocol, create a condition "!FreeSurfer". Leave your mouse for a second over the new folder, an note the study index (iStudy). 1. From the Matlab command window, you can import the thickness maps with the following call: * !ThickFile = import_sources(iStudy, !CortexHiFile, !ThickLhFile, !ThickRhFile, 'FS'); * !CortexHiFile = full path to the high-res cortex file (right-click > File > Copy file path to clipboard) * !ThickLhFile = full path to the surf/lh.thickness file * !ThickRhFile = full path to the surf/rh.thickness file == Feedback == <<EmbedContent(http://neuroimage.usc.edu/brainstorm3_register/get_feedback.php?Tutorials/LabelFreeSurfer)>> |
Using FreeSurfer
The open-source software FreeSurfer can be used to extract the cortical envelope from a T1 MRI. It also registers the individual cortex surfaces to surface-based anatomical atlases (Desikan-Killiany, Destrieux, Brodmann). The process is fully automatic and the results can be imported in Brainstorm with just a few mouse clicks.
Running FreeSurfer
Downloading and installing FreeSurfer is very easy. It just takes some time because the distribution package is huge (get ready to download several Gb). You have two options: you have a Linux system and you want to install FreeSurfer, or you don't and you want to run FreeSurfer in a Linux virtual machine.
Just follow the instructions: http://surfer.nmr.mgh.harvard.edu/fswiki/DownloadAndInstallSet up the FreeSurfer in a csh/tcsh environment: run the following lines, or add them at the end of your $HOME/.cshrc script for permanent change. If you're not sure what csh is: type "echo $SHELL" to know what is the name of the shell that you use. If it says "/bin/tcsh" or "/bin/csh", this is for you.
setenv FREESURFER_HOME /.../local/freesurfer
setenv SUBJECTS_DIR /.../data/freesurfer/subjects
setenv FUNCTIONALS_DIR /.../data/freesurfer/sessions
source /.../local/freesurfer/FreeSurferEnv.csh
Set up the FreeSurfer environment in a bash environment (add those lines at the end of your $HOME/.bashrc script):
export FREESURFER_HOME=/.../local/freesurfer
export SUBJECTS_DIR=/.../data/ftadel/freesurfer
export FUNCTIONALS_DIR=/.../data/ftadel/freesurfer
source $FREESURFER_HOME/FreeSurferEnv.sh
- Run the reconstruction:
recon-all -i <mri_file> -subjid <subject_id>
recon-all -all -subjid <subject_id>
- Go home, come back the next day. The process is fully automatic, but quite resource-consuming.
Done. Everything is ready to be imported in Brainstorm. The results are usually good, but depending on the quality of the structural MR, it may fail. Because of this unpredictable behavior, you always need to check visually the final surfaces. The FreeSurfer wiki suggests that you check all the steps with FreeSurfer. We suggest instead that you load it all in Brainstorm and go back to the manual checking/editing only if it looks bad.
More detailed instructions for setting up the environment and tuning the reconstruction here:
http://surfer.nmr.mgh.harvard.edu/fswiki/RecommendedReconstruction
Importing the results in Brainstorm
- Switch to the anatomy side of the database explorer
- Create a new subject, set the default anatomy option to "No, use individual anatomy"
Right-click on the subject > Import FreeSurfer folder...
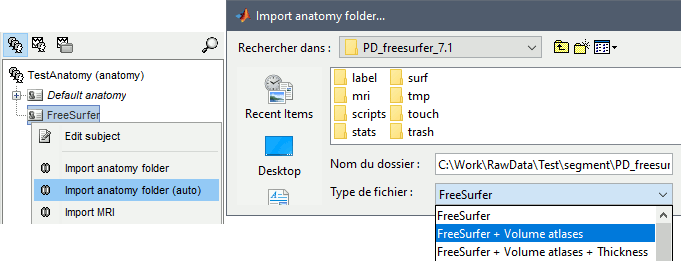
Select the top folder of your subject <subject_id> (/.../data/freesurfer/subjects/subject_id)
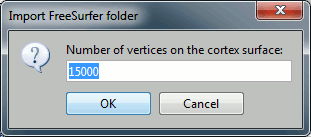
Then you're prompted for the number of vertices you want in the final cortex surface. This will by extension define the number of dipoles to estimate during the source estimation process. By default we set this value to 15000 for the entire brain (it means 7500 for each hemisphere).
The MRI Viewer appears, and a help window asks you to validate the orientation of the MRI and to define the 6 fiducial points. If something doesn't look right at this step, for instance if the MRI is not presented with a correct orientation, you should stop this automatic import process and follow the manual instructions in the basic tutorial pages.
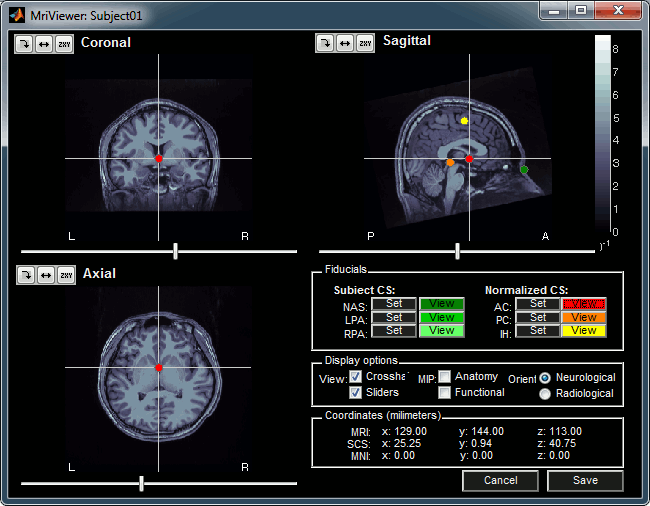
Place the six fiducials. If you need help, refer to this page: CoordinateSystems
- Click on Save to keep your modifications, and the automatic import will go on.
- The files that are imported from the subject_id folder are the following:
/mri/T1.mgz (T1 MRI volume)
/mri/aseg.mgz (segmentation of subcortical structures)
/surf/?h.pial (grey/csf interface)
/surf/?h.smoothwm (grey/white matter interface)
/surf/?h.sphere.reg (registered parametrized sphere, for subject co-registration)
/label/?h.*.annot (cortical surface-based atlases)
/surf/?h.thickness (cortical thickness map: option available only in the "process" version)
- The successive steps that are performed automatically by Brainstorm:
- Import all the surfaces (left/right, white/pial)
- Load all the atlases available for each surface (note that the .pial and .smoothwm surfaces are matching point-to-point, so the same annotation files are imported for both surface types)
- Load the registered spheres for the the left and right hemisperes
- Downsample each hemisphere to the number specified in the options (by default 7500, half of the total default number 15000)
- Merge left and right hemispheres for the two surface types: white matter and cortex envelope
- Delete all the unnecessary surfaces
- Generate a head surface from the MRI
- Read the sub-cortical atlas aseg.mgz as a set of labelled surfaces
The files you can see in the database explorer at the end:
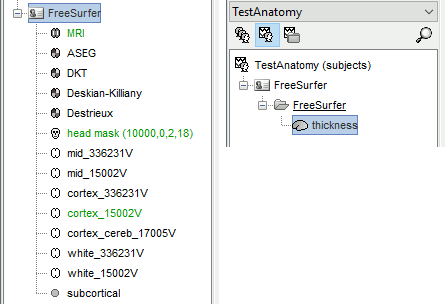
MRI: The T1 MRI of the subject, imported from the MGH file format (.mgz)
head mask (10000,0,2): Scalp surface generated by Brainstorm. The numbers indicate the parameters that were used automatically for this head: vertices=10000, erode factor=0, fill holes=2 (those are detailed later)
cortex_300000V: High-resolution cortex surface that was generated by FreeSurfer, that contains usually between 200,000 and 300,000 vertices.This one appears in green, it means that is going to be used as the default by the processes that require a cortex surface.
cortex_15000V: Low-resolution cortex surface, downsampled using the reducepatch function from Matlab (it keeps a meaningful subset of vertices from the original surface).
white_300000V: High-resolution white matter envelope from FreeSurfer
white_15000V: Low-resolution white matter, processed with reducepatch
aseg atlas: Atlas of subcortical regions
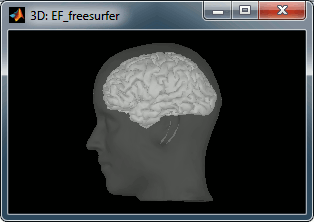
A figure is automatically shown at the end of the process, to check visually that the low-resolution cortex and head surfaces were properly generated and imported. If it doesn't look like the following picture, do not go any further in your source analysis, fix the anatomy first.
Handling errors
How to check the quality of the result
It's hard to estimate what would be a good cortical reconstruction. What you are trying to spot at this level is mostly the obvious errors, like when the early stages of the brain extraction didn't perform well, just with a visual inspection. Play with the Smooth slider in the Surface tab. If it looks like a brain (two separate hemispheres) in both smooth and original views, it is probably ok.
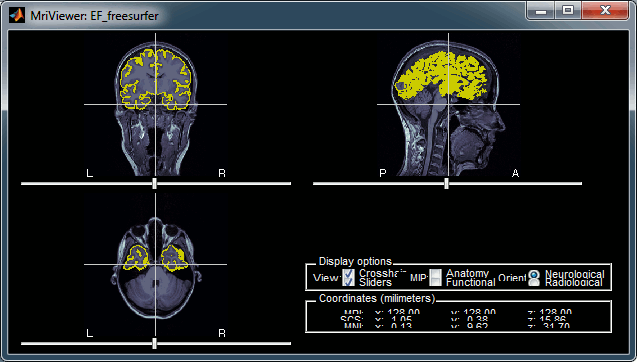
Display the cortex surface on top of the MRI slices, to make sure that they are well aligned, that the surface follows well the folds, and that left and right were not flipped: right-click on the low-resolution cortex > MRI registration > Check MRI/surface registration...
The cortex looks bad
It is critical to get a good cortex surface for source estimation. If the final cortex surface looks bad, it means that something didn't work well somewhere along the FreeSurfer pipeline. You can refer to the following page to fix the problems manually:
http://surfer.nmr.mgh.harvard.edu/fswiki/RecommendedReconstruction
If after following those instructions you still don't manage to get good surfaces, you can try to run the automatic MRI segmentation from BrainVISA or BrainSuite.
The head surface looks bad
It is not mandatory to have a perfect head surface to use any of the Brainstorm features: you don't necessarily have to recognize the face (for the anonymity of the figures, it can be even better if you don't).
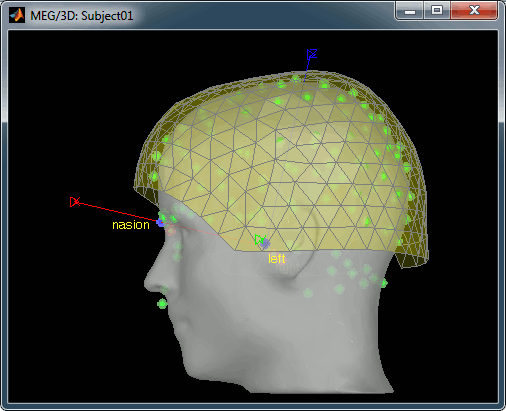
The head surface is important mostly for the alignment of the MEG sensors and the MRI. If you digitized the head shape with a Polhemus device, you can align automatically the head surface (hence the MRI) with the MEG sensors (in the same referential as the Polhemus points). The quality of this automatic registrations depends on the quality of both surfaces: the Polhemus head shape (green points) and the head surface from the MRI (grey surface). If you placed lots of points on the nose but your head surface doesn't have a nose, those points are not going to help. Except for that, a nice head shape is mainly useful for producing nicer figures.
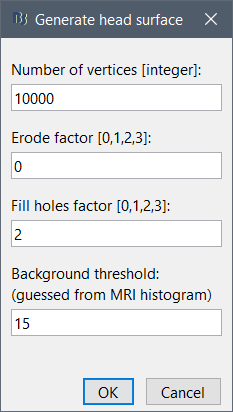
If the default head surface looks bad, you can try generating another one: right-click on the subject folder > Generate head surface. The options are:
Number of vertices: Number of points that are kept from the initial isosurface computed from the MRI. Increasing this number may increase the quality of the final surface.
Erode factor: Number of pixels to erode after the first binary threshold of the MRI. Increasing this number removes small components that are connected to the head.
Fill holes factor: Number of dimensions in which the holes should be identified and closed. Increasing this number removes more of the cavities of the head surface (0=no correction, 1=removes holes inside the surface, 3=closes all the features that make the surface non-convex)
Cortical parcellations
The default analysis pipeline in FreeSurfer implements an automatic parcellation of the cortical surface in anatomical regions. The description of this feature is available here:
http://freesurfer.net/fswiki/CorticalParcellation
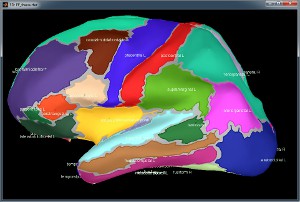
Those atlases are imported in Brainstorm as scouts (cortical regions of interest), and saved directly in the surface files. To check where they are saved: right-click on the low-resolution cortex file > File > View .mat file. You can see that 4 structures "Atlas" are available, the first one that has Name='User scouts', and the second one Name='Destrieux'.
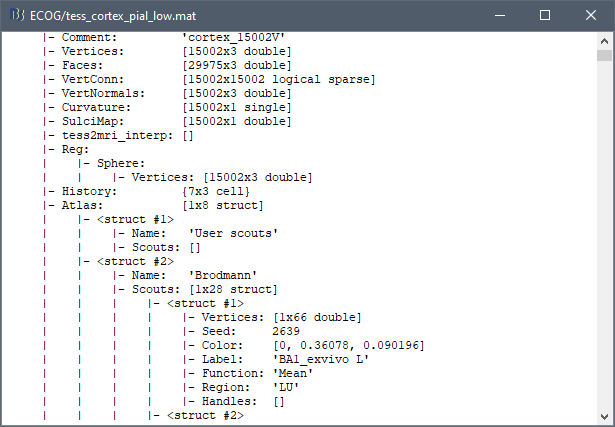
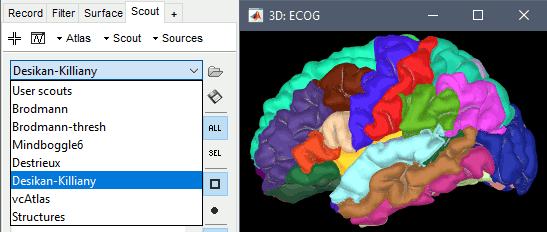
To access them from the interface:
- Double-click on the low-resolution cortex (works with the high-resolution too, it's just longer to display)
Go to the Scout tab, and click on the drop-down list to select another Atlas (ie group of scouts):
- Destrieux atlas (*.aparc.a2009s.annot)
- Desikan-Killiany atlas (*.aparc.annot)
- Some Brodman areas (*.BA.annot)
Examples
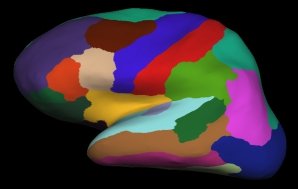
Desikan-Killiany atlas, in FreeSurfer:
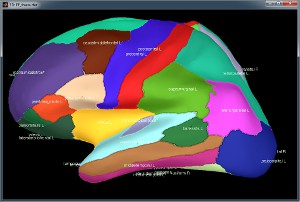
Desikan-Killiany atlas, in Brainstorm:
Desikan-Killiany atlas, in Brainstorm after downsampling to 15000 vertices:
Subcortical structures: aseg atlas
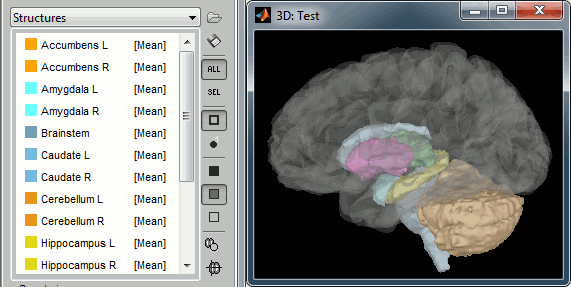
The file aseg.mgz contains a volume atlas of 40 subcortical regions. Brainstorm reads those volume labels and tesselates some of those regions, groups all the meshes in a large surface file where the regions are identified in an atlas called "Structures". It identifies: 8 bialateral structures (accumbens, amygdala, caudate, hippocampus, pallidum, putamen, thalamus, cerebellum) and 1 central structure (brainstem).
You can easily extract one structure (for example the brainstem or the cerebellum) by selecting the corresponding entries in the scouts list and selecting the menu Scout > Edit surface > Keep only selected scouts. It creates a new surface with only the selected regions. If you want to remove one or several structures, use the menu "Remove selected scouts" instead.
Read more about the FreeSurfer subcortical atlas on the software wiki: http://ftp.nmr.mgh.harvard.edu/fswiki/SubcorticalSegmentation
Registered sphere
The registered sphere is saved in each surface file in the field Reg.Sphere.Vertices. There is nothing that can be done with this information at this point, but it will become helpful when projecting the source results from the individual brains to the default anatomy of the protocol, for a group analysis of the results.
Read more about the FreeSurfer registration process on the software wiki: https://surfer.nmr.mgh.harvard.edu/fswiki/SurfaceRegAndTemplates
Cortical thickness
The cortical thickness can be saved as a cortical map in the database (a "results" file). This result is generated only when using the process version of the automated import (see following sections).
FSAverage template
Running the folder import as a process
Manual import of the anatomy
In case you need to import the MRI, surfaces and atlases separately instead of using the menu "Import FreeSurfer folder", here is the sequence of operations to perform to get to the same result:
From the Anatomy side of the database explorer: create a subject.
Right-click on the subject folder > Import MRI > Select "mri/T1.mgz"
- Set the 6 fiducial points, save
Right-click on the subject folder > Import surfaces > Select the FreeSurfer file format > Select simultaneously from the "surf" folder: lh.pial, lh.smoothwm, rh.pial, rh.smoothwm
Double-click on lh.pial toi display it. In the scout tab: Atlas > Load atlas > select all the lh.*.annot files available in the label folder. Close the figure.
- Repeat for the other surfaces: lh.smoothwm, rh.pial, rh.smoothwm
Right-click on lh.pial > MRI registration > Load FreeSurfer sphere > Select "surf/lh.sphere.reg"
- Repeat with the other surfaces (use rh.sphere.reg for the right hemisphere, white and pial surfaces)
Select all the surfaces, right-click > Less vertices > 7500 vertices > Select the first option "Matlab reducepatch"
Select lh.pial, rh.pial, right-click > Merge surfaces: Generates a surface cortex_250000V
Select lh.smoothwm, rh.smoothwm, right-click > Merge surfaces: Generates a surface white_250000V
Select lh.pial_7500V, rh.pial_7500V, right-click > Merge surfaces: Generates a surface cortex_15000V
Select lh.smoothwm_7500V, rh.smoothwm_7500V, right-click > Merge surfaces: Generates a surface white_15000V
- Delete all the separate hemispheres: ?h.pial, ?h.smoothwm
- Double-click on cortex_15000V to set it as the default cortex
Right-click on the subject folder > Import surfaces > Select the file format "Volume mask of atlas" > Select the file mri/aseg.mgz
Go to the functional view of the protocol, create a condition "FreeSurfer". Leave your mouse for a second over the new folder, an note the study index (iStudy).
- From the Matlab command window, you can import the thickness maps with the following call:
ThickFile = import_sources(iStudy, CortexHiFile, ThickLhFile, ThickRhFile, 'FS');
CortexHiFile = full path to the high-res cortex file (right-click > File > Copy file path to clipboard)
ThickLhFile = full path to the surf/lh.thickness file
ThickRhFile = full path to the surf/rh.thickness file
Feedback
