|
Size: 4202
Comment:
|
← Revision 93 as of 2023-02-23 10:07:43 ⇥
Size: 10509
Comment:
|
| Deletions are marked like this. | Additions are marked like this. |
| Line 1: | Line 1: |
| ## page was renamed from brainsuite | |
| Line 5: | Line 4: |
| '''[TUTORIAL UNDER WRITING: NOT READY FOR PUBLIC USE]''' | In this tutorial, we describe the estimation of realistic conductivity tensors of living brain tissues using the [[http://brainsuite.org/|BrainSuite software]]. These results are used in FEM forward modeling, as described in the tutorials: [[https://neuroimage.usc.edu/brainstorm/Tutorials/Duneuro#DUNEuro_options:_Advanced|FEM with DUNEuro]] and [[https://neuroimage.usc.edu/brainstorm/Tutorials/FemMedianNerveCharm#FEM_tensors|FEM median nerve example]]. |
| Line 7: | Line 6: |
| Describe brainsuite here : here we will describe the process of the brain tissues anisotrpy estimation and the different functions that brainstorm offers. | The realistic tensors are estimated from the Diffusion-Weighted Images (DWI): Brainstorm calls the BrainSuite software to compute the diffusion tensors on each brain MRI voxel (DTI), then Effective Medium Approach (EMA) is applied to estimate the conductivity tensors for each element of a tetrahedral FEM mesh. This is particularly interesting for the modeling the anisotropy of the white matter. |
| Line 9: | Line 8: |
| This tutorial explains how to use Brainsuite to estimate the anisotropy of the brain tissues. refer to this page [[https://neuroimage.usc.edu/brainstorm/Tutorials/SegBrainSuite?highlight=(anand)|https://neuroimage.usc.edu/brainstorm/Tutorials/SegBrainSuite?highlight=%28anand%29]] |
BrainSuite is also used for other purposes in Brainstorm, particularly the T1 MRI segmentation, as documented in this tutorial: [[Tutorials/SegBrainSuite|MRI segmentation: BrainSuite]]. |
| Line 17: | Line 12: |
| == Installation == 1. Download the latest version of BrainSuite from http://www.brainsuite.org/download. |
== Download and installation == ==== Requirements ==== * You have already followed all the introduction tutorials. * You have a working copy of Brainstorm installed on your computer. * For the DWI data, only the NIfTI files (.nii) are supported. ==== Install Brainsuite ==== 1. Download the latest version of BrainSuite from http://forums.brainsuite.org/download/. |
| Line 20: | Line 22: |
| 1. Note that you will be using BrainSuite Diffusion Pipeline(BDP), so you need to install a compatible [[http://www.mathworks.com/products/compiler/mcr|MATLAB Compiler Runtime]](last version). 1. Start BrainSuite to check if the installation (It's not required to open BrainSuite to run this tutorial). |
|
| Line 23: | Line 23: |
| == Requirement == * You have already followed all the introduction tutorials * You have already generated the FEM mesh as explained here (link to the FEM mesh tutorial) * You have a working copy of Brainstorm installed on your computer * Get the open access reference data set from''' '''here''' link todataset of Ernie / simnibs''' |
1. You will be using BrainSuite Diffusion Pipeline (BDP), so you need to install a compatible [[https://www.mathworks.com/products/compiler/matlab-runtime.html|MATLAB Runtime]] (2019b for BrainSuite 21a). |
| Line 29: | Line 25: |
| The BrainSuite installation folder should be informed in the Brainstorm preferences: | 1. In Brainstorm, menu File > Edit preferences > Enter the BrainSuite installation folder:<<BR>><<BR>> {{attachment:brainsuiteInstall.gif}} |
| Line 31: | Line 27: |
| {{https://user-images.githubusercontent.com/6920058/81406567-1c785400-913a-11ea-9048-28c7459af7da.png|image}} | ==== Download the dataset ==== * Download the files: [[http://brainsuite.org/WebTutorialData/BrainSuiteTutorialSVReg_Sept16.zip|MRI T1w]] and [[http://brainsuite.org/WebTutorialData/DWI_Feb15.zip|MRI DWI]] (from the [[http://brainsuite.org/tutorials/dtiexercise/|BrainSuite diffusion tutorial]]). |
| Line 33: | Line 30: |
| == Import data == Onc you have imported the MRI and generated a FEM mesh. You can call the process to generate the FEM tensors. In the folowing, both the realistic tensors from the DWI and the artificial tensors will be generated. |
* Unzip them outside of any of the Brainstorm folders (program folder or database folder). * Start Brainstorm (Matlab scripts or stand-alone version) * Select the menu File > Create new protocol. Name it "'''TutorialTensors'''" and select: * No, use individual anatomy * No, use one channel file per condition |
| Line 36: | Line 36: |
| == Realistic condctivity tensors == The realistic tensors are estimated from the Diffusion Weighted Images (DWI). For this purpose, Brainstorm calls internally the BrainSuite Diffusion Pipline to compute the diffusion tensors on each brain voxel. Afterwards, the Effective Medium Appeach is applied to convert the diffusion tensors to the conductivity tensors. The following section shows to the users how to do it from the graphical intefrace. |
== Import the anatomy == === T1 MRI === * Switch to the "anatomical data" view, the left button in the toolbar above the database explorer. * Right-click on the TutorialFem folder > New subject > '''Subject01''' * Keep the default options you set for the protocol. |
| Line 39: | Line 42: |
| Only the NIfTI are supported. All the diffusion data, inclusing the DWI file and direction and the value of the gradient files , respectively the the *.nii, the *.bval and the *.bvec are required. Ideally these files should have the same name and saved in the same folder. | * Right-click on the subject node > '''Import MRI''': * Set the file format: '''All MRI files (subject space)''' |
| Line 41: | Line 45: |
| The FEM head model to use for tensors should be selected and highlighted with the green color (double click on the FEM mesh node to select it) | * Select the T1 file: BrainSuiteTutorialSVReg/'''2523412.nii.gz''' |
| Line 43: | Line 47: |
| When this is done, then right-click on the subject > Convert DWI to DTI, | * Click on the link "'''Click here to compute MNI normalization'''": option "'''maff8'''". This estimates an affine transformation to the [[https://neuroimage.usc.edu/brainstorm/CoordinateSystems#MNI_coordinates|MNI space]] and sets default positions for the anatomical fiducials. The NAS/LPA/RPA fiducials are needed for defining the Brainstorm [[CoordinateSystems|subject coordinate system]], in which the surfaces and FEM meshes are stored. <<BR>><<BR>> {{attachment:importT1.gif}} |
| Line 45: | Line 49: |
| Then follow the popup windows by selecting DWI, bval and bval. If these files are in the same folder, Brainstorm will detect them automatiquely, otherwise user will be asked to browse the files one by one. | === Diffusion imaging === This computes the This requires BrainSuite to be installed on your computer, with the bdp program available in the system path. |
| Line 47: | Line 52: |
| * Right-click on Subject01''' '''> '''Convert DWI to DTI''' | |
| Line 48: | Line 54: |
| * Select the DWI file: DWI/'''2523412.dwi.nii.gz''' | |
| Line 49: | Line 56: |
| Brainstorm will load the avialbale tissue in the FEM head model and the following windows appears. | * The associated text files '''*.bvec''' (orientation of the gradient) and '''*.bval''' (value of the gradient) must be in the same folder, with the same file name. Theses files are created from for the DWI acquisition. If you don't have them, ask the person who programmed your DWI sequence and get the files that are specific to your use case. |
| Line 51: | Line 58: |
| Select the WM anisotropy and kee all the oher tissues as isotropic. | * The process can take up to 30min. At the end, a new file '''DTI-EIG''' appears in the database (DTI=diffusion tensors images, EIG=eigenvalue). This file contains 12 volumes, ie. 12 values for each voxel. From 1 to 9: components of the three eigenvectors; from 10 to 12: the values of their norm to the eigenvalue. <<BR>><<BR>> {{attachment:importDTI.gif}} |
| Line 53: | Line 60: |
| The process of conversion from DWI to Conductivity tensors use the EMA, furthermore, brainstorm propose the option to use the adaptative EMA with the volume constraint option [ref]. In this example we select the EMA with the VC. | == FEM mesh == The FEM approach requires a segmentation of the head volume in different tissues, represented as hexahedral or tetrahedral 3D meshes. The methods available within Brainstorm are listed in the tutorial [[https://neuroimage.usc.edu/brainstorm/Tutorials/FemMesh|FEM mesh generation]]. |
| Line 55: | Line 63: |
| The process will take around 10 min, and then the FEM tensors are computed and stored in the FEM strucutre. [explain how it is organised and how to use it outside brainstorm ] | Here we illustrate only the use of '''Brain2mesh''': this is not the most accurate solution for MRI segmentation but it is probably the fastest option to obtain a tetrahedral mesh of the head with 5 tissues (gray matter, white matter, CSF, skull, skin). |
| Line 57: | Line 65: |
| === Display the tensors === == Artificial/simulated conductivity tensors == In the case where the DWI is not available, or the users desire to evaluates the effect of the conductivity change on the model, the artificial conductivity can be use. |
Note that for most other Brainstorm use cases (e.g. cortically-constrained source reconstruction), we recommend using '''SimNIBS with T1+T2''', as illustrated in the tutorial [[https://neuroimage.usc.edu/brainstorm/Tutorials/FemMedianNerveCharm#FEM_mesh_with_SimNIBS|FEM median nerve example]]. |
| Line 61: | Line 67: |
| Two approaches are integrated within Brainstorm. Either the | * Right-click on the T1 MRI > MRI segmentation > '''Generate FEM mesh''' > '''Brain2mesh'''.<<BR>><<BR>> {{attachment:femMesh1.gif}} * After less than 15 minutes, you will obtain a new FEM mesh in the database.<<BR>><<BR>> {{attachment:femMesh2.gif}} |
| Line 63: | Line 70: |
| == References == | == FEM conductivity tensors == Once the FEM mesh and the DTI tensors are available in the Brainstorm database, the next step is to compute the conductivity tensor for each of the FEM mesh element. * Right-click on the FEM mesh > '''Compute FEM tensors'''. * Brainstorm checks the available tissues in the FEM mesh and assigns a default '''isotropic conductivity''' value of the conductivity for each compartment. Users can change these values to their own if needed. * When selecting "'''Anisotropic'''" for a tissue, the DTI values are used to generate conductivity tensors: this is used mostly for the '''white matter''' (and in some cases for the grey matter). Note that DWI can be used only for the brain tissues and not for the outers compartments (skull and skin). The methods available are: * '''EMA''': Effective Medium Approach: See [[http://www.pnas.org/content/98/20/11697|(Tuch 2001)]]. * '''EMA + VC''': EMA with volume constraints: The final tensors are constrained to fit the volume of the equivalent isotropic tensor volume. * '''Simulated''': Artificial anisotropy (DTI is not required) * For this example, select: WM:Anisotropic and Isotropic for the other tissues, EMA+VA.<<BR>><<BR>> {{attachment:computeTensors.gif}} * Depending on the mesh resolution, this step can take few minutes (2min to 10min), in our example here, this step takes about 2min * The FEM conductivity tensors are saved in the FEM mesh file, in the field Tensors.<<BR>><<BR>> {{attachment:femContents.gif}} == Visualization == * Right-clicking on the FEM head > '''Display FEM tensors'''. The tensors can be displayed as ellipsoids or arrows (vectors in the direction of the main eigenvector) and overlaid on the MRI slices or the FEM mesh. <<BR>><<BR>> {{attachment:displayMenu.gif}} * On the FEM mesh: left=ellipsoids, right=arrows<<BR>><<BR>> {{attachment:femDisp1.gif}} * On the 3D MRI slices: left=ellipsoids, right=arrows: <<BR>><<BR>> {{attachment:femDisp2.gif}} * The orientation of the tensor is color-coded as follows: * '''Red''': right-left * '''Green''': anterior-posterior * '''Blue''': superior-inferior * To configure the display: * Right-click on the figure > '''FEM tensors'''. * Use the '''Resect sliders''' in the Surface to move the slices (or right-click+move for 3D MRI) * Use the keyboard shortcuts '''Up''' and '''Down''' to change the size of the graphical elements representing the tensors. * Note that the quality of the tensors depends on the DWI data and the number of acquisition direction. <<TAG(Advanced)>> == Simulated conductivity tensors == When the DWI is not available, or to evaluate the effect of the conductivity change on the head model, artificial conductivities can be used using the third option '''Simulated'''. Two approaches are integrated within Brainstorm: '''Wang''' or '''Volume''' constraint. The common feature between these methods is the ratio between the transversal and longitudinal conductivity ratio. A common example is the skull anisotropy simulation, where the longitudinal conductivity can be higher than the transversal conductivity, the ratio can vary from 2 to 10 '''[ref]'''. * Right-click on the FEM mesh > '''Compute FEM tensors'''. * Keep all the tissue as isotropic except the skull, configure as below: <<BR>><<BR>> {{attachment:simul1.gif}} * Below: eigenvalues parallel (longitudinal) and perpendicular (transverse) to the fiber directions for 1:10 anisotropy (transversal:longitudinal).<<BR>><<BR>> {{attachment:simul2.gif}} == Additional documentation == ==== Related tutorials ==== * [[https://neuroimage.usc.edu/brainstorm/Tutorials/Duneuro|Realistic head model: FEM with DUNEuro]] * [[https://neuroimage.usc.edu/brainstorm/Tutorials/FemMesh|FEM mesh generation]] * [[https://neuroimage.usc.edu/brainstorm/Tutorials/FemTensors|FEM tensors estimation]] ==== Articles ==== * Medani T, Garcia-Prieto J, Tadel F, Schrader S, Joshi A, Engwer C, Wolters CH, Mosher JC, Leahy RM, [[https://www.spiedigitallibrary.org/conference-proceedings-of-spie/11595/1159554/Realistic-head-modeling-of-electromagnetic-brain-activity--an-integrated/10.1117/12.2580935.short?SSO=1|Realistic head modeling of electromagnetic brain activity: An integrated Brainstorm pipeline from MRI data to the FEM solution]] ([[http://arxiv.org/abs/2011.01292|preprint]]), '''SPIE Medical Imaging''', 2021 * Tuch DS, Wedeen VJ, Dale AM, George JS, Belliveau JW, [[https://www.pnas.org/content/98/20/11697|Conductivity tensor mapping of the human brain using diffusion tensor MRI]], '''PNAS''', 2001 |
FEM tensors estimation with BrainSuite
Authors: Takfarinas Medani, Francois Tadel, Anand Joshi and Richard Leahy
In this tutorial, we describe the estimation of realistic conductivity tensors of living brain tissues using the BrainSuite software. These results are used in FEM forward modeling, as described in the tutorials: FEM with DUNEuro and FEM median nerve example.
The realistic tensors are estimated from the Diffusion-Weighted Images (DWI): Brainstorm calls the BrainSuite software to compute the diffusion tensors on each brain MRI voxel (DTI), then Effective Medium Approach (EMA) is applied to estimate the conductivity tensors for each element of a tetrahedral FEM mesh. This is particularly interesting for the modeling the anisotropy of the white matter.
BrainSuite is also used for other purposes in Brainstorm, particularly the T1 MRI segmentation, as documented in this tutorial: MRI segmentation: BrainSuite.
Contents
Download and installation
Requirements
- You have already followed all the introduction tutorials.
- You have a working copy of Brainstorm installed on your computer.
- For the DWI data, only the NIfTI files (.nii) are supported.
Install Brainsuite
Download the latest version of BrainSuite from http://forums.brainsuite.org/download/.
Install it on your computer by following the instructions in BrainSuite's quick start installation guide.
You will be using BrainSuite Diffusion Pipeline (BDP), so you need to install a compatible MATLAB Runtime (2019b for BrainSuite 21a).
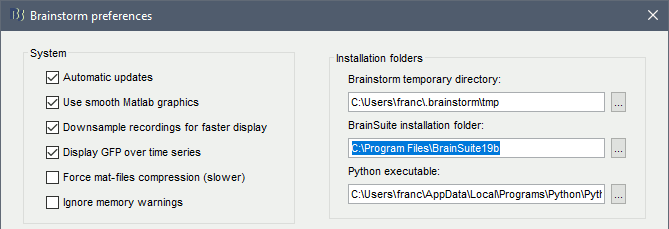
In Brainstorm, menu File > Edit preferences > Enter the BrainSuite installation folder:
Download the dataset
Download the files: MRI T1w and MRI DWI (from the BrainSuite diffusion tutorial).
- Unzip them outside of any of the Brainstorm folders (program folder or database folder).
- Start Brainstorm (Matlab scripts or stand-alone version)
Select the menu File > Create new protocol. Name it "TutorialTensors" and select:
- No, use individual anatomy
- No, use one channel file per condition
Import the anatomy
T1 MRI
- Switch to the "anatomical data" view, the left button in the toolbar above the database explorer.
Right-click on the TutorialFem folder > New subject > Subject01
- Keep the default options you set for the protocol.
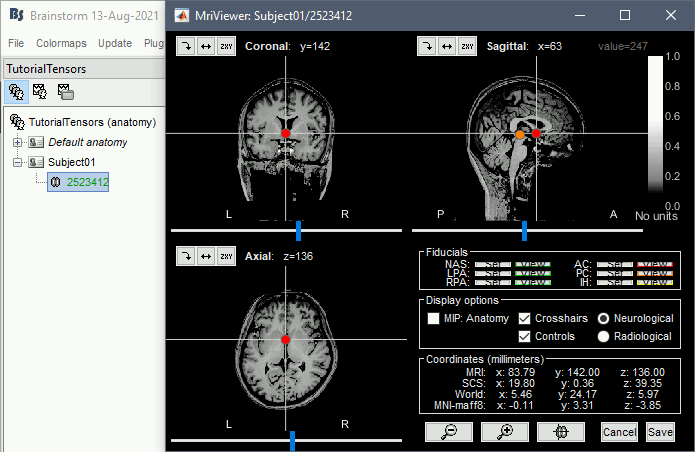
Right-click on the subject node > Import MRI:
Set the file format: All MRI files (subject space)
Select the T1 file: BrainSuiteTutorialSVReg/2523412.nii.gz
Click on the link "Click here to compute MNI normalization": option "maff8". This estimates an affine transformation to the MNI space and sets default positions for the anatomical fiducials. The NAS/LPA/RPA fiducials are needed for defining the Brainstorm subject coordinate system, in which the surfaces and FEM meshes are stored.
Diffusion imaging
This computes the This requires BrainSuite to be installed on your computer, with the bdp program available in the system path.
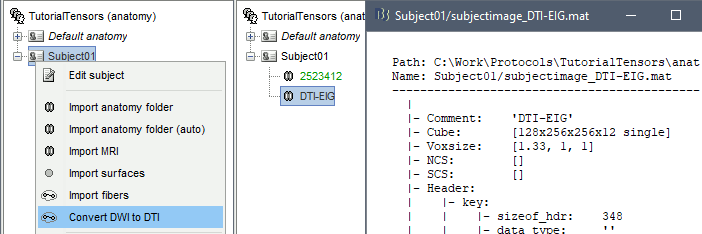
Right-click on Subject01 > Convert DWI to DTI
Select the DWI file: DWI/2523412.dwi.nii.gz
The associated text files *.bvec (orientation of the gradient) and *.bval (value of the gradient) must be in the same folder, with the same file name. Theses files are created from for the DWI acquisition. If you don't have them, ask the person who programmed your DWI sequence and get the files that are specific to your use case.
The process can take up to 30min. At the end, a new file DTI-EIG appears in the database (DTI=diffusion tensors images, EIG=eigenvalue). This file contains 12 volumes, ie. 12 values for each voxel. From 1 to 9: components of the three eigenvectors; from 10 to 12: the values of their norm to the eigenvalue.
FEM mesh
The FEM approach requires a segmentation of the head volume in different tissues, represented as hexahedral or tetrahedral 3D meshes. The methods available within Brainstorm are listed in the tutorial FEM mesh generation.
Here we illustrate only the use of Brain2mesh: this is not the most accurate solution for MRI segmentation but it is probably the fastest option to obtain a tetrahedral mesh of the head with 5 tissues (gray matter, white matter, CSF, skull, skin).
Note that for most other Brainstorm use cases (e.g. cortically-constrained source reconstruction), we recommend using SimNIBS with T1+T2, as illustrated in the tutorial FEM median nerve example.
Right-click on the T1 MRI > MRI segmentation > Generate FEM mesh > Brain2mesh.
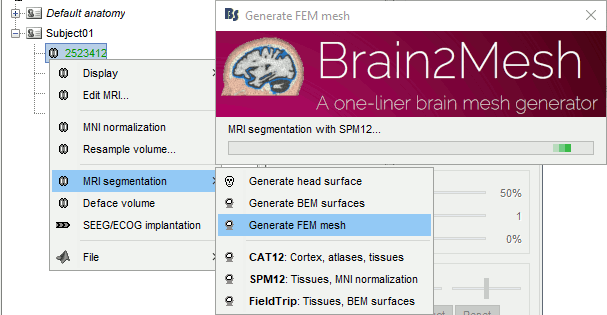
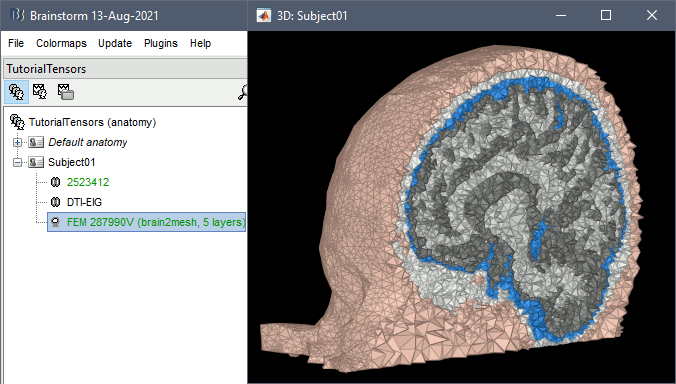
After less than 15 minutes, you will obtain a new FEM mesh in the database.
FEM conductivity tensors
Once the FEM mesh and the DTI tensors are available in the Brainstorm database, the next step is to compute the conductivity tensor for each of the FEM mesh element.
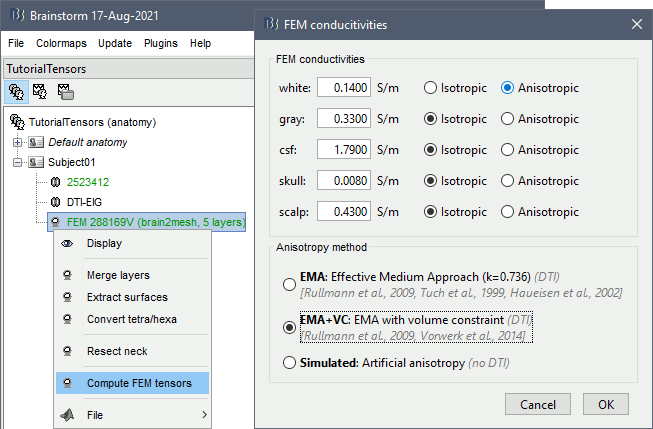
Right-click on the FEM mesh > Compute FEM tensors.
Brainstorm checks the available tissues in the FEM mesh and assigns a default isotropic conductivity value of the conductivity for each compartment. Users can change these values to their own if needed.
When selecting "Anisotropic" for a tissue, the DTI values are used to generate conductivity tensors: this is used mostly for the white matter (and in some cases for the grey matter). Note that DWI can be used only for the brain tissues and not for the outers compartments (skull and skin). The methods available are:
EMA: Effective Medium Approach: See (Tuch 2001).
EMA + VC: EMA with volume constraints: The final tensors are constrained to fit the volume of the equivalent isotropic tensor volume.
Simulated: Artificial anisotropy (DTI is not required)
For this example, select: WM:Anisotropic and Isotropic for the other tissues, EMA+VA.
- Depending on the mesh resolution, this step can take few minutes (2min to 10min), in our example here, this step takes about 2min
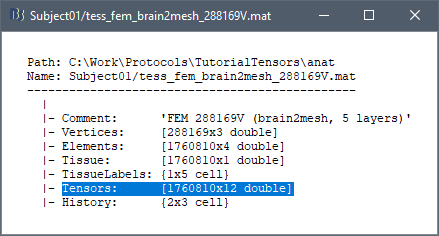
The FEM conductivity tensors are saved in the FEM mesh file, in the field Tensors.
Visualization
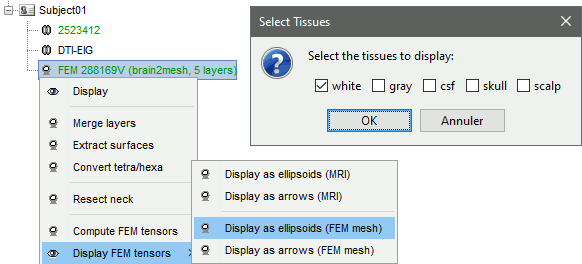
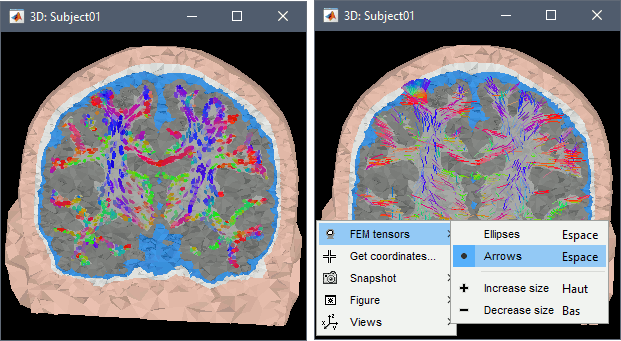
Right-clicking on the FEM head > Display FEM tensors. The tensors can be displayed as ellipsoids or arrows (vectors in the direction of the main eigenvector) and overlaid on the MRI slices or the FEM mesh.
On the FEM mesh: left=ellipsoids, right=arrows
On the 3D MRI slices: left=ellipsoids, right=arrows:
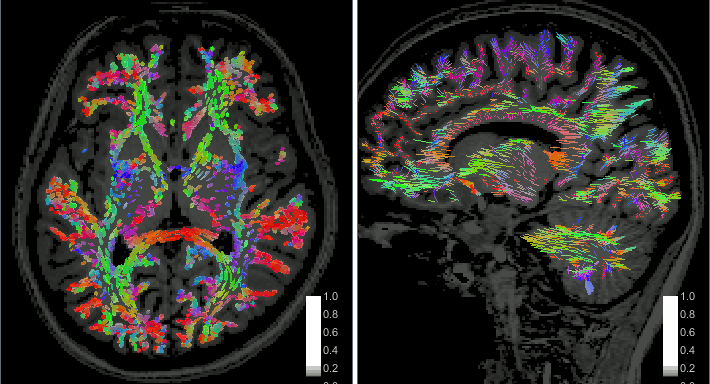
- The orientation of the tensor is color-coded as follows:
Red: right-left
Green: anterior-posterior
Blue: superior-inferior
- To configure the display:
Right-click on the figure > FEM tensors.
Use the Resect sliders in the Surface to move the slices (or right-click+move for 3D MRI)
Use the keyboard shortcuts Up and Down to change the size of the graphical elements representing the tensors.
- Note that the quality of the tensors depends on the DWI data and the number of acquisition direction.
Simulated conductivity tensors
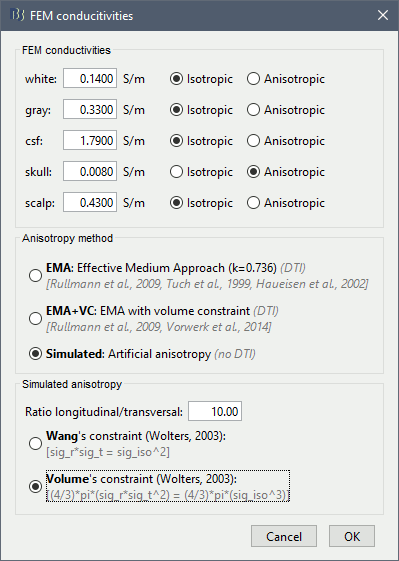
When the DWI is not available, or to evaluate the effect of the conductivity change on the head model, artificial conductivities can be used using the third option Simulated. Two approaches are integrated within Brainstorm: Wang or Volume constraint. The common feature between these methods is the ratio between the transversal and longitudinal conductivity ratio.
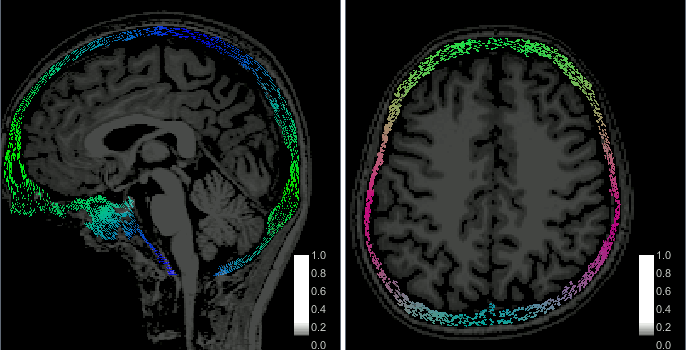
A common example is the skull anisotropy simulation, where the longitudinal conductivity can be higher than the transversal conductivity, the ratio can vary from 2 to 10 [ref].
Right-click on the FEM mesh > Compute FEM tensors.
Keep all the tissue as isotropic except the skull, configure as below:
Below: eigenvalues parallel (longitudinal) and perpendicular (transverse) to the fiber directions for 1:10 anisotropy (transversal:longitudinal).
Additional documentation
Related tutorials
Articles
Medani T, Garcia-Prieto J, Tadel F, Schrader S, Joshi A, Engwer C, Wolters CH, Mosher JC, Leahy RM, Realistic head modeling of electromagnetic brain activity: An integrated Brainstorm pipeline from MRI data to the FEM solution (preprint), SPIE Medical Imaging, 2021
Tuch DS, Wedeen VJ, Dale AM, George JS, Belliveau JW, Conductivity tensor mapping of the human brain using diffusion tensor MRI, PNAS, 2001
