|
Size: 7355
Comment:
|
Size: 16975
Comment:
|
| Deletions are marked like this. | Additions are marked like this. |
| Line 2: | Line 2: |
| ''Authors: Francois Tadel, Elizabeth Bock, Sylvain Baillet'' | ''Authors: Francois Tadel, Elizabeth Bock, Sylvain Baillet, Chinmay Chinara'' Brainstorm orients most of its database organization and processing stream for handling anatomical information together with the MEG/EEG recordings, because its primary focus was to estimate brain sources from MEG/EEG, which ideally requires an accurate spatial modelling of the head and sensors. If you don't have anatomical scans of your subjects or are not interested in any spatial display, various solution will be presented along the tutorials, starting from the [[https://neuroimage.usc.edu/brainstorm/Tutorials/ImportAnatomy#Alternatives|last section]] of this page. Be patient and follow everything as instructed, you will get to the information you need. |
| Line 9: | Line 13: |
| * Go to the [[http://neuroimage.usc.edu/brainstorm3_register/download.php|Download]] page of this website, and download the file: '''sample_auditory.zip ''' | * Go to the [[http://neuroimage.usc.edu/bst/download.php|Download]] page of this website, and download the file: '''sample_introduction.zip ''' |
| Line 17: | Line 21: |
| 1. Right-click on the top folder TutorialAuditory > New subject.<<BR>>Alternatively: Use the menu File > New subject.<<BR>><<BR>> {{attachment:create_subject.gif||height="252",width="331"}} 1. The window that opens lets you edit the subject name and settings. It offers again the same options for the default anatomy and channel file: you can redefine for one subject the default values set at the protocol level if you need to.<<BR>><<BR>> {{attachment:create_subject_options.gif||height="338",width="323"}} |
1. Right-click on the top folder TutorialIntroduction > New subject.<<BR>>Alternatively: Use the menu File > New subject.<<BR>><<BR>> {{attachment:create_subject.gif}} 1. The window that opens lets you edit the subject name and settings. It offers again the same options for the default anatomy and channel file: you can redefine for one subject the default values set at the protocol level if you need to. See [[https://neuroimage.usc.edu/brainstorm/Tutorials/CreateProtocol#Create_your_first_protocol|previous tutorial]] for help.<<BR>><<BR>> {{attachment:create_subject_options.gif}} |
| Line 21: | Line 25: |
| == Right-click doesn't work == If the right-click doesn't work anywhere in the Brainstorm interface and you cannot get to see the popup menus in the database explorer, try to connect a standard external mouse with two buttons. Some Apple pointing devices do not interact very well with Java/Matlab. Alternatively, try to change the configuration of your trackpad in the system preferences. |
|
| Line 22: | Line 31: |
| For estimating the brain sources of the MEG/EEG signals, the anatomy of the subject must include at least by three files: an MRI volume, the envelope of the cortex and the surface head of the head. | For estimating the brain sources of the MEG/EEG signals, the anatomy of the subject must include at least three files: a T1-weighted MRI volume, the envelope of the cortex and the surface of the head. |
| Line 24: | Line 33: |
| Brainstorm cannot extract the extract the cortex envelope from the MRI, you have to run this operation with an external program of your choice. The results of the MRI segmentationobtained with the following programs can be imported automatically: [[Tutorials/LabelFreeSurfer|FreeSurfer]], [[Tutorials/SegBrainSuite|BrainSuite]], [[Tutorials/SegBrainVisa|BainVISA]] and [[Tutorials/SegCIVET|CIVET]]. | Brainstorm cannot extract the cortex envelope from the MRI, you have to run this operation with an external program of your choice. The results of the MRI segmentation obtained with the following programs can be automatically imported: [[Tutorials/LabelFreeSurfer|FreeSurfer]], [[Tutorials/SegBrainSuite|BrainSuite]], [[Tutorials/SegBrainVisa|BainVISA]], [[https://neuroimage.usc.edu/brainstorm/Tutorials/SegCAT12|CAT12]], and [[Tutorials/SegCIVET|CIVET]]. '''CAT''' is the only application fully interfaced with Brainstorm, and available for download as a [[Tutorials/Plugins|Brainstorm plugin]]. However, '''FreeSurfer''' is more considered as a reference in this domain, therefore this is the solution we decided to demonstrate in these tutorials. |
| Line 26: | Line 35: |
| The anatomical information of this study was acquired with a 1.5T MRI scanner, the subject had a marker placed on the left cheek. The MRI volume was processed with FreeSurfer 5.3, the result of this automatic segmentation process is available in the downloaded folder sample_auditory/anatomy. | The anatomical information of this study was acquired with a 1.5T MRI scanner, the subject had a marker placed on the left cheek. The MRI volume was processed with FreeSurfer 7.1, the result of this automatic segmentation process is available in the downloaded folder sample_introduction/anatomy. |
| Line 28: | Line 37: |
| 1. Make your that you are still in the anatomy view for your protocol. 1. Right-click on the subject folder > Import anatomy folder: * Set the file format: '''FreeSurfer folder''' * Select the folder: '''sample_auditory/anatomy''' |
1. Make sure that you are still in the anatomy view for your protocol. 1. Right-click on the subject folder > '''Import anatomy folder''': * Set the file format: '''FreeSurfer + Volume atlases''' * Select the folder: '''sample_introduction/anatomy''' |
| Line 33: | Line 42: |
| 1. Number of vertices of the cortex surface: '''15000 '''(default value)<<BR>>This option defines the number of points that will be used to represent the cortex envelope. It will also be the number of electric dipoles we will use to model the activity of the brain. This default value of 15000 was chosen empirically a good balance between the spatial accuracy of the models and the computation speed. More details later in the tutorials.<<BR>><<BR>> {{attachment:import_anat_menu.gif||height="260",width="572"}} 1. The MRI viewer is displayed, together with a message box that tells you what to do. Follow these instructions. The MRI views should be correct (axial/coronal/sagittal), you just need to make sure that the marker on the cheek is really on the left of the MRI. Then you can proceed with the fiducial selection.<<BR>><<BR>> {{attachment:import_anat_marker.gif||height="335",width="355"}} |
1. Number of vertices of the cortex surface: '''15000 '''(default value).<<BR>>This option defines the number of points that will be used to represent the cortex envelope. It will also be the number of electric dipoles we will use to model the activity of the brain. This default value of 15000 was chosen empirically as a good balance between the spatial accuracy of the models and the computation speed. More details later in the tutorials.<<BR>><<BR>> {{attachment:import_anat_menu.gif}} 1. The MRI views should be correct (axial/coronal/sagittal), you just need to make sure that the marker on the cheek is really on the left of the MRI. Then you can proceed with the fiducial selection.<<BR>><<BR>> {{attachment:import_anat_marker.gif}} |
| Line 37: | Line 46: |
| To help define those fiducial points, let's start with a brief description of the MRI Viewer: | To help define these fiducial points, let's start with a brief description of the MRI Viewer: |
| Line 43: | Line 52: |
| * '''Zoom''': Use the magnifying glass buttons at the bottom of the figure. | * On a MacBook pad, use the two finger-move up/down to scroll. * '''Zoom''': Use the magnifying glass buttons at the bottom of the figure, or the corresponding shortcuts (keyboard [+]/[-], or [CTRL]+mouse wheel). |
| Line 46: | Line 56: |
| * '''Display the head surface''': Click on the button "View 3D head surface" to [[https://neuroimage.usc.edu/brainstorm/Tutorials/LabelFreeSurfer#The_head_surface_looks_bad|compute]] and [[https://neuroimage.usc.edu/brainstorm/Tutorials/ExploreAnatomy#Surfaces|display]] the head surface. Click on the surface to move the coordinates of the cursor in the MRI Viewer figure. When the fiducials are not defined, they appear as floating a few centimeters away from the head. <<BR>><<BR>> {{attachment:head_fiducials.gif}} * More information about all the coordinates displayed in this figure: [[CoordinateSystems]] |
|
| Line 50: | Line 62: |
| * Three to define the Subject Coordinate System (SCS): | * '''Required''': Three points to define the Subject Coordinate System ('''SCS'''): |
| Line 53: | Line 65: |
| * Three to define the Normalized coordinate system (NCS): * Anterior commissure (AC), Posterior commissure (PC) and any interhemispheric point (IH) * This is used to align the individual subject's anatomy on the anatomical templates. * When using one of the templates that has been registered to the MNI stereotaxic space (Colin27 or ICBM152), those coordinates correspond to the standard MNI coordinates. |
* '''Optional''': Three additional anatomical landmarks (NCS): * Anterior commissure (AC), Posterior commissure (PC) and any interhemispheric point (IH). * Computing the MNI normalization sets these points automatically (see below), therefore setting them manually is not required. |
| Line 58: | Line 69: |
| * For instructions to find those points, read the following page: [[CoordinateSystems]]. | * For instructions on finding these points, read the following page: [[https://neuroimage.usc.edu/brainstorm/CoordinateSystems#Subject_Coordinate_System_.28SCS_.2F_CTF.29|CoordinateSystems]]. |
| Line 64: | Line 75: |
| . In this study, we used the connection points between the tragus and the helix (red dot on the [[CoordinateSystems]] page) instead of the CTF coil position or the left and right preauricular points.<<BR>>MRI coordinates: 52, 113, 96 <<BR>> {{attachment:import_anat_lpa.gif||height="126",width="386"}} | . In this study, we used the connection points between the tragus and the helix (red dot on the [[CoordinateSystems]] page) instead of the CTF coil position or the left and right preauricular points.<<BR>> <<BR>> {{attachment:import_anat_lpa.gif||height="126",width="386"}} <<BR>>MRI coordinates: 52, 113, 96 |
| Line 67: | Line 78: |
| . MRI coordinates: 202, 113, 91 <<BR>> {{attachment:import_anat_rpa.gif||height="126",width="386"}} | . {{attachment:import_anat_rpa.gif||height="126",width="386"}} <<BR>>MRI coordinates: 202, 113, 91 |
| Line 70: | Line 81: |
| . MRI coordinates: 127, 119, 149 <<BR>> {{attachment:import_anat_ac.gif||height="126",width="386"}} | . {{attachment:import_anat_ac.gif||height="126",width="386"}} <<BR>>MRI coordinates: 127, 119, 149 |
| Line 73: | Line 84: |
| . MRI coordinates: 128, 93, 141 <<BR>> {{attachment:import_anat_pc.gif||height="126",width="386"}} | . {{attachment:import_anat_pc.gif||height="126",width="386"}} <<BR>>MRI coordinates: 128, 93, 141 |
| Line 76: | Line 87: |
| . This point can be anywhere in the mid-sagittal plane, those coordinates are just an example.<<BR>>MRI coordinates: 131, 114, 206 <<BR>> {{attachment:import_anat_ih.gif||height="126",width="386"}} | . This point can be anywhere in the mid-sagittal plane, these coordinates are just an example.<<BR>><<BR>> {{attachment:import_anat_ih.gif||height="126",width="386"}} <<BR>>MRI coordinates: 131, 114, 206 ==== Type the coordinates ==== . If you have the coordinates of the fiducials already written somewhere, you can type or copy-paste them instead of the pointing at them in with the cursor. Right-click on the figure > Edit fiducials positions > MRI coordinates.<<BR>><<BR>> {{attachment:import_anat_typefid.gif||height="268",width="289"}} |
| Line 79: | Line 93: |
| * Once you are done with the fiducial selection, click on [Save]. * The automatic import of the FreeSurfer folder resumes automatically. At the end you get many new files in the database, and a 3D view of the cortex and scalp surface. <<BR>><<BR>> {{attachment:import_anat_files.gif||height="202",width="323"}} * If you do not see the cortex surface through the head surface, or if you observe any other issue with the 3D display, there might be an issue with the OpenGL drivers. You can try the following: * Change the '''OpenGL''' rendering properties: Menu File > Set preferences. * Update the drivers for your graphics card. * Use a newer version of Matlab or the compiled version of Brainstorm. * The next tutorial will describe those files and explore the various visualization options. |
* Once you are done with the fiducial selection, click on the [Save] button, at the bottom-right corner of the MRI Viewer figure. * The automatic import of the FreeSurfer folder resumes. At the end you get many new files in the database and a 3D view of the cortex and scalp surface. Here again you can note that the marker is visible on the left cheek, as expected. <<BR>><<BR>> {{attachment:import_anat_files.gif}} * The next tutorial will describe these files and explore the various visualization options. * '''Close all figures and clear memory''': Use this button in the toolbar of the Brainstorm window to close all the open figures at once and to empty the memory from all the temporary data that the program keeps in memory for faster display.<<BR>><<BR>> {{attachment:close_all.gif}} == Graphic bugs == If you do not see the cortex surface through the head surface, or if you observe any other issue with the 3D display, there might be an issue with the OpenGL drivers. You may try the following options: * Update the drivers for your graphics card. * Upgrade your version of Matlab. * Run the compiled version of Brainstorm (see [[http://neuroimage.usc.edu/brainstorm/Installation|Installation]]). * Turn off the OpenGL hardware acceleration: Menu File > Edit preferences > ''Software'' or ''Disabled''. * Send a bug report to MathWorks. For Linux users with an integrated GPU and NVIDIA GPU, if you experience the troubles above, or the slow navigation in the 3D display (usually with 2 or more surfaces). Verify that you are using the NVIDIA GPU as primary GPU. More information depending on your distribution: [[https://help.ubuntu.com/community/BinaryDriverHowto/Nvidia|Ubuntu]], [[https://wiki.debian.org/NVIDIA%20Optimus|Debian]] and [[https://wiki.archlinux.org/title/NVIDIA_Optimus|Arch Linux]]. == MNI normalization == For comparing results with the literature or with other imaging modalities, the normalized [[http://neuroimage.usc.edu/brainstorm/CoordinateSystems#MNI_coordinates|MNI coordinate system]] is often used. To be able to get "MNI coordinates" for individual brains, an extra step of normalization is required. To compute a transformation between the individual MRI and the ICBM152 space, you have two available options, use the one of your choice: * In the MRI Viewer: Click on the link "'''Click here to compute MNI normalization'''". * In the database explorer: Right-click on the MRI > '''MNI normalization'''. Select the first option '''maff8''': This method is embedded in Brainstorm and does not require the installation of SPM12. However, it requires the automatic download of the file SPM12 Tissue Probability Maps. If you do not have access to internet, see the instructions on the [[https://neuroimage.usc.edu/brainstorm/Installation#No_internet_access|Installation]] page. It is based on an affine co-registration with the MNI ICBM152 template from the SPM software, described in the following article: Ashburner J, Friston KJ, [[http://www.ncbi.nlm.nih.gov/pubmed/15955494|Unified segmentation]], NeuroImage 2005. {{attachment:mni_norm.gif}} Note that this normalization does not modify the anatomy, it just saves a transformation that enables the conversion between Brainstorm coordinates and MNI coordinates. After computing this transformation, you have access to one new line of information in the MRI Viewer. . {{attachment:mni_coordinates.gif}} This operation also sets automatically some anatomical points (AC, PC, IH) if not defined yet. After the computation, make sure they are correctly positioned. You can run this computation while importing the anatomy, when the MRI viewer is displayed for the first time, this will save you the trouble of marking the AC/PC/IH points manually. ==== MacOS troubleshooting ==== Error "'''mexmaci64 cannot be opened because the developer cannot be verified'''": * [[https://neuroimage.usc.edu/forums/t/error-on-macos-mexmaci64-file-cannot-be-opened-because-the-developer-cannot-be-verified/30159/2|Brainstorm forum]] * [[https://en.wikibooks.org/wiki/SPM/Installation_on_64bit_Mac_OS_(Intel)#macOS_Big_Sur|SPM12 website]] * [[https://www.fieldtriptoolbox.org/faq/mexmaci64_cannot_be_opened_because_the_developer_cannot_be_verified/|FieldTrip website]] == Import CT == This feature allows importing a CT to Brainstorm and co-register it to an already available MRI for a subject. 1. Assuming we have an anatomy all setup until [[https://neuroimage.usc.edu/brainstorm/Tutorials/ImportAnatomy#Import_the_anatomy|this section]] where we have a default MRI available for a given subject, Right-click on the subject folder > '''Import CT'''.<<BR>><<BR>> {{attachment:import_ct_fig1.png}} 1. From the '''Import CT…''' window that pops up, choose the desired CT image and click '''Open'''.<<BR>><<BR>> {{attachment:import_ct_fig5.png}} 1. Choose '''Yes/No''' for the '''Nifti Scaling''' depending on the requirement (here we choose No) and '''Yes''' for the transformation for '''MRI orientation'''.<<BR>><<BR>> {{attachment:import_ct_fig6.png}} <<BR>><<BR>> {{attachment:import_ct_fig7.png}} 1. Choose '''CT2MRI''' and '''Yes''' for reslicing so that we can overlay the CT with the MRI.<<BR>><<BR>> {{attachment:import_ct_fig8.png}} <<BR>><<BR>> {{attachment:import_ct_fig9.png}} 1. Choose if you want to remove regions outside of the skull. Here, we do not want to so Select '''No'''.<<BR>><<BR>> {{attachment:import_ct_fig12.png}} 1. It takes some time to do the co-registration and we get the final CT co-registered with the default MRI volume. The '''Data Options''' section in the left can be used to control the thresholding and transparency to get the overlay as required.<<BR>><<BR>> {{attachment:import_ct_fig11.png}} 1. If we choose '''Yes''' in Step-5 above, then we would get a skull stripped CT as under. This is useful when analysis is required for regions only within the skull. It uses [[https://brainsuite.org/processing/surfaceextraction/bse/|BrainSuite's skull stripping]] to mask out regions outside the skull. So make sure you follow the [[https://neuroimage.usc.edu/brainstorm/Tutorials/SegBrainSuite#Installation|Installation]] instructions prior to running this step.<<BR>><<BR>> {{attachment:import_ct_fig13.png}} == Alternatives == '''The head surface looks bad''': You can try [[https://neuroimage.usc.edu/brainstorm/Tutorials/LabelFreeSurfer#The_head_surface_looks_bad|computing another one]] with different properties. '''No individual anatomy''': If you do not have access to an individual MR scan of the subject, or if its quality is too low to be processed with FreeSurfer, you have other options: * If you do not have any individual anatomical data: [[Tutorials/DefaultAnatomy|Use the default anatomy]] * If you have a digitized head shape of the subject: [[Tutorials/TutWarping|Warp the default anatomy]] Other options for importing the FreeSurfer anatomical segmentation: * '''Automated import''': We selected the menu '''Import anatomy folder''' for a semi-manual import, in order to select manually the position of the anatomical fiducials and the number of points of the cortex surface. If you are not interested in setting accurately the positions of the fiducials, you can use the menu '''Import anatomy folder (auto)''': it computes the linear MNI normalization first and use default fiducials defined in MNI space, and uses automatically 15000 vertices for the cortex. * '''FreeSurfer options''': We selected the file format '''FreeSurfer + Volume atlases''' for importing the ASEG parcellation in the database. This slows down the import and increases the size on the hard drive. If you know you won't use it, select '''FreeSurfer''' instead. A third menu is avalaible to also import the cortical '''thickness '''as source files in the database. <<HTML(<!-- END-PAGE -->)>> |
| Line 89: | Line 170: |
| <<EmbedContent(http://neuroimage.usc.edu/bst/get_feedback.php?Tutorials/CreateProtocol)>> | <<EmbedContent(http://neuroimage.usc.edu/bst/get_feedback.php?Tutorials/ImportAnatomy)>> |
Tutorial 2: Import the subject anatomy
Authors: Francois Tadel, Elizabeth Bock, Sylvain Baillet, Chinmay Chinara
Brainstorm orients most of its database organization and processing stream for handling anatomical information together with the MEG/EEG recordings, because its primary focus was to estimate brain sources from MEG/EEG, which ideally requires an accurate spatial modelling of the head and sensors.
If you don't have anatomical scans of your subjects or are not interested in any spatial display, various solution will be presented along the tutorials, starting from the last section of this page. Be patient and follow everything as instructed, you will get to the information you need.
Contents
Download
The dataset we will use for the introduction tutorials is available online.
Go to the Download page of this website, and download the file: sample_introduction.zip
- Unzip it in a folder that is not in any of the Brainstorm folders (program folder or database folder).
- This is really important that you always keep your original data files in a separate folder: the program folder can be deleted when updating the software, and the contents of the database folder is supposed to be manipulated only by the program itself.
Create a new subject
The protocol is currently empty. You need to add a new subject before you can start importing data.
- Switch to the anatomy view (first button just above the database explorer).
Right-click on the top folder TutorialIntroduction > New subject.
Alternatively: Use the menu File > New subject.
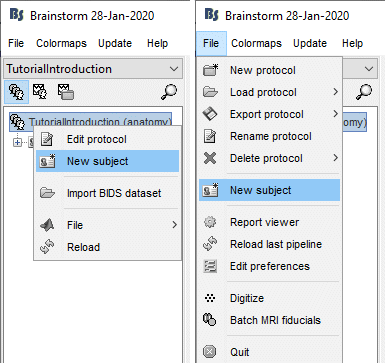
The window that opens lets you edit the subject name and settings. It offers again the same options for the default anatomy and channel file: you can redefine for one subject the default values set at the protocol level if you need to. See previous tutorial for help.
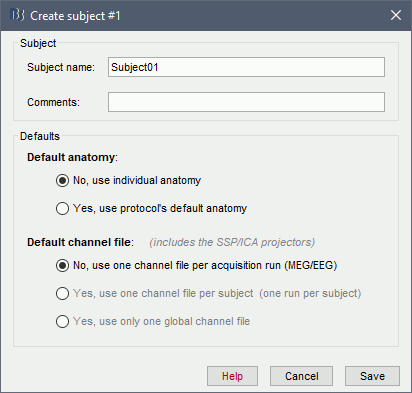
- Keep all the default settings and click on [Save].
Right-click doesn't work
If the right-click doesn't work anywhere in the Brainstorm interface and you cannot get to see the popup menus in the database explorer, try to connect a standard external mouse with two buttons. Some Apple pointing devices do not interact very well with Java/Matlab.
Alternatively, try to change the configuration of your trackpad in the system preferences.
Import the anatomy
For estimating the brain sources of the MEG/EEG signals, the anatomy of the subject must include at least three files: a T1-weighted MRI volume, the envelope of the cortex and the surface of the head.
Brainstorm cannot extract the cortex envelope from the MRI, you have to run this operation with an external program of your choice. The results of the MRI segmentation obtained with the following programs can be automatically imported: FreeSurfer, BrainSuite, BainVISA, CAT12, and CIVET. CAT is the only application fully interfaced with Brainstorm, and available for download as a Brainstorm plugin. However, FreeSurfer is more considered as a reference in this domain, therefore this is the solution we decided to demonstrate in these tutorials.
The anatomical information of this study was acquired with a 1.5T MRI scanner, the subject had a marker placed on the left cheek. The MRI volume was processed with FreeSurfer 7.1, the result of this automatic segmentation process is available in the downloaded folder sample_introduction/anatomy.
- Make sure that you are still in the anatomy view for your protocol.
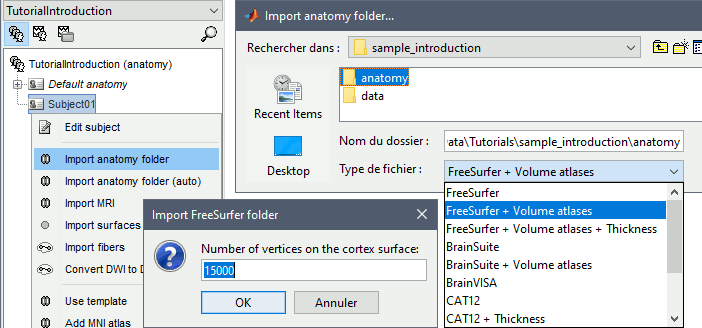
Right-click on the subject folder > Import anatomy folder:
Set the file format: FreeSurfer + Volume atlases
Select the folder: sample_introduction/anatomy
- Click on [Open]
Number of vertices of the cortex surface: 15000 (default value).
This option defines the number of points that will be used to represent the cortex envelope. It will also be the number of electric dipoles we will use to model the activity of the brain. This default value of 15000 was chosen empirically as a good balance between the spatial accuracy of the models and the computation speed. More details later in the tutorials.
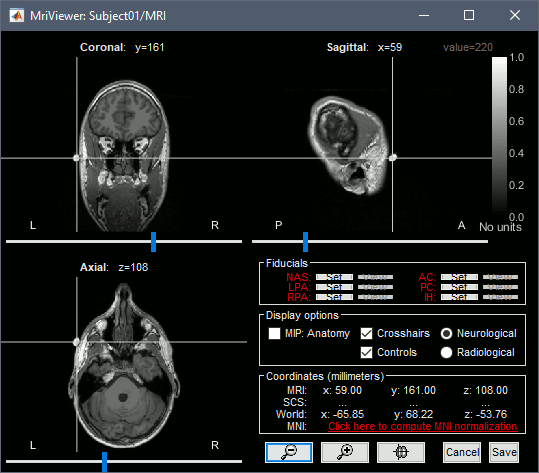
The MRI views should be correct (axial/coronal/sagittal), you just need to make sure that the marker on the cheek is really on the left of the MRI. Then you can proceed with the fiducial selection.
Using the MRI Viewer
To help define these fiducial points, let's start with a brief description of the MRI Viewer:
Navigate in the volume:
- Click anywhere on the MRI slices to move the cursor.
- Use the sliders below the views.
- Use the mouse wheel to scroll through slices (after clicking on the view to select it).
On a MacBook pad, use the two finger-move up/down to scroll.
Zoom: Use the magnifying glass buttons at the bottom of the figure, or the corresponding shortcuts (keyboard [+]/[-], or [CTRL]+mouse wheel).
Image contrast: Click and hold the right mouse button on one image, then move up and down.
Select a point: Place the cursor at the spot you want and click on the corresponding [Set] button.
Display the head surface: Click on the button "View 3D head surface" to compute and display the head surface. Click on the surface to move the coordinates of the cursor in the MRI Viewer figure. When the fiducials are not defined, they appear as floating a few centimeters away from the head.
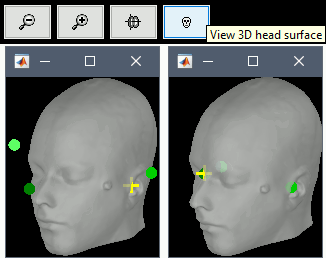
More information about all the coordinates displayed in this figure: CoordinateSystems
Fiducial points
Brainstorm uses a few reference points defined in the MRI to align the different files:
Required: Three points to define the Subject Coordinate System (SCS):
- Nasion (NAS), Left ear (LPA), Right ear (RPA)
- This is used to register the MEG/EEG sensors on the MRI.
Optional: Three additional anatomical landmarks (NCS):
- Anterior commissure (AC), Posterior commissure (PC) and any interhemispheric point (IH).
- Computing the MNI normalization sets these points automatically (see below), therefore setting them manually is not required.
For instructions on finding these points, read the following page: CoordinateSystems.
Nasion (NAS)
In this study, we used the real nasion position instead of the CTF coil position.

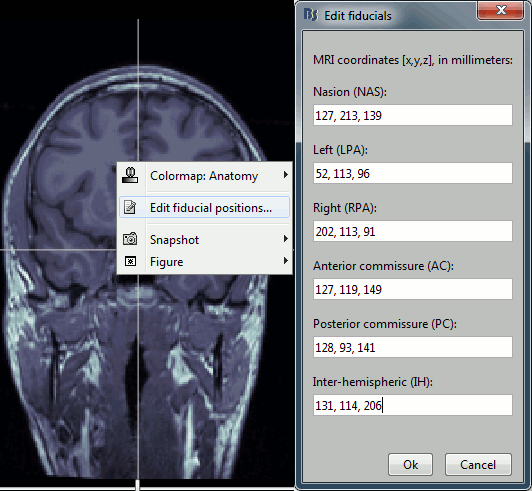
MRI coordinates: 127, 213, 139
Left ear (LPA)
In this study, we used the connection points between the tragus and the helix (red dot on the CoordinateSystems page) instead of the CTF coil position or the left and right preauricular points.

MRI coordinates: 52, 113, 96
Right ear (RPA)

MRI coordinates: 202, 113, 91
Anterior commissure (AC)

MRI coordinates: 127, 119, 149
Posterior commissure (PC)

MRI coordinates: 128, 93, 141
Inter-hemispheric point (IH)
This point can be anywhere in the mid-sagittal plane, these coordinates are just an example.

MRI coordinates: 131, 114, 206
Type the coordinates
If you have the coordinates of the fiducials already written somewhere, you can type or copy-paste them instead of the pointing at them in with the cursor. Right-click on the figure > Edit fiducials positions > MRI coordinates.
Validation
- Once you are done with the fiducial selection, click on the [Save] button, at the bottom-right corner of the MRI Viewer figure.
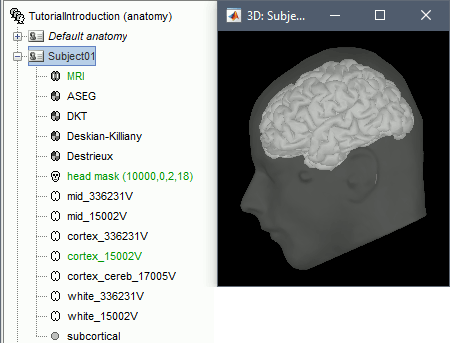
The automatic import of the FreeSurfer folder resumes. At the end you get many new files in the database and a 3D view of the cortex and scalp surface. Here again you can note that the marker is visible on the left cheek, as expected.
- The next tutorial will describe these files and explore the various visualization options.
Close all figures and clear memory: Use this button in the toolbar of the Brainstorm window to close all the open figures at once and to empty the memory from all the temporary data that the program keeps in memory for faster display.

Graphic bugs
If you do not see the cortex surface through the head surface, or if you observe any other issue with the 3D display, there might be an issue with the OpenGL drivers. You may try the following options:
- Update the drivers for your graphics card.
- Upgrade your version of Matlab.
Run the compiled version of Brainstorm (see Installation).
Turn off the OpenGL hardware acceleration: Menu File > Edit preferences > Software or Disabled.
Send a bug report to MathWorks.
For Linux users with an integrated GPU and NVIDIA GPU, if you experience the troubles above, or the slow navigation in the 3D display (usually with 2 or more surfaces). Verify that you are using the NVIDIA GPU as primary GPU. More information depending on your distribution: Ubuntu, Debian and Arch Linux.
MNI normalization
For comparing results with the literature or with other imaging modalities, the normalized MNI coordinate system is often used. To be able to get "MNI coordinates" for individual brains, an extra step of normalization is required.
To compute a transformation between the individual MRI and the ICBM152 space, you have two available options, use the one of your choice:
In the MRI Viewer: Click on the link "Click here to compute MNI normalization".
In the database explorer: Right-click on the MRI > MNI normalization.
Select the first option maff8: This method is embedded in Brainstorm and does not require the installation of SPM12. However, it requires the automatic download of the file SPM12 Tissue Probability Maps. If you do not have access to internet, see the instructions on the Installation page.
It is based on an affine co-registration with the MNI ICBM152 template from the SPM software, described in the following article: Ashburner J, Friston KJ, Unified segmentation, NeuroImage 2005.
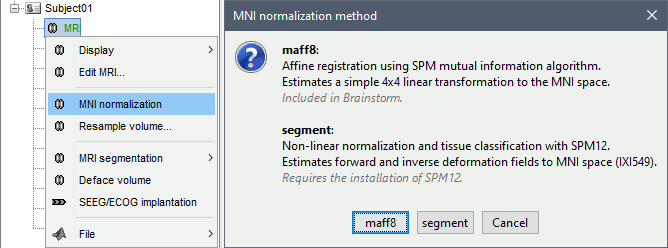
Note that this normalization does not modify the anatomy, it just saves a transformation that enables the conversion between Brainstorm coordinates and MNI coordinates. After computing this transformation, you have access to one new line of information in the MRI Viewer.
This operation also sets automatically some anatomical points (AC, PC, IH) if not defined yet. After the computation, make sure they are correctly positioned. You can run this computation while importing the anatomy, when the MRI viewer is displayed for the first time, this will save you the trouble of marking the AC/PC/IH points manually.
MacOS troubleshooting
Error "mexmaci64 cannot be opened because the developer cannot be verified":
Import CT
This feature allows importing a CT to Brainstorm and co-register it to an already available MRI for a subject.
Assuming we have an anatomy all setup until this section where we have a default MRI available for a given subject, Right-click on the subject folder > Import CT.
![[ATTACH] [ATTACH]](/moin_static1911/brainstorm1/img/attach.png)
From the Import CT… window that pops up, choose the desired CT image and click Open.
![[ATTACH] [ATTACH]](/moin_static1911/brainstorm1/img/attach.png)
Choose Yes/No for the Nifti Scaling depending on the requirement (here we choose No) and Yes for the transformation for MRI orientation.
![[ATTACH] [ATTACH]](/moin_static1911/brainstorm1/img/attach.png)
![[ATTACH] [ATTACH]](/moin_static1911/brainstorm1/img/attach.png)
Choose CT2MRI and Yes for reslicing so that we can overlay the CT with the MRI.
![[ATTACH] [ATTACH]](/moin_static1911/brainstorm1/img/attach.png)
![[ATTACH] [ATTACH]](/moin_static1911/brainstorm1/img/attach.png)
Choose if you want to remove regions outside of the skull. Here, we do not want to so Select No.
![[ATTACH] [ATTACH]](/moin_static1911/brainstorm1/img/attach.png)
It takes some time to do the co-registration and we get the final CT co-registered with the default MRI volume. The Data Options section in the left can be used to control the thresholding and transparency to get the overlay as required.
![[ATTACH] [ATTACH]](/moin_static1911/brainstorm1/img/attach.png)
If we choose Yes in Step-5 above, then we would get a skull stripped CT as under. This is useful when analysis is required for regions only within the skull. It uses BrainSuite's skull stripping to mask out regions outside the skull. So make sure you follow the Installation instructions prior to running this step.
![[ATTACH] [ATTACH]](/moin_static1911/brainstorm1/img/attach.png)
Alternatives
The head surface looks bad: You can try computing another one with different properties.
No individual anatomy: If you do not have access to an individual MR scan of the subject, or if its quality is too low to be processed with FreeSurfer, you have other options:
If you do not have any individual anatomical data: Use the default anatomy
If you have a digitized head shape of the subject: Warp the default anatomy
Other options for importing the FreeSurfer anatomical segmentation:
Automated import: We selected the menu Import anatomy folder for a semi-manual import, in order to select manually the position of the anatomical fiducials and the number of points of the cortex surface. If you are not interested in setting accurately the positions of the fiducials, you can use the menu Import anatomy folder (auto): it computes the linear MNI normalization first and use default fiducials defined in MNI space, and uses automatically 15000 vertices for the cortex.
FreeSurfer options: We selected the file format FreeSurfer + Volume atlases for importing the ASEG parcellation in the database. This slows down the import and increases the size on the hard drive. If you know you won't use it, select FreeSurfer instead. A third menu is avalaible to also import the cortical thickness as source files in the database.

